Applies To: Locally-managed Fireboxes
To troubleshoot NAT problems, you can verify settings in your configuration, use log messages, or perform packet captures.
Local Internet Access Fails
The Firebox default configuration contains RFC1918 subnets in the dynamic NAT settings. These subnets are:
- 192.168.0.0/16
- 172.16.0.0/12
- 10.0.0.0/8
If you delete these dynamic NAT settings, Internet access fails when you attempt to use these subnets on the internal network.
If you choose to use one or more public subnets that you do not own within your internal network, you must add dynamic NAT entries for those subnets to access the Internet. However, you might still experience DNS issues and website issues when you use public IP addresses allocated to other companies.
We recommend that you use subnets reserved for private use, such as RFC1918, on your internal network.
All Firebox policies have dynamic NAT enabled by default and use the Network NAT settings. However, if Internet access fails, it is important to verify that dynamic NAT is enabled on your Internet access policies. To do this, edit a policy, then select the Advanced tab and make sure the Dynamic NAT check box is enabled. For more information, go to Configure Policy-Based Dynamic NAT.
Mobile VPN Internet Access Fails
If the subnet used for the Virtual IP Address Pool is not listed within the dynamic NAT settings, then Internet access for mobile VPN clients fails. There are two common causes for this problem.
The first possibility is that the default RFC1918 subnets were deleted in the dynamic NAT settings and then replaced with interface or zone aliases, such as Any-Trusted. Because mobile VPNs are not considered local networks, these interface or zone aliases do not apply to the mobile VPN traffic.
The second possibility is that the mobile VPN Virtual IP Address Pool uses a public IP subnet. The Firebox does not include any public subnets in the dynamic NAT settings by default, so no NAT is performed on this traffic, and the connections fail when they leave the Firebox external interface.
To resolve either of these cases, you must configure a dynamic NAT entry for the subnet used for the mobile VPN Virtual IP Address Pool.
For the mobile VPN Virtual IP Address Pool, we recommend that you use a private IP subnet that the Firebox does not use for any other purpose.
All Firebox policies have dynamic NAT enabled by default and use the Network NAT settings. However, if Internet access fails, it is important to verify that dynamic NAT is enabled on your mobile VPN Internet access policies. To do this, edit a policy, then select the Advanced tab and make sure the Dynamic NAT check box is enabled.
Use Firebox Log Messages to Verify NAT
To verify that NAT applies to your traffic, you can enable logging for allowed packets on a policy, as described in Configure Logging and Notification for a Policy. Here is an example of an outbound connection request:
2020-06-10 15:58:34 Allow 10.10.10.10 1.0.0.1dns/udp 51091 53 Internal External Allowed 98 127 (DNS-outbound-00) proc_id="firewall" rc="100" msg_id="3000-0148" src_ip_nat="203.0.113.45" src_port_nat="47792" Traffic
The src_ip_nat indicates that the source IP address of this connection request is written to another IP address, in this case, the public IP address on the external interface. If an outbound connection request does not include src_ip_nat t, this indicates that there is no matching dynamic NAT entry for the subnet on the internal network where this connection request originated.
The same type of log message can help you to determine whether NAT is applied to inbound connections. However, in this case, NAT is labeled as dst_ip_nat, because the destination IP address is written to match the internal server IP address defined in a Static NAT action or 1-to-1 NAT.
Use a Packet Capture to Verify NAT
In many cases, inbound traffic might fail due to a misconfiguration of an internal server. When this occurs, the connection does not complete, so it might be difficult to get relevant log message data on the Firebox. A packet capture is a good way to verify that traffic is passing through the Firebox and that NAT is applied to inbound connections to an internal server.
You can use TCP dump to obtain packet captures for this purpose. To perform the required packet captures, you must:
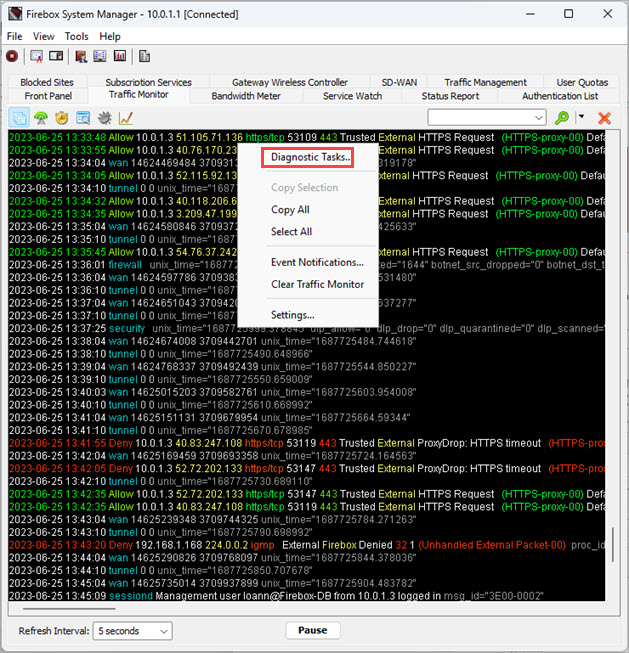
- Launch Firebox System Manager.
- Open two Diagnostic Tasks windows from the Tools menu
- Use one window to capture the traffic on the external interface and use the other window for the internal interface where the server is located
In each window, complete these steps:
- In Fireware System Manager, on the Traffic Monitor tab, right-click a message and select Diagnostic Tasks.
- From the Task drop-down list, select TCP Dump.
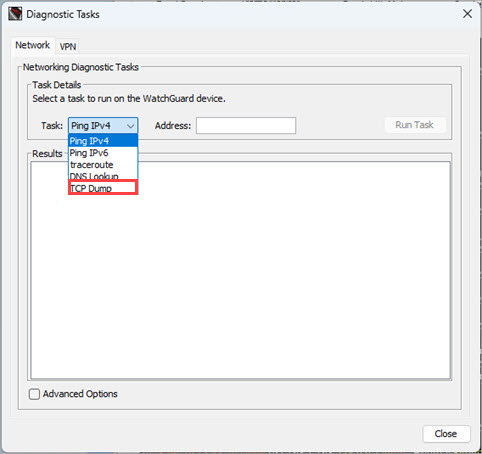
- Select the Advanced Options check box.
- Select Stream Data to File.
- In each window, specify a unique name for the .PCAP file.
- In each window, type this string in the Arguments text box:
-nei ethX host a.b.c.d and port Y -s0- Replace X with the interface you want to capture packets on.
- Replace a.b.c.d with the public IP address of the remote device that you want to test the connection from.
- Replace Y with the port number you opened in the inbound policy. For example, if interface 0 is your external interface and you want to capture SMTP traffic from 203.0.113.65, the argument is:
-nei eth0 host 203.0.113.65 and port 25 -s0. - In the second Diagnostic Tools window, change the interface to the internal interface where the server is located. In this example, it is interface 1:
-nei eth1 host 203.0.113.65 and port 25 -s0.
- After you specify the arguments, click Run Task in each window. With both captures running at the same time, traffic flow is captured through the Firebox from your test location to the destination server.
- After you make a number of connections, click Stop Task in each window.
For more information on the TCP Dump tool, go to Run Diagnostic Tasks to Learn More About Log Messages.