Applies To: Locally-managed Fireboxes
These instructions are written for WatchGuard IPSec Mobile VPN Client end users. These instructions tell users to contact their network administrator for information about how to install a desktop firewall or configure the firewall that is part of the client software, and for the settings to control the connection behavior if they do not use a .ini file. You can print these instructions or use them to create a set of instructions for your end users.
The WatchGuard IPSec Mobile VPN Client creates an encrypted connection between your computer and the Firebox with a standard Internet connection. The IPSec Mobile VPN Client enables you to get access to protected network resources from any remote location with an Internet connection.
Before you install the WatchGuard IPSec Mobile VPN Client, make sure you understand these requirements and recommendations.
- You can install the WatchGuard IPSec Mobile VPN Client software on any computer with a supported version of Windows or macOS. For information about which operating systems are compatible, see the Operating System Compatibility list in the Fireware Release Notes. You can find the Release Notes for your version of Fireware OS on the Fireware Release Notes page of the WatchGuard website.
- Before you install the client software, make sure the remote computer does not have any other IPSec VPN client software installed. You must also uninstall any desktop firewall software (other than Microsoft firewall software) from each remote computer.
- We recommend that you install all available service packs for your client operating system before you install the Mobile VPN client software.
- WINS and DNS settings for the Mobile VPN client are obtained in the client profile you import when you set up your Mobile VPN client.
- We recommend that you keep all default Mobile VPN client settings unless this documentation directs you to change a setting.
You must use the client software installation file that matches your Windows OS system type (64-bit or 32-bit). To see your system type in Windows 10, type About in the Cortana search box and select About Your PC. For instructions for other Windows operating systems, see your network administrator or the Microsoft documentation.
Before you start the installation, make sure you have the following installation components:
- IPSec Mobile VPN software installation file (64-bit or Windows 32-bit)
- End-user profile, with a .wgx or .ini file extension
- Passphrase (if the end-user profile is a .wgx file or the connection uses certificates for authentication)
- User name and password
- cacert.pem and .p12 certificate file (if the connection uses certificates for authentication)
- The WatchGuard IPSec VPN Client license number and serial number to activate the client
Install the Client Software for Windows
To install the client on a Windows computer:
- Copy the Mobile VPN .zip file to the remote computer and extract the contents of the file to the remote (client or user) computer. Make sure that you use the installation file for the correct system type (64-bit or 32-bit).
- Copy the end user profile (the .wgx or .ini file) to the same location as the client installation software.
If you use certificates to authenticate, copy the cacert.pem and .p12 files to the same location as well. - Double-click the .exe file you extracted in Step 1. This starts the WatchGuard Mobile VPN Installation Wizard.
- Click through the wizard and accept all the default settings.
- Restart your computer when the installation wizard completes.
- When the computer restarts, the WatchGuard Mobile VPN Monitor appears. When the software starts for the first time after you install it, you see this message:
There is no profile for the VPN dial-up!
Do you want to use the configuration wizard for creating a profile now?
- Click No.
- Select View > Autostart > No Autostart so that the program does not run automatically.
To start the WatchGuard Mobile VPN client in Windows 10:
From your Windows desktop, select Start and then select WatchGuard Mobile VPN > Mobile VPN Monitor. For instructions for other Windows operating systems, see your network administrator.
To configure the client, import the end user profile that configures the IPSec Mobile VPN client with the settings required to create a VPN tunnel. For this procedure, you need the profile passphrase set by the administrator.
To import a Mobile VPN configuration .wgx or .ini file:
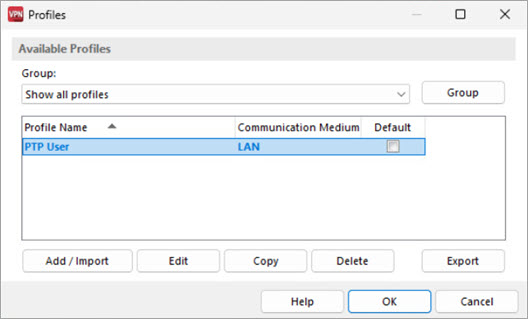
- From the WatchGuard Mobile VPN client, select Configuration > Profiles.
- Click Add/Import.
The New Profile Wizard starts. - Select Profile Import.
- Click Next.
- Browse to the location of the .wgx or .ini configuration file. To select a .ini file, you must select All Files from the Windows file format drop-down menu.
- Click Next.
- On the Decrypt User Profile screen, type the passphrase. The passphrase is case-sensitive.
- Click Next.
- On the Overwrite or add Profile screen, you can select to overwrite a profile of the same name. This is useful if your network administrator gives you a new .wgx or .ini file to import.
- Click Next.
- On the Authentication screen, you can type the user name and password that you use to authenticate the VPN tunnel.
Specify the user name only. Do not preface the user name with a domain name and do not specify an email address.
To type your credentials each time you connect to the VPN, keep the User name and Password text boxes empty. This method provides the greatest security.
To connect to the VPN with saved credentials, type your user name and password. The Firebox stores this information so you do not have to type your user name and password each time you connect. This is the least secure method. You can also type your user name and keep the Password text box empty.
After you install the client software, reinstall the original desktop firewall software or configure the firewall that is part of the client software. If you use a third-party desktop firewall, make sure you configure it to allow traffic to establish the VPN tunnel and the traffic that goes through the tunnel. Contact your network administrator for instructions.
Install the Client Software for macOS
In Fireware v12.9.4 or higher, WatchGuard IPSec Mobile VPN Client for macOS v4.70 does not include firewall functionality.
To install the client on a macOS computer:
- Copy the Mobile VPN disk image file (.dmg) to the remote computer. Do not open the disk image file from a CD or other external drive.
- Copy the end user profile (the .wgx or .ini file) to the remote (client or user) computer.
If you use certificates to authenticate, copy the cacert.pem and .p12 files to the root directory. - Double-click the Mobile VPN installation file.
- Double-click the Watchguard Mobile VPN.pkg icon
The WatchGuard Mobile VPN Installer starts. - Click through the wizard and accept the default settings.
The VPN client software is installed in the Applications folder.
To start the WatchGuard Mobile VPN Client:
From the Applications folder, double-click the WatchGuard Mobile VPN client.
To configure the client, you import the end user profile that configures the IPSec Mobile VPN client with the settings required to create a VPN tunnel. For this step, you need the profile passphrase set by the administrator.
To import the end user profile:
- Start the WatchGuard Mobile VPN Client.
The first time you start the WatchGuard Mobile VPN client, it asks you to type a profile name. - Click Cancel.
- To import the profile, click Import.
- Browse to the folder where you saved the .wgx. or .ini file.
- Select the file and click Open.
- Click Next.
- If you use a .wgx file, in the Key text box, type the passphrase for this profile.
- Click Next.
- Select the profile within the imported file to import.
- Click Next.
- On the Authentication data page, you can select whether to type the user name and password that you use to authenticate the VPN tunnel.
If you type your user name and password, the Firebox stores them and you do not have to enter this information each time you connect. However, this is a security risk. You can also type just your user name and keep the Password field empty. If you type a user name, do not preface the user name with a domain name and do not specify an email address.
- Click Next.
- Click Finish.
- Click OK.
To see the installed profiles, or install a different profile, in the WatchGuard Mobile VPN client, select WatchGuard Mobile VPN > Profiles.
After you install the client software, reinstall the original desktop firewall software or configure the firewall that is part of the client software. If you use a third-party desktop firewall, make sure you configure it to allow traffic to establish the VPN tunnel and the traffic that goes through the tunnel. Contact your network administrator for instructions.
In v12.5 or higher, the WatchGuard VPN client for macOS supports Dark Mode for macOS Mojave or higher.
Select a Certificate and Type the PIN
Complete these steps only if you have a cacert.pem and a .p12 file.
To configure the certificate in the Windows VPN client:
- Start the WatchGuard Mobile VPN Client.
- Select Configuration > Certificates.
- Click Add.
- On the User Certificate tab, select from PKS#12 file from the Certificate drop-down list.
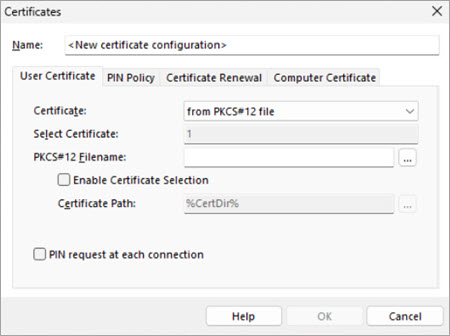
- Adjacent to the PKS#12 Filename text box, click the button and browse to the location of the .p12 file.
- Click OK. Click Close.
- Select Configuration > Profiles.
- Select the profile name. Click Edit.
- Click Identities.
- From the Certificate configuration drop-down box, select the certificate configuration you added.
- Select Connection > Enter PIN.
- Type the passphrase and click OK.
To configure the certificate in the macOS VPN client:
- Start the WatchGuard Mobile VPN Client.
- Select WatchGuard Mobile VPN > Preferences
The list of certificates appears. - Click "+" to add a new certificate.
- Type a name for the certificate.
- From the Certificate drop-down list, select from PKS#12 file.
- Adjacent to the PKS#12 Filename text box, click the button and browse to the location of the .p12 file.
- Click OK.
- Close the Preferences dialog box.
- Select WatchGuard Mobile VPN > Profiles.
- Select the profile name. Click Edit.
- Click Identities.
- From the Certificate configuration drop-down box, select the certificate configuration you added.
- Click OK.
- Close the Profiles dialog box.
- Select Connection > Enter PIN.
- Type the passphrase and click OK.
In v12.5 or higher, the WatchGuard VPN client for macOS supports the macOS Keychain for certificate storage. You must first import the certificate into the macOS Keychain. To use the private key contained in the certificate, make sure the NCP service ncprwsmac can access the directory /Library/Application Support/NCP/Secure Client/.
Activate the VPN Client License
To use the IPSec Mobile VPN client, you must activate a license for it. To activate your IPSec Mobile VPN Client, you must have:
- The WatchGuard Mobile VPN Client for Windows v11.3.2 or higher
or the WatchGuard Mobile VPN Client for macOS - An active connection to the Internet
- The license number and serial number from your administrator
or an Initialization File from your administrator
To activate the client with the license number and serial number:
- Start the WatchGuard Mobile VPN client.
- At the bottom of the dialog box, click Activation.
The License Data dialog box appears. The Activation status shows that the client is not activated. - Click Activation to start the Software Activation Wizard.
This button is available only if the client has not already been activated. - Select Online Activation.
- Click Next.
The License Data page opens.
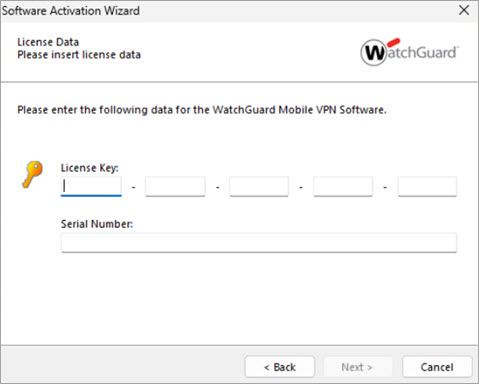
- Type the License Key and Serial Number for the VPN client.
- Click Next.
The Internet Connection step appears. - Make sure your computer can connect to the Internet.
If your computer already has an Internet connection, you do not need to do anything in this step.
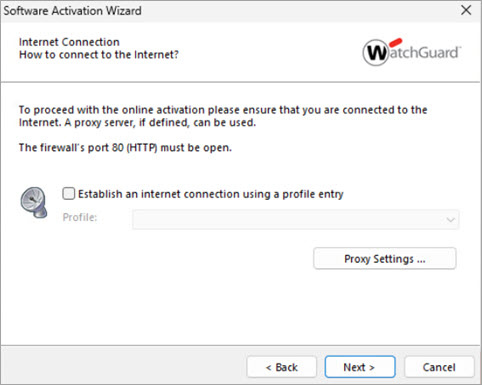
In the Windows client, the Software Activation Wizard provides two options you can use to connect to the Internet:
- To use an existing VPN client profile to connect to the Internet, select the Establish an internet connection using a profile entry check box. From the Profile drop-down list, select the profile to use.
- To connect to the Internet through a proxy server, click Proxy Settings. Select the settings for your proxy server.
- Click Next.
The wizard processes your online activation and tells you whether it was successful. - Click Finish to exit the wizard.
The serial number you activated appears on the License Data dialog box, and the Activation status is OK. - Click Close to close the License Data dialog box.
To activate the client with an Initialization File:
- Start the WatchGuard Mobile VPN client.
- At the bottom of the dialog box, click Activation.
The License Data dialog box appears. The Activation status shows that the client is not activated. - Click Activation to start the Software Activation Wizard.
This button is available only if the client has not already been activated. - Select Activation using Initialization File.
- Click Next.
The Initialization File step appears. - Browse to the Initialization File.
- Click Next.
The initialization file is imported, and the client license is activated.
Connect and Disconnect the Mobile VPN Client
Connect to the Internet through a dial-up networking connection or a LAN connection. Then, use the instructions below to select your profile, connect, and disconnect.
To select your profile in the WatchGuard Mobile VPN client:
- Start the WatchGuard Mobile VPN Client.
- From the Connection Profile drop-down list, select the name of the profile you imported.
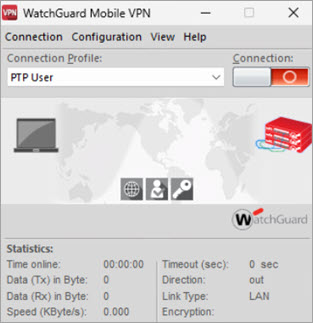
- Click
 to connect.
To disconnect the Mobile VPN client:
- Restore the Mobile VPN Monitor.
- Click
 to disconnect.
Or select Disconnect from the Mobile VPN icon menu in the Windows system tray or macOS menu bar.
WatchGuard Mobile VPN Client Icon
The WatchGuard Mobile VPN client icon appears in the system tray (Windows) or menu bar (macOS). The icon color indicates the status of the VPN connection.
- Red — VPN is not connected
- Yellow — VPN client is attempting to connect
- Green — VPN is connected
- Yellow and green flash — VPN is still logically active after a physical disconnection
On a Windows computer, you can right-click the icon in the system tray to reconnect and disconnect your Mobile VPN, and to see the profile in use.
![]()
On a macOS computer, the VPN client icon does not automatically appear in the menu bar. To make the icon appear in the menu bar, in the Mobile VPN Client, select WatchGuard Mobile VPN > Show VPN client monitor in menu bar.
![]()
Click the icon in the menu bar to show VPN connection status.
From the menu bar icon, you can:
- Connect or disconnect the VPN
- Select the profile to use
- See connection information and a local log file
- Start the VPN client monitor as an application (this removes the icon from the menu bar)
- Quick the WatchGuard Mobile VPN client.
Control the Connection Behavior
The connection behavior controls the action the IPSec Mobile VPN client software takes when the VPN tunnel becomes unavailable for any reason. By default, you must manually reconnect. You are not required to change the connection behavior, but you can configure the client to automatically or variably reconnect. Contact your network administrator for the suggested setting.
If you import a .ini file to configure the VPN client, do not change the Line Management settings. The .ini file configures these settings for you.
- On a Windows computer, from the Windows WatchGuard Mobile VPN client, select Configuration > Profiles. Or, on a macOS computer, from the WatchGuard Mobile VPN client, select WatchGuard Mobile VPN Client > Profiles.
- Select the name of the profile and click Edit.
- From the left pane, select Line Management.
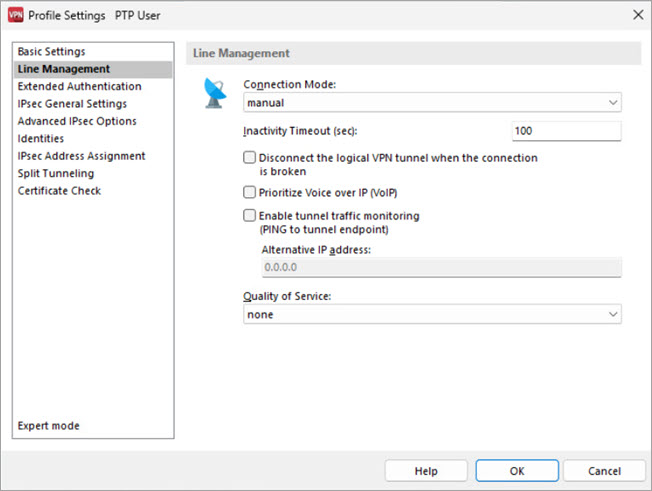
- From the Connection Mode drop-down list, select the connection mode for this profile.
The available connection modes are:
manual
In manual mode, you must manually start the VPN tunnel. The client does not try to restart the VPN tunnel automatically if the VPN tunnel disconnects. To start the VPN tunnel, click Connect in the Mobile VPN client or right-click the Mobile VPN icon on your Windows desktop toolbar and click Connect.
automatic (connection initiated by data transfer)
In automatic mode, the client automatically tries to start the connection when your computer sends traffic to a remote host through the VPN tunnel. If the VPN tunnel disconnects, the client automatically tries to restart the VPN tunnel when an application on the client computer sends traffic to a remote host.
always
In always mode, the client automatically starts the VPN connection when you start the client. The connection is established independent of the Connect button, traffic through the tunnel, or how the VPN monitor is set to be displayed.
variable ("Connect" starts "automatic" mode)
In this mode, click Connect to manually start the VPN tunnel the first time. After you start the tunnel, the tunnel runs in automatic mode until you click Disconnect. If the VPN tunnel goes down before you click Disconnect, the client automatically tries to restart the VPN tunnel whenever an application on the client initiates sends traffic to a remote host.
variable ("Connect" starts "always" mode)
In this mode, click Connect to manually start the VPN tunnel the first time. After you start the tunnel, the tunnel runs in always mode, as described above. The client continues to use always mode until you close the client.
- In the Inactivity Timeout text box, specify the number of seconds the VPN client waits to automatically disconnect after the last transmission of data through the tunnel. When the Inactivity Timeout is set to 0, the VPN client does not automatically disconnect an established tunnel after inactivity.
For information about other line management settings, click Help in the WatchGuard Mobile VPN Client.
Other Configuration Settings
For information about other settings in the client, click Help in the WatchGuard Mobile VPN Client.