Applies To: Locally-managed Fireboxes
You can deploy and configure a FireboxV virtual machine in a Linux KVM (Kernel Virtual Machine) hypervisor. FireboxV deployment on KVM is supported in Fireware v12.6.2 and higher.
FireCluster is supported for KVM. Both FireboxV instances must be running on the same KVM host. For more information, view the requirements in Before You Configure a FireCluster.
Installation Requirements
Make sure your system meets these requirements:
- Operating System — Linux with a KVM hypervisor
- Disk Space — 5 GB for each FireboxV virtual machine
- For more information about FireboxV on KVM system requirements, go to the FireboxV System Requirements section of the Operating System Compatibility Matrix in Fireware Release Notes.
Other system requirements vary by FireboxV model.
Recommended resources for FireboxV by model:
| FireboxV Model | Memory | Maximum vCPUs |
|---|---|---|
| Micro | 2048 MB* | 2 |
| Small | 2048 MB* | 2 |
| Medium | 4096 MB | 4 |
| Large | 4096 MB | 8 |
| Extra Large | 4096 MB | 16 |
4096 MB memory is required to enable IntelligentAV.
Before You Begin
To prepare for your installation, make sure you have:
- FireboxV device serial number
You receive the serial number when you purchase the FireboxV virtual device. - WatchGuard FireboxV VMware .ovf template
The file name is Fireboxv_<version>.ova , where <version> is the Fireware version. - WatchGuard System Manager (optional)
The WSM version must be the same version or higher than the Fireware version.
Download the FireboxV .ova file for VMware and the WatchGuard System Manager software (optional) from the Software Downloads page on the WatchGuard website.
Create a New FireboxV Image File
WatchGuard provides an .ova (open virtual appliance) file for FireboxV installation on VMware. To install FireboxV on KVM, you must download the .ova file, extract a .vmdk file, and convert it to a .qcow2 image file. You can then use the .qcow2 image file to create the FireboxV virtual machine on KVM.
Create the image file on the server where you want to install the FireboxV virtual machine. This helps to ensure that the image is compatible with drivers and other characteristics of your KVM environment.
To create the FireboxV image file:
- Log on to the server where you want to install FireboxV.
- Download the VMware .ova file from the FireboxV VMware Software page.
Or, use this command to download the file:
wget http://cdn.watchguard.com/SoftwareCenter/Files/XTM/<version>/FireboxV_<version>.ova
Replace <version> in the path and file name with the Fireware version. For example:
wget http://cdn.watchguard.com/SoftwareCenter/Files/XTM/12_6/FireboxV_12_6_2.ova
- Use this command to extract the files from the .ova file:
tar xvf FireboxV_12_6_2.ova
- Use this command to convert the extracted .vmdk file to a .qcow2 image file:
qemu-img convert -f vmdk -O qcow2 FireboxV_12_6-disk1.vmdk fireboxv_12_6_2.qcow2
Create the FireboxV Virtual Machine
The steps to install a virtual machine depend on which KVM hypervisor you use. The steps to deploy FireboxV might be different from those described here. If you need more information about how to install a VM in your environment, see the documentation and support resources for your KVM hypervisor.
To install the FireboxV:
- Copy the qcow2 image file to /var/lib/libvirt/images.
- Open Virt-manager. To open Virt-manager from the command line, run the command:
virt-manager. - In virt-manager, click Create a new virtual machine, or select File > Virtual Machine.
- Select Import existing disk image. Click Forward.
- Click Browse and browse to the location of the fireboxv.qcow2 image file. Click Open. Click Forward.
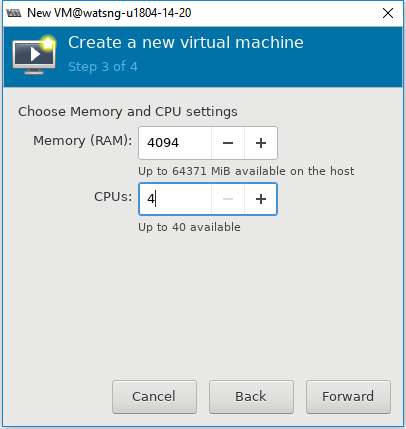
- Set the Memory to 4GB(4096 MB) and CPUs to 4. Click Forward.
- Enter a Name for your virtual machine.
- Select the Customize configuration before install check box.
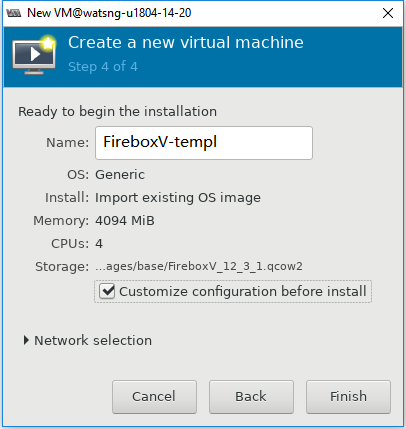
- Click Finish.
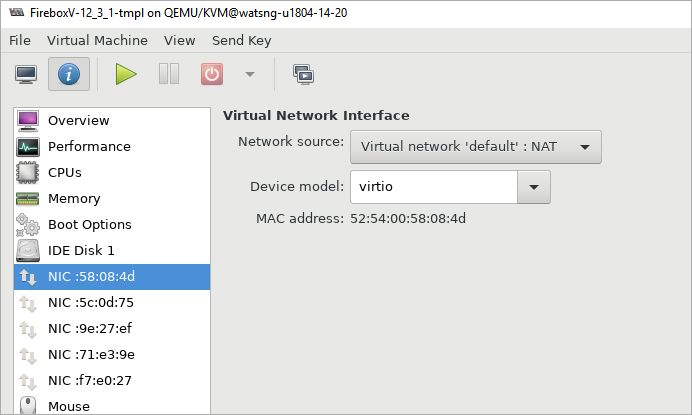
The configuration details of the virtual machine you will create appear. - Add at least two virtual network interfaces. For each interface, from the Device model drop-down list, select virtio. FireboxV supports a maximum of 10 interfaces. Click Apply.
- In the CPUs configuration settings, select the Copy host CPU configuration check box.
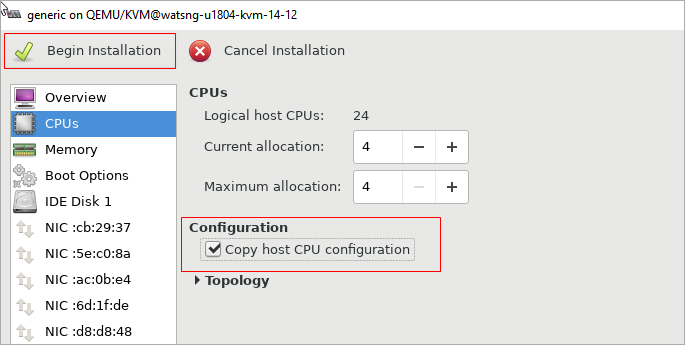
- To install the virtual machine, click Begin Installation.
Find the External Interface IP Address
To configure the Firebox, you can connect to the external interface. By default, the external interface uses DHCP to receive an IP address. You can use Fireware CLI to find the assigned external IP address.
To find the assigned external IP address:
- Open the FireboxV VM console.
The Fireware CLI appears. - Log in with the default credentials admin/ readwrite.
- To see interface status, run the CLI command:
show interface - Look at the IP address assigned to interface 0.
- To log out, type exit.
Use the Web Setup Wizard to Create a Basic Configuration
The Fireware Web Setup Wizard is almost the same for FireboxV as it is for any other Firebox. One difference is that, for a FireboxV virtual machine, you can connect to either the trusted interface or the external interface to run the Web Setup Wizard. Another difference is that the virtual machine reboots after the wizard is complete, so that the virtual machine can restart with the new serial number.
If you do not complete all of the Web Setup Wizard steps within 15 minutes, the wizard does not save any of your settings. You must log in and start again.
The Web Setup Wizard includes a step to activate your FireboxV device. You must activate the Firebox with a feature key to get the serial number and to enable all licensed features.
To set up a basic configuration on a FireboxV virtual machine:
- On the KVM host, open a web browser and connect to Fireware Web UI on either the external or trusted interface.
- Connect to the external interface — From any computer on the FireboxV external network, connect to:
https://<External_IP_Address>:8080
For <External_IP_Address>, use the IP address assigned to the external interface. - Connect to the trusted interface — From any computer on the FireboxV trusted network, connect to:
https://10.0.1.1:8080
- Log in to Fireware Web UI with the default administrator account credentials:
- Username — admin
- Passphrase — readwrite
- Complete the steps in the Web Setup Wizard.
After you complete the wizard, the FireboxV virtual machine reboots with the new serial number. The setup wizard creates a basic configuration that allows outbound TCP, UDP, and ping traffic, and blocks all unrequested traffic from the external network. The configuration also uses the interface IP addresses and administrative passphrases you specified. The wizard automatically enables default policies and services with recommended settings.
If you changed the IP address of the interface you used to connect to the Fireware Web Setup Wizard, you must connect to the new address to manage the device.
Reboot the FireboxV Virtual Machine
You cannot use the reboot command in virt-manager to reboot the Firebox. From virt-manager you can only power off and power on the Firebox.
To reboot the Firebox with Firebox management tools, use one of these methods:
Reboot from the Fireware command line interface (CLI)
- Log in to the Fireware CLI with the admin account or any other user account with the Device Administrator role.
- Run the command reboot.
Reboot from Firebox System Manager
- Connect to the Firebox with WatchGuard System Manager.
- Start Firebox System Manager.
- In Firebox System Manager, select File > Reboot.
- Log in with the admin user account or any other user account with the Device Administrator role.
- Click OK.
The device reboots.
Reboot from Fireware Web UI
- Connect to Fireware Web UI for the Firebox.
- Log in with the admin user account or any other user account that has the Device Administrator role.
- On the Front Panel, in the System section, click Reboot.