Applies To: WatchGuard Cloud-managed Access Points (AP130, AP230W, AP330, AP332CR, AP430CR, AP432)
You can use Wi-Fi in WatchGuard Cloud access points to authenticate Wi-Fi clients with their Active Directory credentials. If you have an existing RADIUS server you can integrate the server with Active Directory for authentication and access management, or use the Microsoft NPS (Network Policy Server).
Active Directory and NPS authentication integration requires RADIUS server authentication with 802.1X (WPA2 or WPA3 Enterprise security setting on your SSIDs). In this example, we use Microsoft NPS.
Integration requirements:
- Each WatchGuard access point that performs 802.1X authentication must be configured as a client on the RADIUS server.
- The access point must be configured with a static IP address or use DHCP reserved addresses.
- All authenticating access points must be able to contact the IP address and port for the RADIUS server.
- The server must host a certificate from a Certificate Authority (CA) trusted by clients on the network.
- Use WPA2 or WPA3 Enterprise with 802.1X authentication to authenticate wireless clients. The wireless client authenticates with the RADIUS server using any EAP method configured on the RADIUS server.
Configuration Steps
- Add WatchGuard Access Points as RADIUS Clients in NPS
- Define a Network Policy in NPS
- Add RADIUS Servers in WatchGuard Cloud
- Configure RADIUS Authentication for Wireless Clients in WatchGuard Cloud
- Troubleshooting RADIUS Authentication and NPS
Add WatchGuard Access Points as RADIUS Clients in NPS
To add Wi-Fi in WatchGuard Cloud access points as RADIUS Clients in NPS:
- Open the NPS console.
- Go to the RADIUS Clients and Servers section.
- Right-click RADIUS Clients, then select New.
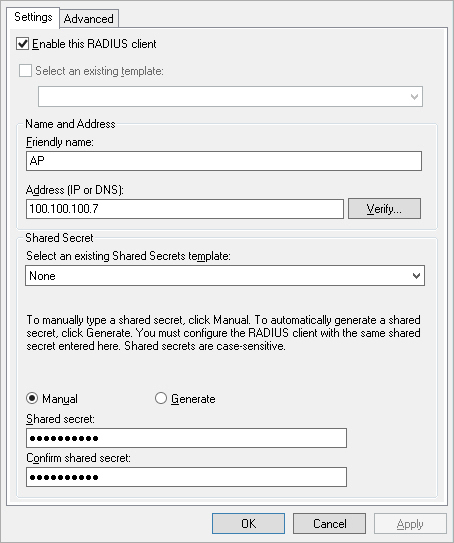
- Select the Enable this RADIUS Client check box.
- In the Friendly Name text box, type a descriptive name for the RADIUS client.
- In the Address text box, type the IP address of the access point to add as a RADIUS client. (The access point must have a static IP address or use DHCP reservations).
- In the Shared Secret text box, specify a shared secret that acts as a password between the RADIUS server and client. You will use this same shared secret when you configure a RADIUS server in WatchGuard Cloud. You can manually enter a shared secret or automatically generate the shared secret.
- Repeat this procedure for each WatchGuard access point that performs 802.1 authentication on your wireless network.
Define a Network Policy in NPS
You must configure a Network Policy on the NPS server for wireless connections:
- Open the NPS console.
- Go to the Policies section.
- Right-click Network Policies, then select New.
- Configure these options in the Overview tab:
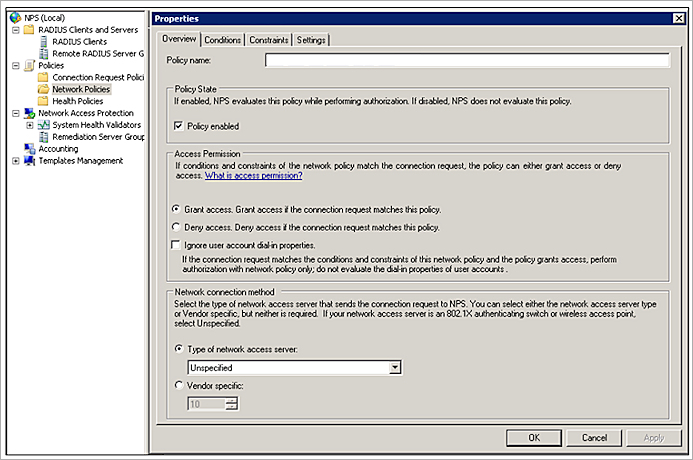
- In the Policy name text box, type a name for this policy.
- Select the Policy Enabled check box.
- In the Access Permission section, select Grant Access.
- In the Network connection method section, set the Type of network access server to Unspecified.
- Configure these options in the Conditions tab:
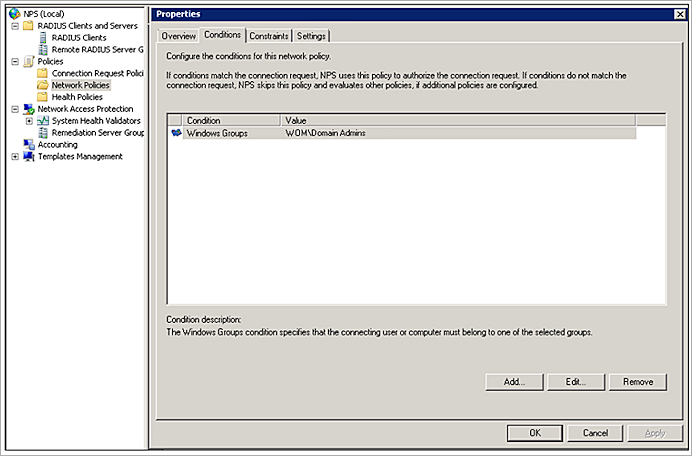
- (Optional) Add the Windows Groups condition and select the Active Directory user groups that can use this policy. This enables you to limit which clients can connect by their group membership. You can also select the Domain Users group to allow access for all authenticated domain users.
- (Optional) Add the NAS Port Type condition with the value “Wireless - IEEE 802.11" or "Wireless - Other” to restrict the policy to wireless communications.
- Configure these options in the Constraints tab:
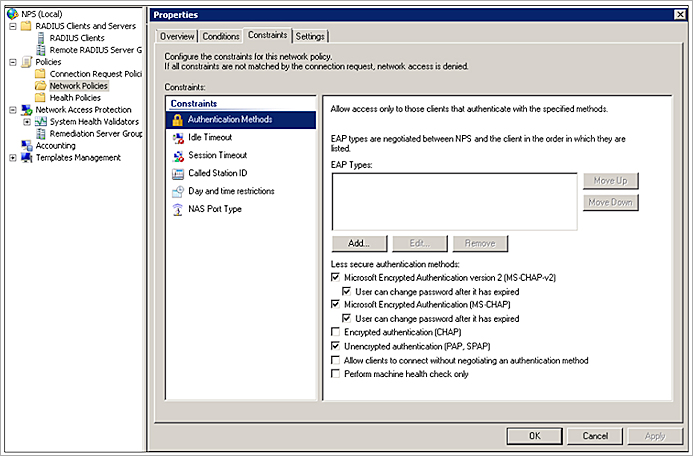
- In the Authentication Methods section, you must allow EAP authentication for wireless 802.1X authentication. There are multiple different types of EAP authentication available with NPS (EAP-MSCHAPv2, PEAP, Microsoft Smart Card or Other Certificate). Not all EAP types require certificates. If you choose a type that requires a certificate, you must create a Domain Controller certificate type on Windows Server for use with 802.1x authentication.
Wireless authentication does not work with other non-EAP authentication types.
- Configure any advanced options in the Settings tab if required in your environment.
Add RADIUS Servers in WatchGuard Cloud
An Authentication Domain is a domain associated with one or more external authentication servers. The authentication domain is a shared configuration that you can use for multiple cloud-managed devices.
You can add your RADIUS server to the Authentication Domain, then select this Authentication Domain when you configure wireless RADIUS authentication.
To add an authentication domain, from WatchGuard Cloud:
- If you are a Service Provider, select the name of the managed subscriber account.
- Select Configure > Authentication Domains.
The Authentication Domains page opens.
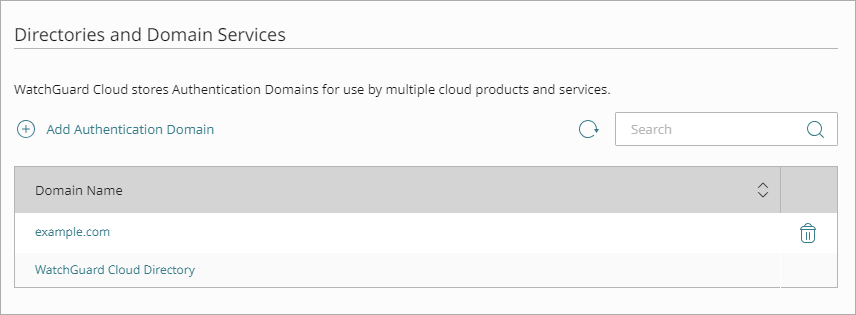
- Click Add Authentication Domain.
The Add Authentication Domain page opens.

- In the Domain Name text box, type the domain name to add.
The domain name must include a domain suffix. For example, type example.com, not example. - Click Next.
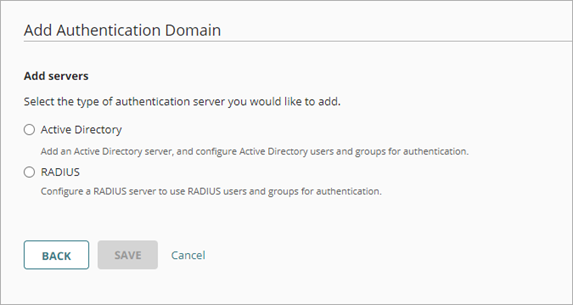
- Select the RADIUS server type.
To configure settings for a RADIUS server:
- In the Add Servers settings, select RADIUS.

- In the Domain Name text box, type the domain name to add. The domain name must include a domain suffix. For example, type example.com, not example.
- From the RADIUS Server Type drop-down list, select RADIUS Authentication Server.
For WatchGuard access points, you can also add a RADIUS Accounting Server. A RADIUS accounting server monitors RADIUS traffic and collects data about client sessions, such as when sessions begin and end. Make sure you add a RADIUS authentication server to the authentication domain before you add a RADIUS accounting server. In many deployments, the Authentication and Accounting services are on the same RADIUS server and run on different ports.
- From the Type drop-down list, select the Host IPv4 or Host IPv6 IP address type.
- In the IP Address text box, type the IP address of the RADIUS server.
- In the Port text box, type the port number RADIUS uses for authentication. Most RADIUS servers use port 1812 by default (older RADIUS servers might use port 1645). Most RADIUS accounting servers use port 1813.
- In the Shared Secret text box, type the shared secret for connections to the RADIUS server.
- In the Confirm Shared Secret text box, type the shared secret again.
- (Fireware v12.11.1 or higher) To require RADIUS authentication servers to use the Message-Authenticator attribute, select the Require Message-Authenticator Attribute check box. The Message-Authenticator attribute is a field in RADIUS packets that verifies the integrity of the packet and prevents spoofing.
- Click Save.
Make sure your RADIUS server is also configured to accept connections from each cloud-managed Firebox or access point as a RADIUS client.
Additional RADIUS Server Options
After you have configured and saved your RADIUS server basic settings, you can also edit the server to configure these additional options:
Radius Authentication Server Options
- Timeout (Seconds) — In the Timeout text box, type a value in seconds. The timeout value is the amount of time the device waits for a response from the authentication server before it tries to connect again. The default value is 10 seconds.
- Retries — In the Retries text box, type the number of times the device tries to connect to the RADIUS server before it reports a failed connection for one authentication attempt. The default value is 3.
- Dead Time — In the Dead Time text box, type the amount of time after which an inactive server is marked as active again. The default value is 10 minutes.
- Group Attribute — In the Group Attribute text box, type a value for the group attribute for the RADIUS server to retrieve group membership for users. The group the user is a member of is returned in the RADIUS FilterID attribute. This default RADIUS group attribute is 11.
Radius Accounting Server Options
- Interim Accounting Interval (Seconds) — In the Interim Accounting Interval text box, type the number of seconds between updates sent to a RADIUS accounting server. The default is 600 seconds (10 minutes).
For more information, go to:
Add Authentication Domains to an Access Point
To add an authentication domain for an access point, from WatchGuard Cloud:
You can use Access Point Sites to create Authentication Domain settings that are applied to multiple access points that subscribe to the site.
- Select Configure > Devices.
- Select the access point.
- Click Device Configuration.
The Device Configuration page opens.

- Click Domains.
The Authentication Domains page opens.
- Click Add Authentication Domain.
The Add Authentication Domain page opens.
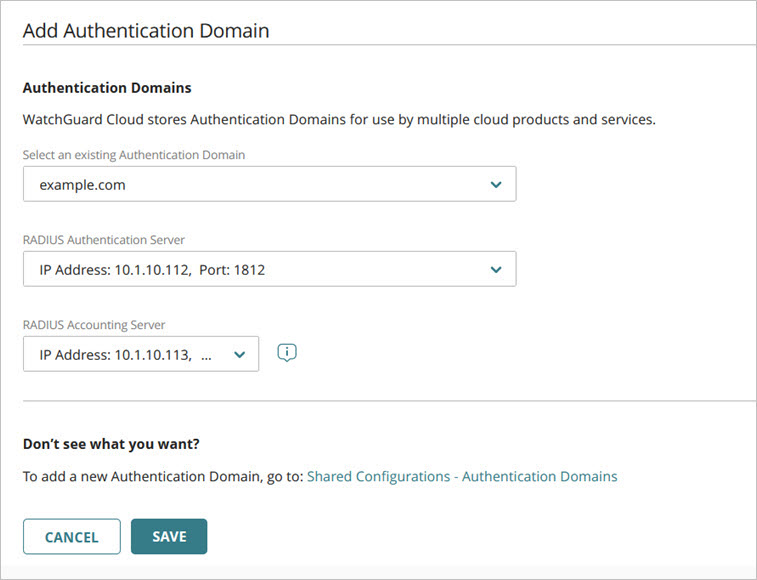
- Select an existing Authentication Domain, RADIUS Authentication Server, and RADIUS Accounting server from the drop-down list.
If you need to create a new Authentication Domain, you must go to Configure > Authentication Domains. For more information, see Add an Authentication Domain to WatchGuard Cloud.
- Click Save.
You can now select the authentication domain and RADIUS server you created when you configure an SSID with WPA2 or WPA3 Enterprise authentication.
Configure RADIUS Authentication for Wireless Clients in WatchGuard Cloud
To configure an SSID with RADIUS authentication in WatchGuard Cloud:
You can use Access Point Sites to create SSID configuration settings that are applied to multiple access points that subscribe to the site.
- Select Configure > Devices.
- Select the access point you want to configure.
- Select Device Configuration.
The device configuration page opens.
- In the Wi-Fi Networks tile, click SSIDs.
- Click Add SSID.
- Type an SSID Name for the wireless network.
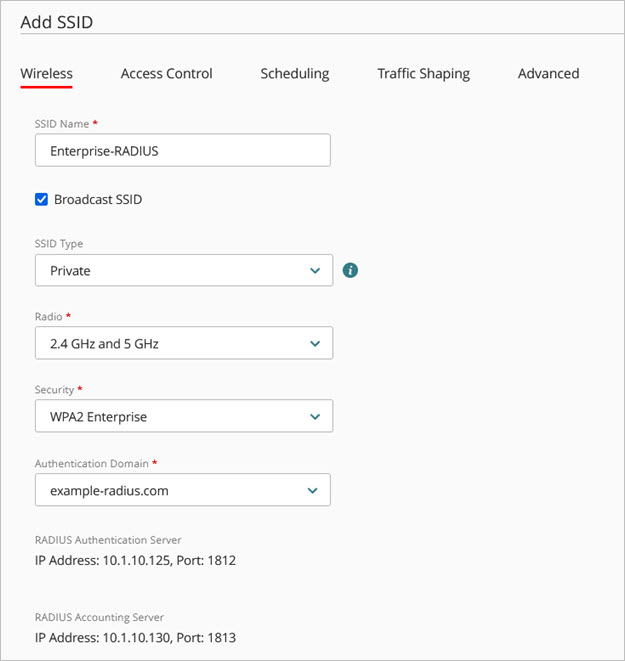
- Select the Broadcast SSID check box to broadcast the SSID name to wireless clients. Clear this check box if you want to hide the SSID name.
- From the SSID Type drop-down list, select a Private or Guest SSID.
- Select the access point radios (2.4 GHz, 5 GHz, or both 2.4 GHz and 5 GHz) that will broadcast this SSID.
- From the Security drop-down list, select either WPA2 Enterprise or WPA3 Enterprise. Select an Authentication Domain and RADIUS servers from the drop-down list.
To use WPA3 Enterprise, all your wireless clients must support WPA3.
- Save the SSID configuration.
- Deploy the configuration to your access points.
Troubleshooting RADIUS Authentication and NPS
If you encounter issues with wireless client authentication with RADIUS, check the following:
- Make sure your WatchGuard access points can communicate with the RADIUS server and that UDP ports 1812 and 1813 are open for communication.
- Make sure the shared secret for the SSID matches the RADIUS client configuration for the access point on the RADIUS server.
- Examine the successful and failed authentication attempts in the RADIUS server logs to help you narrow down the issue.
- Download the access point logs for troubleshooting information about the connection to the RADIUS server. For more information, go to Access Point Diagnostic Tools.
Common Configuration Errors
These common configuration errors may result in failed RADIUS authentication attempts:
- You have not added the access points as RADIUS clients on the RADIUS server.
- Access points are configured for dynamic IP addresses with DHCP.
- Incorrect RADIUS shared secret set in the SSID configuration or in the RADIUS client configuration on the RADIUS server.
- The Network or Connection Request Policy on the NPS server is not configured correctly.
- There is a mismatch in the Authentication Settings.
- Incorrect credentials provided by the wireless client.
- If a certificate is required for EAP authentication, there is no certificate installed on the RADIUS server or the certificate has expired. You have not added a root certificate on the wireless client.
Common Error Codes with Windows NPS
The error codes detailed here are specific to Windows NPS:
Event ID 6273 with reason code 23 (bad/missing certificate)
Connection issues may occur because a digital certificate is not installed on the RADIUS server or an expired certificate. A certificate must be installed or renewed on your NPS server to establish TLS connections.
Event Viewer: An error occurred during the Networks Policy Server use of the Extensible Authentication Protocol (EAP)
Check the EAP log files for errors.
Event ID 13: A RADIUS message was received from the invalid RADIUS client (access points not added as clients)
WPA2 with 802.1x authentication requires that access points are added as RADIUS clients on your NPS Server. Your access points must have a static IP address or reserved DHCP IP address.
Event ID 18: An Access-Request message was received from RADIUS client x.x.x.x with a Message-Authenticator attribute that is not valid (bad shared secret)
When you configure the RADIUS server in WatchGuard Cloud, you must type a shared secret. This value must match the shared secret you configured when you added your access points as RADIUS clients in NPS.
Event ID 6273 :Reason Code 48 (bad network policy)
A Network Policy is incorrectly configured on your NPS server. It is also possible that the network policy order is not correct and while processing the client through the policies, there was no policy match.
Event ID 6273: Reason Code 66 (Auth settings mismatch)
Authentication settings incorrectly configured in the Network Policy on your NPS server.
Event ID 6273: Reason Code 8 (bad username or password)
Username or password incorrect, or the username may not exist in the Windows group specified in the Network Policy.
Event ID 6273 Reason Code 265 (untrusted CA)
Windows client devices provide the option to validate the server certificate sent by the server when using WPA2 with 802.1x. When implemented, the Certificate Authority must be added to the Trusted Root Certification Authorities list on the client.