Applies To: Locally-managed Fireboxes
You can use a Lightweight Directory Access Protocol (LDAP) authentication server to authenticate users with your Firebox. LDAP is an open-standard protocol for use with online directory services.
Before you configure your Firebox for LDAP authentication, review the documentation for your LDAP server to determine whether your installation supports the memberOf (or equivalent) attribute.
For authentication to an Active Directory server, we recommend that you configure Active Directory authentication on the Firebox rather than LDAP authentication. For more information, go to Configure Active Directory Authentication.
LDAP Settings
Connection Settings
You can specify the IP address or the DNS name of your LDAP server.
The standard LDAP ports are:
- LDAP — 389
- LDAPS — 636
- Active Directory Global Catalog queries — 3269
Search Base and Group String
When you configure the LDAP authentication method, you set a search base to specify where in the authentication server directories the Firebox can search for an authentication match. If your domain name is example.com, you can use the search base dc=example,dc=com.
Example search bases
To restrict the LDAP search to the Organizational Unit (OU) named as accounts, you can use the search base ou=accounts,dc=example,dc=com. Any user or group you use in the Firebox configuration must be within this OU.
If you also have user group objects in another OU named groups, with user accounts in an OU named accounts, and your domain name is example.com, use the search base dc=example,dc=com.
If you use an OpenLDAP server without the memberOf attribute overlay support, add users to more than one OU, and find that the default Group String setting of memberOf does not return correct group information for your users, you can instead configure the Firebox to use another group attribute. To manage user groups, you can add the object classes member, memberUID, or gidNumber. For more information about these object classes, see RFC 2256 and RFC 2307.
LDAP over SSL (LDAPS)
By default, LDAP traffic is unencrypted plain text. LDAP authentication does not hash or encrypt passphrases.
To encrypt user credentials, we recommend that you select Enable LDAPS. When you use LDAPS, the traffic between the LDAPS client on your Firebox and your LDAP server is secured by a TLS tunnel. When you select the Enable LDAPS option, you can choose whether to enable the LDAPS client to validate the LDAP server certificate, which prevents man-in-the-middle attacks. If you choose to use LDAPS and you specify the DNS name of your server, make sure the search base you specify includes the DNS name of your server. When you select the Enable LDAPS option, you can also assign a client certificate to provide support for two-way certificate authentication for the SSL handshake (Fireware v12.9 and higher).
If you enable LDAPS, you can choose to validate the LDAP server certificate with an imported Certificate Authority (CA) certificate. If you select to validate the LDAP server certificate, you must import the root CA certificate from the CA that signed the LDAP server certificate, so your Firebox can use the CA certificate to validate the LDAP server certificate. When you import the CA certificate, make sure to select the General Use option in the certificate import wizard.
For more information about how to import certificates with Fireware Web UI, go to Manage Device Certificates (Web UI).
For more information about how to import certificates with Firebox System Manager, go to Manage Device Certificates (WSM).
Configure LDAP
To configure LDAP authentication, from Fireware Web UI:
- Select Authentication > Servers.
The Authentication Servers page opens. - From the Server list, select LDAP.
The LDAP server settings appear. - Select the
Enable LDAP Server check box.
The LDAP server settings are enabled.
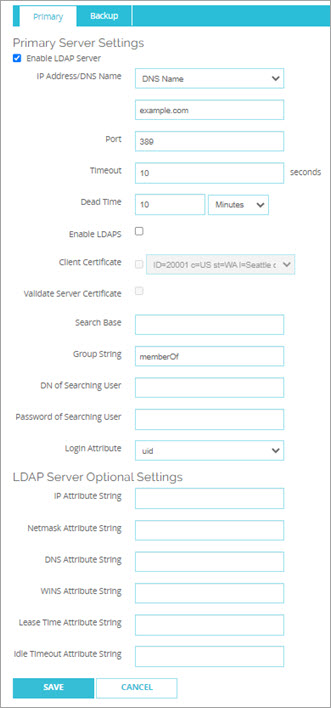
- From the IP Address/DNS Name drop-down list, select whether to use the IP address or DNS name to contact your primary LDAP server.
- In the IP Address/DNS Name text box, type the IP address or DNS name of the primary LDAP server for the device to contact with authentication requests.
The LDAP server can be located on any Firebox interface. You can also configure your device to use an LDAP server on a remote network through a VPN tunnel. - In the Port text box, type the TCP port number for the Firebox to use to connect to the LDAP server. The default port number is 389.
If you enable LDAPS, you must select port 636. - In the Timeout text box, type or select the number of seconds the device waits for a response from the LDAP server before it closes the connection and tries to connect again.
- In the Dead Time text box, type or select the amount of time after which an inactive server is marked as active again.
The default value is 3 minutes. In Fireware v12.1.1 or lower, the default value is 10 minutes. - From the Dead Time drop-down list, select Minutes or Hours to set the duration.
After an authentication server has not responded for a period of time, it is marked as inactive. Additional authentication attempts do not try this server until it is marked as active again. - To enable secure SSL connections to your LDAP server (recommended):
- Select the Enable LDAPS check box.
- If you enable LDAPS but did not set the Port value to the default port for LDAPS (Port 636), a port message dialog box opens. To use the default port, click Yes. To use the port you specified, click No.
- (Optional) If you selected the Enable LDAPS check box, you can also select the Client Certificate check box and select a client certificate from the drop-down list (Fireware v12.9 and higher).
When you assign a client certificate, it provides support for two-way certificate authentication for the SSL handshake. For information about how to import a certificate, see Manage Device Certificates (Web UI). - To verify the certificate of the LDAP server with the imported CA certificate, select the Validate Server Certificate check box.
- In the Search Base text box, type the search base settings in the standard format: ou=organizational unit,dc=first part of distinguished server name,dc=any part of the distinguished server name that appears after the dot.
For example: ou=accounts,dc=example,dc=com - In the Group String text box, type the group string attribute.
The default attribute is memberOf.
This attribute string holds user group information on the LDAP server. On many LDAP servers, the default group string is uniqueMember; on other servers, it is member. For user groups on an OpenLDAP server without memberOf overlay support, you can also specify the attributes member, memberUID, or gidNumber. - In the DN of Searching User text box, type the distinguished name (DN) for a search operation.
You can add any user DN with the privilege to search LDAP, such as an administrator. Some administrators create a new user that only has searching privileges.
For example, cn=Administrator,cn=Users,dc=example,dc=com. - In the Password of Searching User text box, type the password associated with the distinguished name for a search operation.
- In the Login Attribute text box, select a LDAP login attribute to use for authentication from the drop-down list.
The login attribute is the name used for the bind to the LDAP database. The default login attribute is uid. If you use uid, the DN of Searching User and the Password of Searching User text boxes can be empty. - To specify optional attributes for the primary LDAP server, complete the settings in the LDAP Server Optional Settings section.
For more information about how to configure optional settings, see the next section. - To add a backup LDAP server, select the Backup tab, and select the Enable Backup LDAP Server check box.
- Repeat Steps 3–16 to configure the backup server. Make sure the shared secret is the same on the primary and backup LDAP servers.
For more information, go to Use a Backup Authentication Server. - Click Save.
To configure LDAP authentication, from Policy Manager:
- Click
 .
.
Or, select Setup > Authentication > Authentication Servers.
The Authentication Servers dialog box opens. - Select the LDAP tab.
- Select the
Enable LDAP Server check box.
The LDAP server settings are enabled.
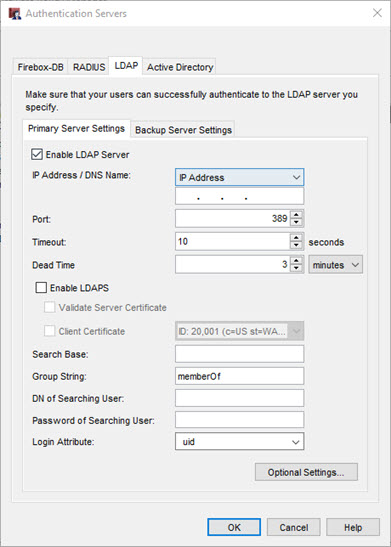
- From the IP Address/DNS Name drop-down list, select whether to use the IP address or DNS name to contact your primary LDAP server.
- In the IP Address/DNS Name text box, type the IP address or DNS name of the primary LDAP server for the device to contact with authentication requests.
The LDAP server can be located on any Firebox interface. You can also configure your device to use an LDAP server on a remote network through a VPN tunnel. - In the Port text box, type the TCP port number for the Firebox to use to connect to the LDAP server. The default port number is 389.
If you enable LDAPS, you must select port 636. - In the Timeout text box, type or select the number of seconds the device waits for a response from the LDAP server before it closes the connection and tries to connect again.
- In the Dead Time text box, type or select the amount of time after which an inactive server is marked as active again.
The default value is 3 minutes. In Fireware v12.1.1 or lower, the default value is 10 minutes. - From the Dead Time drop-down list, select Minutes or Hours to set the duration.
After an authentication server has not responded for a period of time, it is marked as inactive. Additional authentication attempts do not try this server until it is marked as active again. - To enable secure SSL connections to your LDAP server (recommended):
- Select the Enable LDAPS check box.
- If you enable LDAPS but did not set the Port value to the default port for LDAPS (Port 636), a port message dialog box appears. To use the default port, click Yes. To use the port you specified, click No.
- To verify the certificate of the LDAP server with the imported CA certificate, select the Validate Server Certificate check box.
- (Optional) If you selected the Enable LDAPS check box, you can also select the Client Certificate check box and select a client certificate from the drop-down list (Fireware v12.9 and higher).
When you assign a client certificate, it provides support for two-way certificate authentication for the SSL handshake. For information about how to import a certificate, see Manage Device Certificates (WSM).
- In the Search Base text box, type the search base settings in the standard format: ou=organizational unit,dc=first part of distinguished server name,dc=any part of the distinguished server name that appears after the dot.
For example: ou=accounts,dc=example,dc=com - In the Group String text box, type the group string attribute.
The default attribute is memberOf.
This attribute string holds user group information on the LDAP server. On many LDAP servers, the default group string is uniqueMember; on other servers, it is member. For user groups on an OpenLDAP server without memberOf overlay support, you can also specify the attributes member, memberUID, or gidNumber. - In the DN of Searching User text box, type the distinguished name (DN) for a search operation.
You can add any user DN with the privilege to search LDAP, such as an administrator. Some administrators create a new user that only has searching privileges.
For example, cn=Administrator,cn=Users,dc=example,dc=com. - In the Password of Searching User text box, type the password associated with the distinguished name for a search operation.
- In the Login Attribute text box, type the LDAP login attribute to use for authentication.
The login attribute is the name used for the bind to the LDAP database. The default login attribute is uid. If you use uid, the DN of Searching User and the Password of Searching User text boxes can be empty. - To specify optional attributes for the primary LDAP server, click Optional Settings.
For more information about how to configure optional settings, see the next section. - To add a backup LDAP server, select the Backup Server Settings tab and select the Enable Backup LDAP Server check box.
- Repeat Steps 3–16 to configure the backup server. Make sure the shared secret is the same on the primary and backup LDAP servers.
For more information, go to Use a Backup Authentication Server. - Click OK.
- Save the Configuration File.
About LDAP Optional Settings
Fireware can get additional information from the LDAP server when it reads the list of attributes in the search response from the server. The enables you to use directory server to assign extra parameters to the authenticated user sessions, such as timeouts and Mobile VPN with IPSec address assignments. Because the data comes from LDAP attributes associated with individual user objects, you are not limited to the global settings specified in the device configuration file. You can set these parameters for each individual user.
For more information, go to Use Active Directory or LDAP Optional Settings.
Test the Connection to the Server
To make sure that your Firebox can connect to your LDAP server and successfully authenticate your users, from Fireware Web UI, you can test the connection to your authentication server. You can also use this feature to determine whether a specific user is authenticated and to get authentication group information for that user.
You can test the connection to your authentication server from the Authentication Servers page for your server, or you can navigate directly to the Server Connection page in Fireware Web UI.
To navigate to the Server Connection page from the Authentication Servers page:
- Click Test Connection for LDAP and Active Directory.
The Server Connection page opens. - Follow the instructions in the Server Connection topic to test the connection to your server.
For instructions to navigate directly to the Server Connection page in Fireware Web UI, go to Server Connection.