Applies To: WatchGuard Advanced EPDR, WatchGuard EPDR, WatchGuard EDR
The Indicators of Attack list shows details of the IOA detected on workstations and servers by Endpoint Security.
Each IOA refers to a single computer and IOA type. If the same chain of suspicious events occurs on multiple computers, Endpoint Security generates a separate IOA for each computer. If the same pattern is detected several times in an hour on the same computer, a minimum of two IOAs are generated — one when the first IOA is detected and one every hour that shows the number of occurrences in that hour.
From the options ![]() menu in a computer row, you can:
menu in a computer row, you can:
- Archive IOA
- Mark an Indicator of Attack as Pending
- Delete an IOA
- Add an Automatic Deletion Rule
- View the IOAs detected on the computer
- View computers on which the IOA was detected
Detection Grouping
To prevent too many detections in the management UI, Endpoint Security might group two or more detections of the same IOA. The number of detections shows in the Occurrences column in the list of IOAs or in the Detected Occurrences on the details page.
To group two or more detections, they must be:
- For the same IOA
- Detected on the same computer
- Detected close to each other in time
The grouping process depends on the type of IOA and whether the computer is in Audit mode. The group process follows these steps:
- The security software logs the first detection and sets the Detected Occurrences to 1.
- Equal detections made in the 6 hours after the first detection was logged are grouped together. The security software sends a detection at the end of each 6-hour interval. (Detected Occurrences indicates the total number of detections made.).
- If the security software does not log an equal detection within a 6-hour interval, then it does not send a detection for the interval.
- After four intervals (24 hours), the process starts again.
Detection Grouping for RDP Attack IOAs
Endpoint Security reports a maximum of 50 equal detections of the Network Attack IOA every 24 hours for each computer. For 2 detections of a Network Attack IOA to be considered the same, these conditions must be met:
- The target computer must be the same.
- The process involved on the target computer must be the same. Depending on the stage of the attack, this is the process that listens for the operating system RDP requests or any other process runs remotely on the computer after a successful login preceded by multiple failed login attempts.
For information on RDP attack containment, go to Configure RDP Attack Settings.
Filter the Indicators of Attack List
To filter the Indicators of Attack list and open attack details:
- Click Filters.
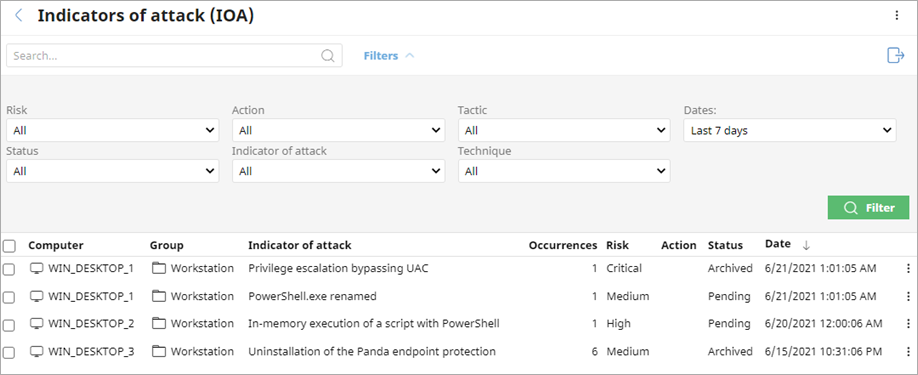
- Specify the parameters you want to filter the results for.
- Risk — Impact of the IOA detected (Critical, High, Medium, Low, Unknown).
- Action — Type of action taken by WatchGuard Endpoint Security on brute-force attacks against RDP IOAs (Reported, Attack Blocked).
- Tactic — Category of the attack tactic that generated the IOA, mapped to the MITRE matrix.
- Dates — Time period when the IOA was generated.
- Status — Status of the IOA (Archived or Pending). Archived IOAs no longer require administrator attention because it was a false positive or was resolved. Pending IOAs have not been investigated by the administrator.
- Indicator of Attack — Name of the rule that detected the pattern of events that triggered the IOA. Select All or search for and select the IOA you want to filter the list for.
- Technique — Category (and sub-category, if available) of the attack technique that generated the IOA, mapped to the MITRE matrix (for example, T1012 - Query Registry). You can search for and select more than one technique.
- Click Filter.
To export the list to a CSV file, click .
. - To view the IOA details for a computer, select the computer in the list.
For more information, go to Indicator of Attack Details.
Delete an IOA
If they are not useful to you, you can manually delete IOAs that Endpoint Security detected. Endpoint Security permanently deletes detections with the Deleted status after 40 days. You cannot recover an IOA that is permanently deleted.
To change the status of a deleted IOA within the past 40 days, you can filter the list to show deleted IOAs. Click ![]() and select Archive IOA or Mark IOA as Pending to change the status. The IOA detection is now counted in dashboards widgets.
and select Archive IOA or Mark IOA as Pending to change the status. The IOA detection is now counted in dashboards widgets.
To delete an IOA from the Indicators of Attack list:
- Filter the list to show the IOAs you want to delete.
- In the row for the IOA you want delete, click
 .
. - Select Delete Indicator of Attack.
The IOA detection disappears from the list and is not counted in dashboards.
Add an Automatic Deletion Rule
Automatic deletion rules remove detections generated by an IOA that you determine to be false positives or unimportant. To add an automatic deletion rule, you select a specific detection as the base to create the rule from. You can add rules that affect computers in your managed accounts. After you add a rule, you can edit it to make it more general or specific, to apply only to certain computers or groups, or to avoid detections that meet certain characteristics.
Automatic deletion rules do not delete already generated detections. They mark new detections that meet the criteria in the rule as Deleted. Advanced EPDR deletes these detections after 40 days. After a detection is deleted, you cannot recover it.
To add an automatic deletion rule, in the Endpoint Security management UI:
- Select Status.
- In the My Lists section, click Add.
- In the Security section of the Add List dialog box, select Indicators of attack (IOA).
The New list: Indicators of attack (IOA) page opens. - Configure the filter to find the detection you want to use as the base for the automatic deletion rule.
- Click Launch Query.
- Click
 in the row for the detection you want to use. Select Add Automatic Deletion Rule.
A dialog box opens with the base configuration of the automatic deletion rule.

- (Optional) Add computer groups that you do not want to generate detections.
- (Optional) Add additional computers that you do not want to generate detections.
If you do not add computer groups or individual computers, the automatic deletion rule affects all groups and all computers. - In the Details section, specify data for the detections you want to delete from the Other Details field. The Other Details field includes data in JSON format relevant to the event that led to the generation of the IOA and is available on the details page for the selected IOA.

- From the drop-down list, select an option and add the Other Details data:
- Equals — Enter the exact content.
- RegEx — Enter the content with a regular expression to add flexibility to the rule. For information on regular expressions, go to the Microsoft Regular Expression Quick Reference Guide. (external link)
- Click Add.
The rule assigns the Deleted status to all detections that meet the criteria in the rule.
To test and validate your regular expressions, go to http://regexstorm.net/tester. (external link)
View Detections Deleted by the Rule
To view a list of IOA detections automatically deleted by a rule, in the Endpoint Security management UI:
- Select Settings.
- Select Automatic IOA Deletion Rules.
The Automatic IOA Deletion Rules list opens. - Click in the row for the automatic IOA deletion rule you want to view the deleted detections for. Select View Deleted IOA.
The Indicators of Attack list opens filtered to show IOA detections deleted by the rule.