
Related Topics
Configure the IPS Update Server
The Intrusion Prevention Service (IPS) downloads signature updates from a signature update server. Gateway AV, IPS, Application Control, and Data Loss Prevention all use the same update server settings. When you configure the update server for any one of these subscription services, the settings apply to all of these services.
IPS and Application Control signature updates are delivered together in the same update file.
The size of the IPS signature set depends on your Firebox hardware platform and software version. For more information, see IPS and Application Control signature set sizes.
To make sure that the Firebox can connect to the update server, you must add at least one DNS server to your network configuration. The Firebox uses DNS to resolve the update server URL to an IP address. For more information on adding DNS servers, see Add WINS and DNS Server Addresses.
Configure Automatic Signature Updates
- Select Subscription Services > Intrusion Prevention (IPS).
- Click Update Server.
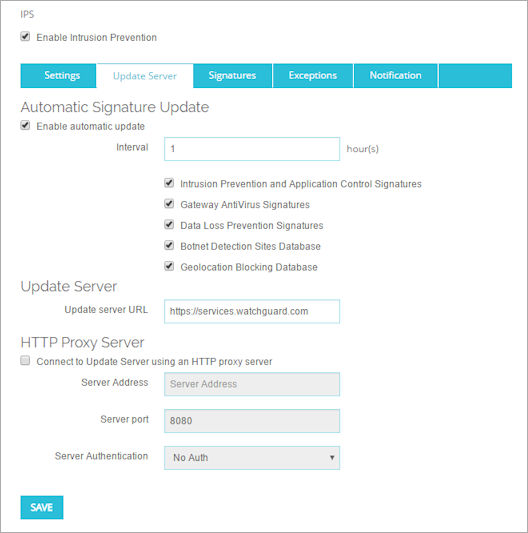
IPS Update Server in Fireware Web UI
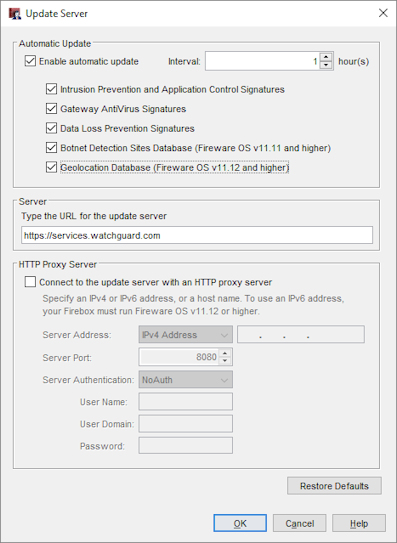
- To enable automatic signature updates, select the Enable automatic update check box. This option is enabled by default.
- From the Interval drop-down list, enter the number of hours between automatic updates.
- Select the Intrusion Prevention and Application Control Signatures check box to automatically update signatures at the selected update interval.
Do not change the Update server URL unless you are told to do so by WatchGuard. You can reset the value to a default setting.
Connect to the Update Server Through an HTTP Proxy Server
If your Firebox must connect to the update server through an HTTP proxy, you must add information about the HTTP proxy server to your update server configuration.
- In the HTTP Proxy Server section, select the Connect to Update Server with an HTTP proxy server check box.
- In the Server Address section, type the IP address or host name of your HTTP proxy server.
- (Optional) To specify which port number to use to connect to your HTTP proxy server, in the Server port text box, type the port number.
Most HTTP proxy servers accept requests on port 8080. You must only specify a different port if your server does not use port 8080. - From the Server authentication drop-down list, select the type of authentication your HTTP proxy server uses.
- If your HTTP proxy does not require authentication, select No Auth.
- If your HTTP proxy server requires NTLM or Basic authentication, in the text boxes, type your User name, Domain, and Password.
- Save your configuration.
Update Signatures Manually
For information about how to see the status of signature updates, and how to manually force an update to the most current signatures, see Subscription Services Status and Manual Signatures Updates.
Offline Signature Updates
For security reasons, some customer environments require direct control over the distribution and installation of periodic signature updates for signature services such as Gateway AntiVirus, Intrusion Prevention, and Data Loss Prevention.
WatchGuard offers Offline Signature Updates that enable you to download the latest signatures for these services directly from WatchGuard, and then use a script to manually install these files on your Fireboxes.
A special set of credentials are required to access the signature update files from the WatchGuard servers. For more information about this feature, contact WatchGuard technical support.