
Related Topics
Explicit Proxy: PAC Files
When you use the Explicit Proxy for web traffic, you must configure your client web browsers to use the Firebox IP address as the proxy server. You can manually configure your client web browser with the IP address of the Firebox, or you can use proxy automatic configuration (PAC) methods to distribute the proxy configuration to all your clients.
For more information on how to configure client web browsers, see Explicit Proxy: Configure Client Web Browsers.
About PAC Files
A PAC (Proxy Auto-Configuration) file is a simple JavaScript file that you can use to configure client web browsers to use the Firebox as a proxy server. The PAC file includes the IP address and port number to use to connect to the Firebox
Here is an example of a simple PAC file:
function FindProxyForURL(url, host){return "PROXY 10.0.1.1:3128";}
Here is an example of a more advanced proxy configuration in a PAC file:
function FindProxyForURL(url, host)
{ if (isInNet(host, "10.0.1.0", "255.255.255.0")) {
return "DIRECT"; }
else if (url.substring(0, 5) == "http:") {
return "PROXY 10.0.1.1:3128"; }
else if (url.substring(0, 6) == "https:") {
return "PROXY 10.0.1.1:3128"; }
else { return "DIRECT"; }
}
In this example, 10.0.1.0 is the local network you want to bypass, and 10.0.1.1 is the address of the Firebox. Make sure to replace the addresses in this example with your local network and Firebox addresses.
Manage PAC Files on your Firebox
You can add up to 10 PAC files to your Firebox configuration. You can clone any PAC file you have already added and edit it to make changes. You can also edit or remove PAC files from the list.
Your Firebox does not validate the contents of PAC files.
Add a PAC File
If you already have a PAC file, you can import it to the Firebox. If you do not have a PAC file, you can modify the text of the PAC file example for your network configuration and add it to the Firebox.
After you have added a PAC file to the list of PAC files, you can specify that PAC file as active.
- Select System > Proxy Auto-Configuration.
The Proxy Auto-Configuration Files page appears.

- To add a PAC file, click Add.
The Import Proxy Auto-Configuration File page appears. - If you have a PAC file you can import, click Browse and select the file.
If you do not have a PAC file:- In the Name text box, type the name for the new PAC file.
- In the text box, type or paste the contents for the PAC file.
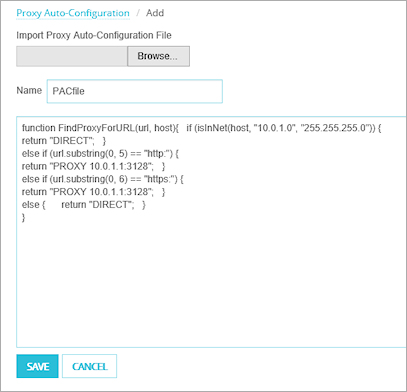
- Click Save.
The PAC file name you specified appears in the Proxy Auto-Configuration Files list. - To mark the PAC file as active, in the Active column for the PAC file, select the check box.
- Click Save.
- Select Tools > Proxy Auto-Configuration.
The Proxy Auto-Configuration Files dialog box appears. If you connected to the Firebox with Device Monitor credentials, you must specify the Configuration passphrase for the Firebox..

- To add a PAC file, click Add.
The Import Proxy Auto-Configuration File page appears. - If you have a PAC file you can import, click Choose File and select the file.
If you do not have a PAC file:- In the Name text box, type the name for the new PAC file.
- In the text box, type or paste the contents for the PAC file.
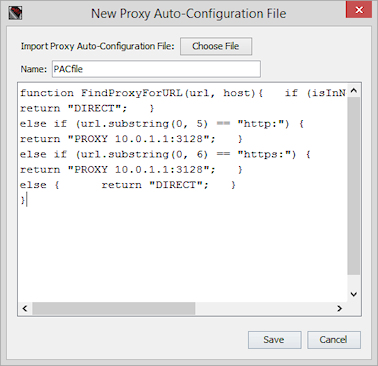
- Click Save.
The PAC file name you specified appears in the Proxy Auto-Configuration Files list. - To mark the PAC file as active, in the Active column for the PAC file, select the check box.
- Click Close.
Edit a PAC File
After you add a PAC file to your Firebox configuration, if your network configuration changes, you can edit your PAC files to update the information in the file. When you edit a PAC file, you can change the contents of the file but not the file name.
To change the information in a PAC file:
- From the Proxy Auto-Configuration Files list, select a PAC file.
- Click Edit.
- Modify the contents of the PAC file.
- Click Save.
Clone a PAC File
You can make a copy of any PAC file in your configuration and edit it to make a new PAC file. When you clone a PAC file, you can change the file name and the contents of the file.
To change the information in a PAC file:
- From the Proxy Auto-Configuration Files list, select a PAC file.
- Click Edit.
- In the Name text box, type a new name for the PAC file.
- Modify the contents of the PAC file.
- Click Save.
Delete a PAC File
When you no longer need a PAC file that is in your configuration, you can remove it.
To delete a PAC file:
- From the Proxy Auto-Configuration Files list, select a PAC file.
- Click Remove.
The PAC file is removed from the list.
Configure WPAD on the Firebox
You can host PAC files on the Firebox and distribute the PAC file to clients with the Web Proxy Autodiscovery Protocol (WPAD).
The Firebox only supports WPAD through DHCP. WPAD through DNS is not supported.
The DHCP-based WPAD mechanism sends the URL of the PAC file as option number 252 in the DHCP lease granted to a client. If the web browser is configured to automatically detect proxy settings, it receives the URL from the DHCP lease to download the PAC file.
- Select Network > Interfaces.
The Interfaces page appears. - Edit the network interface that provides DHCP services to your network clients.
- In the DHCP Options section, click Add.
The Add DHCP Option dialog box appears.

- Select Custom Option.
- In the Code text box, type 252.
- In the Name text-box, type a descriptive name for the option.
For example, type PAC File. - From the Type drop-down list, select Text.
- In the Value text box, type the URL for the PAC file on this Firebox.
For example, type http://10.0.1.1:4125/PACfile.pac.
- Select Network > Configuration.
The Network Configuration dialog box appears, with the Interfaces tab selected. - Select the network interface that provides DHCP services to your network clients, and click Configure.
The Interface Settings dialog box appears. - Click DHCP Options.
The DHCP Options dialog box appears. - Click Add.
The Add DHCP Option dialog box appears.

- Select Custom Option.
- In the Code text box, type 252.
- In the Name text-box, type a description name for the option.
For example, type PAC file. - From the Type drop-down list, select Text.
- In the Value text box, type the URL for the PAC file on this Firebox.
For example, type http://10.0.1.1:4125/PACfile.pac