
Related Topics
Configure the Firebox for Mobile VPN with SSL
When you activate Mobile VPN with SSL, an SSLVPN-Users user group and a WatchGuard SSLVPN policy are automatically created to allow SSL VPN connections from the Internet to the Firebox. You can use the default group or you can create new groups that have the same names as the user group names on your authentication servers.
The WatchGuard SSLVPN policy is shared by Management Tunnel over SSL, BOVPN over TLS in Server mode, Mobile VPN with SSL, and the Access Portal. For more information about this policy, see SSL/TLS Settings Precedence and Inheritance.
Several Firebox features use SSL/TLS for secure communication and share the same OpenVPN server. The features that share the OpenVPN server, in order of precedence from highest to lowest, are:
- Management Tunnel over SSL on hub devices
- BOVPN over TLS in Server mode
- Mobile VPN with SSL
- Access Portal
Features with lower precedence inherit some SSL/TLS settings from enabled features with higher precedence. The shared settings are not configurable for the features with lower precedence.
Example — Management Tunnel and Mobile VPN with SSL enabled
When you enable a Management Tunnel over SSL on your WSM Management Server, some of the settings that are shared by the Mobile VPN with SSL tunnels become managed by your Management Server. You cannot change these settings in the Mobile VPN with SSL configuration. These settings include the Firebox IP addresses, networking method, virtual IP address pool, VPN resources, data channel, and configuration channel. You also cannot disable the Firebox-DB authentication server, which is required for Management Tunnel authentication. You must change these shared settings in the Device Properties on the Management Server.
Example — BOVPN over TLS Server and Mobile VPN with SSL enabled
When you enable your Firebox as a BOVPN over TLS server, some Mobile VPN with SSL settings are inherited from the BOVPN over TLS Server settings. You cannot change these settings in the Mobile VPN with SSL or VPN Portal configuration. These settings include the Firebox IP addresses, networking method, virtual IP address pool, VPN resources, data channel, authentication and encryption settings, and timeout settings. In the VPN Portal settings, you cannot change the VPN Portal port (the configuration channel for Mobile VPN with SSL). For more information about VPN Portal settings, see Configure the VPN Portal Settings.
Before You Begin
Before you configure Mobile VPN with SSL, decide how you want the Firebox to send traffic through the VPN tunnel. Based on the option you choose, you might have to make changes to your network configuration before you enable Mobile VPN with SSL.
You can configure Mobile VPN with SSL to use one of two methods to handle VPN traffic to your network:
Routed VPN Traffic
This is the default selection. With this option, the Firebox sends traffic from the VPN tunnel to all local trusted, optional, and custom networks, or to the specific network resources you specify.
Bridge VPN Traffic
This option enables you to bridge SSL VPN traffic to a trusted, optional, or custom network. When you select this option, you cannot filter traffic between the SSL VPN users and the network that the SSL VPN traffic is bridged to. When you bridge VPN traffic to a network, the SSL VPN users are in the same security zone as other users on the network that you bridge to, and the traffic for those mobile users is managed by the same security policies as traffic for other users on the bridged network.
For example, if you bridge VPN traffic to a trusted interface, all policies that allow traffic for the Any-Trusted alias also allow traffic for the users who connect to the network with Mobile VPN with SSL. The Bridge VPN Traffic option does not bridge SSL VPN traffic to any secondary networks on the selected network bridge.
If you select Bridge VPN Traffic in the Mobile VPN with SSL configuration on a FireboxV or XTMv virtual machine, you must enable promiscuous mode on the attached virtual switch (vSwitch) in VMware.
The choice of interfaces you can bridge VPN traffic to depends on the version of Fireware installed on the device:
- Fireware v11.8.x or lower — You can bridge VPN traffic to any interface that is not a LAN bridge.
- Fireware v11.9 or higher — You can bridge VPN traffic only to a LAN bridge.
For information about how to configure a bridge interface, see Create a Network Bridge Configuration.
If you configure Mobile VPN with SSL from the Web UI, do not change the interface that you used to log in to the Web UI to a bridge interface. This causes you to immediately lose the management connection to the device. If this happens, you must use a different configured interface to reconnect to Fireware Web UI.
If you want to change the interface that you use to manage the device to a bridge interface, we recommend that you make this change from Policy Manager. You can complete all interface configuration changes before you save the updated configuration file to the device.
To change the trusted or optional interface you use for management to a bridge interface, from Fireware Web UI:
- Configure another trusted or optional interface to use as a temporary management interface.
- Connect the management computer to the new interface, and log in to the Web UI.
- Change the original management interface to a bridge interface, and configure a LAN bridge that includes this interface.
- Connect the management computer to the original management interface.
- Disable the temporary management interface.
For detailed instructions, see Create a Network Bridge Configuration.
Configure Connection Settings
- Select VPN > Mobile VPN with SSL.
The Mobile VPN with SSL Configuration page appears.
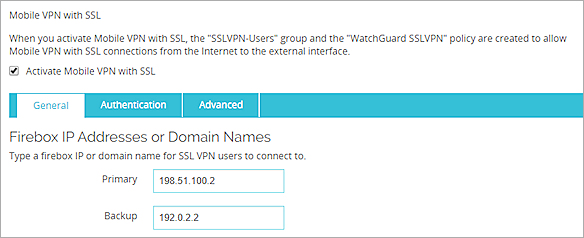
- Select the Activate Mobile VPN with SSL check box.
- In the Primary text box, type a public IP address or domain name.
This is the IP address or domain name that Mobile VPN with SSL clients connect to by default. This can be an external IP address, secondary external IP address, or external VLAN. For a device in drop-in mode, use the IP address assigned to all interfaces. - If your Firebox has more than one external address, in the Secondary text box, type a different public IP address.
This is the IP address that the Mobile VPN with SSL client connects to if it is unable to establish a connection with the primary IP address. If you add a secondary IP address, make sure it is an IP address assigned to a Firebox external interface or VLAN. If you want the Mobile VPN with SSL client to use a secondary IP address, you must also select the Auto reconnect after a connection is lost check box in the Authentication settings, as described in the next section.
- Select VPN > Mobile VPN > SSL.
The Mobile VPN with SSL Configuration dialog box appears.
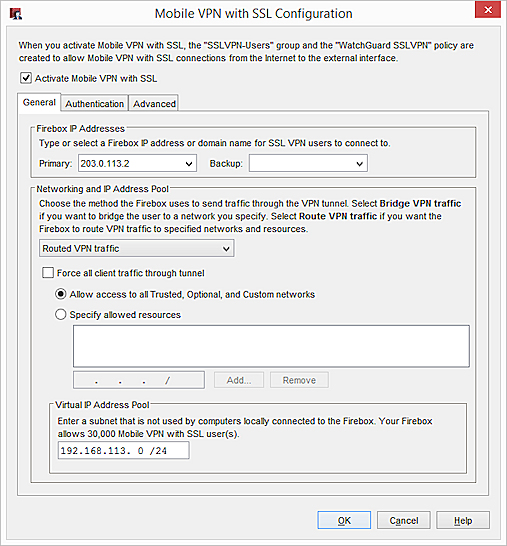
- Select the Activate Mobile VPN with SSL check box.
- In the Primary text box, type or select a public IP address or domain name.
This is the IP address or domain name that Mobile VPN with SSL clients connect to by default. This can be an external IP address, secondary external IP address, or external VLAN. For a device in drop-in mode, use the IP address assigned to all interfaces. - If your Firebox has more than one external address, in the Backup text box, type or select a different public IP address.
This is the IP address that the Mobile VPN with SSL client connects to if it is unable to establish a connection with the primary IP address. If you add a backup IP address, make sure it is an IP address assigned to a Firebox external interface or VLAN. If you want the Mobile VPN with SSL client to use a backup IP address, you must also select the Auto reconnect after a connection is lost check box in the Authentication settings.
Configure the Networking and IP Address Pool Settings
In the Networking and IP Address Pool section, configure the network resources that Mobile VPN with SSL clients can use.
By default, the BOVPN over TLS server assigns addresses in the 192.168.113.0/24 pool to BOVPN over TLS clients. Mobile VPN with SSL also uses the 192.168.113.0/24 pool by default. If BOVPN over TLS in Client mode and Mobile VPN with SSL are enabled on the same Firebox, you must specify a different address pool for one of these features. If both features use the same IP address pool, BOVPN over TLS traffic is not sent through the tunnel properly.
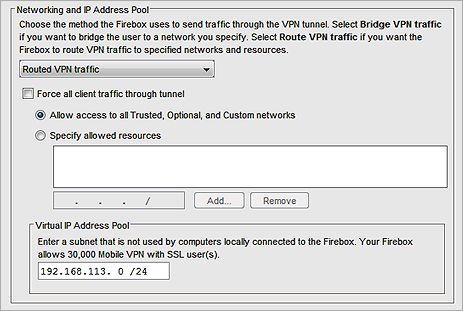
- In the Networking and IP address pool section, from the drop-down list, select the method the Firebox uses to send traffic through the VPN tunnel:
- Select Bridge VPN Traffic to bridge SSL VPN traffic to a network you specify. When you select this option, you cannot filter traffic between the SSL VPN users and the network that the SSL VPN traffic is bridged to.
- Select Routed VPN Traffic to route VPN traffic to specified networks and resources. This is the default for all Fireboxes.
- Select or clear the Force all client traffic through the tunnel check box.
- To route all traffic from the VPN client to your private network and to the Internet through the tunnel, select Force all client traffic through tunnel.
This option sends all external traffic through the Firebox policies you create and offers consistent security for mobile users. However, because it requires more Firebox processing power, access to Internet resources can be very slow for the mobile user.
For information about how to allow clients to access the Internet when this option is selected, see Options for Internet Access Through a Mobile VPN with SSL Tunnel. - To route only traffic from the VPN client to your private networks through the tunnel, clear the Force all client traffic through tunnel check box.
This option gives your users better network speeds by only routing traffic to private network resources through the Firebox. Other traffic to the Internet does not go through the tunnel and is not restricted by the policies on your Firebox.- To allow access to all internal networks, select Allow access to all Trusted, Optional, and Custom networks.
- To restrict Mobile VPN with SSL client access to only specified devices on your private network, select Specify allowed resources. To specify an allowed resource, type the IP address of the network resource in slash notation and click Add.
- To route all traffic from the VPN client to your private network and to the Internet through the tunnel, select Force all client traffic through tunnel.
- Configure the IP addresses the Firebox assigns to Mobile VPN with SSL client connections.
- Fireware v11.8.x and lower — You can bridge VPN traffic to any interface that is not a LAN bridge.
- Fireware v11.9 and higher — You can bridge VPN traffic only to a LAN bridge.
Routed VPN traffic
For the Virtual IP Address Pool, keep the default setting of 192.168.113.0/24 or enter a different range. Type the IP address of the subnet in slash notation. IP addresses from this subnet are automatically assigned to Mobile VPN with SSL client connections. You cannot assign an IP address to a specific user.
To avoid potential IP address conflicts, we recommend that you assign virtual IP addresses that are not part of a network protected by the Firebox, any network accessible through a route or BOVPN, assigned by DHCP to a device behind the Firebox, or used for Mobile VPN with IPSec or Mobile VPN with SSL address pools. If FireCluster is enabled, the virtual IP address pool cannot be on the same subnet as a primary cluster IP address.
For a Firebox with Fireware v11.12.4 or lower, make sure to assign virtual IP addresses that are not part of the Mobile VPN with PPTP address pool.
Bridge VPN traffic
From the Bridge to interface drop-down list, select the name of the interface to bridge to. The choice of interfaces you can bridge VPN traffic to depends on the version of Fireware on the device:
For more information, see Before You Begin.
In the Start and End text boxes, type the IP addresses in the range that you want to assign to Mobile VPN with SSL client connections. The Start and End IP addresses must be on the same subnet as the bridged interface.
For more information about virtual IP addresses, see Virtual IP Addresses and Mobile VPNs.
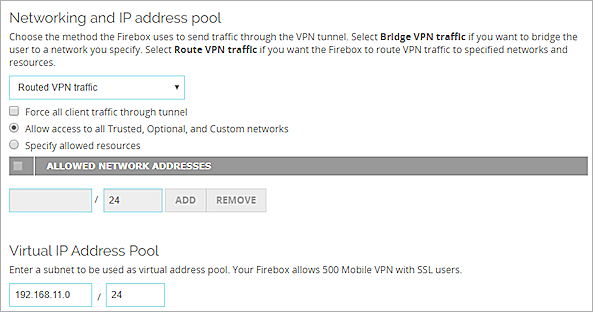
- In the Networking and IP Address Pool section, from the drop-down list, select the method the Firebox uses to send traffic through the VPN tunnel.
- Select Bridge VPN Traffic to bridge SSL VPN traffic to a network you specify. When you select this option, you cannot filter traffic between the SSL VPN users and the network that the SSL VPN traffic is bridged to.
- Select Routed VPN Traffic to route VPN traffic to specified networks and resources. This is the default for all Fireboxes.
- Select or clear the Force all client traffic through the tunnel check box.
- To route all traffic from the VPN client to your private network and to the Internet through the tunnel, select Force all client traffic through tunnel.
This option sends all external traffic through the Firebox policies you create and offers consistent security for mobile users. However, because it requires more Firebox processing power, access to Internet resources can be very slow for the mobile user.
For information about how to allow clients to access the Internet when this option is selected, see Options for Internet Access Through a Mobile VPN with SSL Tunnel. - To route only traffic from the VPN client to your private networks through the tunnel, clear the Force all client traffic through tunnel check box.
This option sends all external traffic through the Firebox policies you create and offers consistent security for mobile users. However, because it requires more Firebox processing power, access to Internet resources can be very slow for the mobile user.- To allow access to all internal networks, select Allow access to all Trusted, Optional, and Custom networks.
- To restrict Mobile VPN with SSL client access to only specified devices on your private network, select Specify allowed resources. To specify an allowed resource, type the IP address of the network resource in slash notation and click Add.
- To route all traffic from the VPN client to your private network and to the Internet through the tunnel, select Force all client traffic through tunnel.
- Configure the IP addresses the Firebox assigns to Mobile VPN with SSL client connections. If FireCluster is enabled, the virtual IP address pool cannot be on the same subnet as a primary cluster IP address.
- In Fireware XTM v11.8.x and lower, you can bridge VPN traffic to any interface that is not a LAN bridge.
- In Fireware v11.9 and higher, you can bridge VPN traffic only to a LAN bridge.
Routed VPN traffic
For the Virtual IP Address Pool, keep the default setting of 192.168.113.0/24 or enter a different range.
To avoid potential IP address conflicts, we recommend that you assign virtual IP addresses that are not part of a network protected by the Firebox, any network accessible through a route or BOVPN, assigned by DHCP to a device behind the Firebox, or used for Mobile VPN with IPSec or Mobile VPN with SSL address pools. If FireCluster is enabled, the virtual IP address pool cannot be on the same subnet as a primary cluster IP address.
For a Firebox with Fireware v11.12.4 or lower, make sure to assign virtual IP addresses that are not part of the Mobile VPN with PPTP address pool.
Bridge VPN traffic
From the Bridge to interface drop-down list, select the name of the interface to bridge to. The choice of interfaces you can bridge VPN traffic to depends on the version of Fireware the device uses.
For more information, see Before You Begin.
In the Start and End text boxes, type the first and last IP addresses in the range that you want to assign to Mobile VPN with SSL client connections. When you bridge VPN traffic to a LAN bridge, the Start and End IP addresses must be on the same subnet as the bridged interface.
For more information about virtual IP addresses, see Virtual IP Addresses and Mobile VPNs.
Configure Authentication Settings
Next, you must configure the authentication settings. You can select one or more configured authentication servers to use. The server at the top of the list is the default server. The default server is used for authentication if the user does not specify the authentication server or domain in the Mobile VPN with SSL client.
Make sure you create a group on the server that has the same name as the name you added in the wizard for the Mobile VPN group. If you use Active Directory as your authentication server, the users must belong to an Active Directory security group with the same name as the group name you configure for Mobile VPN with SSL. For more information, see Configure the External Authentication Server.
Select Authentication Servers
In Fireware v12.1 and higher, the authentication server settings appear in the VPN Portal settings.
From the Mobile VPN with SSLpage:
- Select the Authentication tab.
A list of configured Authentication Servers appears in the VPN Portal section.
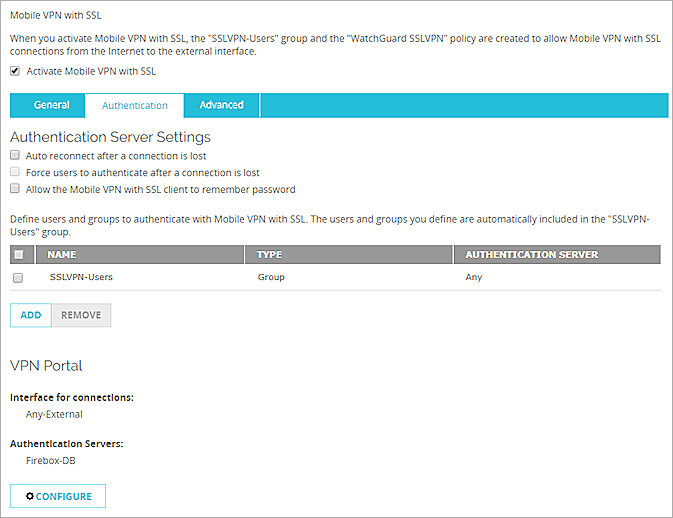
- Click Configure.
The VPN Portal page appears.
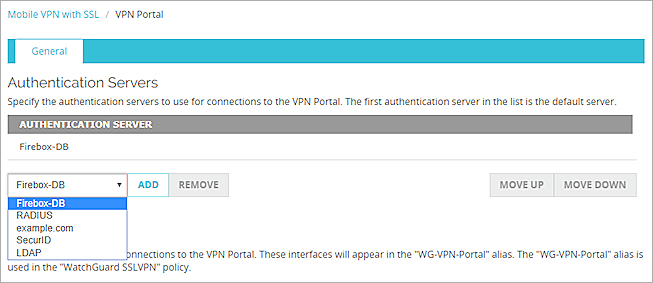
- From the drop-down list, select each authentication server you want to use for Mobile VPN with SSL user authentication. You can select any enabled authentication server: the internal Firebox database (Firebox-DB) or a RADIUS, SecurID, LDAP, or an Active Directory server domain.
Only enabled authentication method servers and domains are listed. For information about supported authentication methods, see Authentication Server Types. - If you selected more than one server to use for authentication, select the server you want to be the default server. Click Move Up to move that server to the top of the list.
If a user does not specify the authentication server in the Username text box when they use the Mobile VPN with SSL client to authenticate, Mobile VPN with SSL uses the default authentication server. - Click Save.
The Mobile VPN with SSL page appears. - Select the Authentication tab.
- If you want the Mobile VPN with SSL client to be able to automatically reconnect, select the Auto reconnect after a connection is lost check box. If you enable this option, the mobile user can select a check box on the Mobile VPN with SSL client to control whether the client automatically reconnects. You must also enable this option if you want the client to automatically use the secondary IP address when it cannot connect to the primary IP address.
- To require users to authenticate after a Mobile VPN with SSL connection is disconnected, select the Force users to authenticate after a connection is lost check box . We recommend that you select this check box if you use two-factor authentication method with a one-time password, such as RADIUS, SecurID or VASCO. If you do not force users to authenticate after a connection is lost, the automatic connection attempt can fail. This is because the Mobile VPN with SSL client tries to use the one-time password the user originally entered, which is no longer correct, to automatically reconnect after a connection is lost.
- If you want the Mobile VPN with SSL client to be able to remember the password, select the Allow the Mobile VPN with SSL client to remember password check box. If you enable this option, the mobile user can select a check box in the Mobile VPN with SSL client to control whether the client remembers the password.
If you configure Mobile VPN with SSL to use more than one authentication server, users who do not use the default authentication server must specify the authentication server or domain as part of the user name. For more information and examples, see Install and Connect the Mobile VPN with SSL Client.
From the Mobile VPN with SSL Configuration dialog box:
- Select the Authentication tab.
A list of configured Authentication Servers appears in the VPN Portal section.
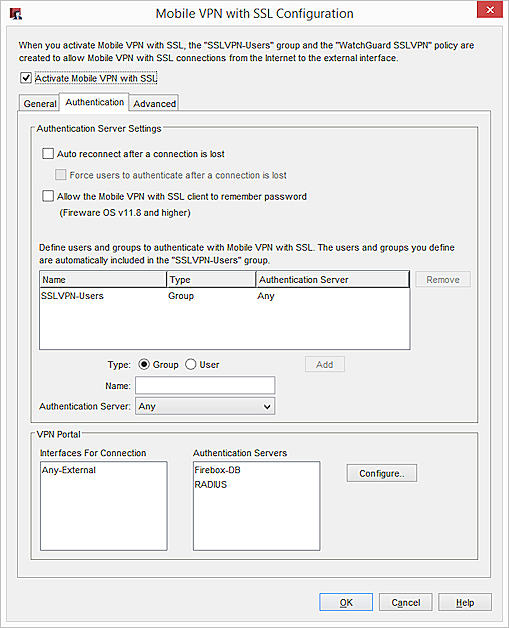
- Click Configure.
The VPN Portal Settings dialog box appears.
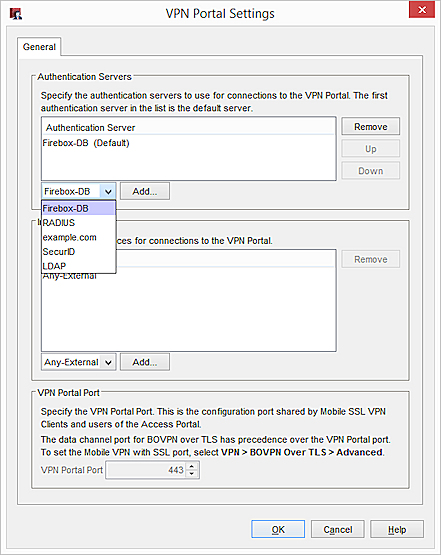
- From the drop-down list, select each authentication server to use for Mobile VPN with SSL user authentication. You can select any enabled authentication server:
- Firebox-DB
- RADIUS
- SecurID
- LDAP
- Active Directory
For information about supported authentication methods, see Authentication Server Types.
- If you selected more than one server to use for authentication, select which server is the default server. Click Up to move that server to the top of the list.
If a user does not specify the authentication server in the Username text box when they use the Mobile VPN with SSL client to authenticate, Mobile VPN with SSL uses the default authentication server. - Click OK.
The Mobile VPN with SSL Configuration dialog box appears. - If you want the Mobile VPN with SSL client to be able to automatically reconnect, select the Auto reconnect after a connection is lost check box.
If you enable this option, the mobile user can select a check box on the Mobile VPN with SSL client to control whether the client automatically reconnects. You must also enable this option if you want the client to automatically use the backup IP addresses when it cannot connect to the primary IP address. - To require users to authenticate after a Mobile VPN with SSL connection is disconnected, select the Force users to authenticate after a connection is lost check box.
We recommend that you select this check box if you use two-factor authentication method with a one-time password, such as RADIUS, SecurID or VASCO. If you do not force users to authenticate after a connection is lost, the automatic connection attempt can fail. This is because the Mobile VPN with SSL client tries to use the one-time password the user originally entered, which is no longer correct, to automatically reconnect after a connection is lost. - If you want the Mobile VPN with SSL client to be able to remember the password, select the Allow the Mobile VPN with SSL client to remember password check box. If you enable this option, the mobile user can select a check box in the Mobile VPN with SSL client to control whether the client remembers the password.
If you configure Mobile VPN with SSL to use more than one authentication server, users who do not use the default authentication server must specify the authentication server or domain as part of the user name. For more information and examples, see Install and Connect the Mobile VPN with SSL Client.
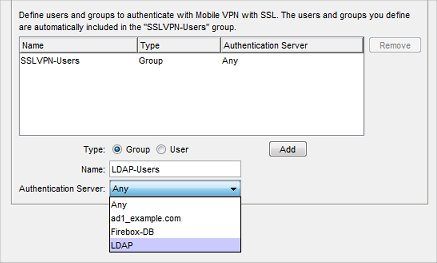
Add Users and Groups
You can use the default SSLVPN-Users group for authentication, or you can add the names of users and groups that exist on your authentication server.
The group SSLVPN-Users is added by default. You can add the names of other groups and users that use Mobile VPN with SSL. For each group or user, you can select a specific authentication server where the group exists or select Any if that group exists on more than one authentication server. The group or user name you add must exist on the authentication server. The group and user names are case sensitive and must exactly match the name on your authentication server.
- Below the list of users and groups, click Add.
The Add User or Group dialog box appears.
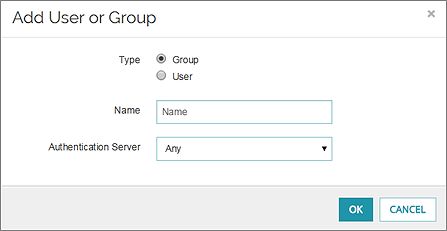
- Select Group or User to add a group or user.
- In the Name text box, type the name of the group or user in the adjacent text box. The name must be the same as the name of a group or user in your authentication server.
- From the Authentication Server drop-down list, select the authentication server where the user or group exists.
Or, select All if the group can be used with all selected authentication servers. - Click OK.
The user or group is added to the Users and Groups list. - Click Save to save the configuration settings.
- Select Group or User to add a group or user.
- In the Name text box, type the name of the group or user in the adjacent text box. The name must be the same as the name of a group or user in your authentication server.
- From the Authentication Server drop-down list, select the authentication server where the user or group exists.
Or, select All if the group can be used with all selected authentication servers. - Click Add.
The user or group is added to the Users and Groups list. - Click OK to save the configuration settings.
- Select the group or user in the list.
- Click Remove.
The Allow SSLVPN-Users Policy and Mobile VPN with SSL Groups and Users
When you save the Mobile VPN with SSL configuration, the Allow SSLVPN-Users policy is created or updated to apply to the groups and users you configured for authentication. The group and user names you added do not appear in the From list in the Allow SSLVPN-Users policy. Instead, the single group name SSLVPN-Users appears. The group and user names you added do not appear in the From list. However, this policy does apply to all users and groups you configured in the Mobile VPN with SSL authentication settings.
If you disable Mobile VPN with SSL, the Allow SSLVPN-Users policy and the SSLVPN-Users group are automatically removed.
Configure Advanced Settings for Mobile VPN with SSL
You can configure these settings on the Advanced page:
- Authentication and encryption
- Ports
- Timers
- DNS and WINS
The authentication and encryption settings changed to stronger defaults in Fireware v12.0. Settings for Blowfish, MD5, and DES were removed. For more information about these settings in Fireware v11.12.4 and lower, see the previous version of Fireware Help.
- Select VPN > Mobile VPN with SSL.
The Mobile VPN with SSL Configuration page appears.
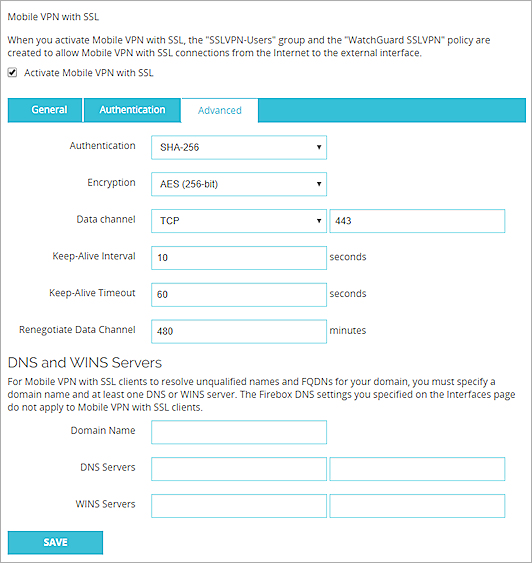
- Select the Advanced tab.
- Configure the advanced settings:
Authentication
Select an authentication method for the connection: SHA-1, SHA-256, or SHA-512. We recommend the SHA-2 variants, SHA-256 and SHA-512, which are stronger than SHA-1.
Encryption
Select an algorithm to encrypt the traffic: 3DES, AES (128-bit), AES (192-bit), or AES (256-bit). We recommend AES encryption. For the best performance, choose AES (128-bit). For the strongest encryption, choose AES (256-bit).
If you select 3DES, be aware of a potential, but unlikely, security attack. For more information, see Sweet32 Vulnerability in the WatchGuard Knowledge Base.
Data channel
Select the protocol and port Mobile VPN with SSL uses to send data after a VPN connection is established. You can use the TCP or UDP protocol. Then, select a port. The default protocol and port for Mobile VPN with SSL is TCP port 443. This is also the standard protocol and port for HTTPS traffic. You can use port 443 for Mobile VPN with SSL as long as the you do not use the same external IP address in an incoming HTTPS policy.
If you change the data channel to use a port other than 443, users must manually type this port in the Mobile VPN with SSL connection dialog box. For example, if you change the data channel to 444, and the Firebox IP address is 203.0.113.2, the user must type 203.0.113.2:444 instead of 203.0.113.2.
If the port is set to the default 443, the user must only type the IP address of the Firebox. It is not necessary to type :443 after the IP address.
For more information, see Choose the Port and Protocol for Mobile VPN with SSL.
Mobile VPN with SSL does not support a UDP data channel for VPN connections to a secondary external interface IP address.
Configuration channel
In Fireware v12.1 and higher, the Configuration Channel appears in the VPN Portal settings and is named the VPN Portal port. For more information about VPN Portal settings, see Configure the VPN Portal Settings.
In Fireware v12.0.1 and lower, select the protocol and port Mobile VPN with SSL uses to negotiate the data channel and to download configuration files. If you set the data channel protocol to TCP, the configuration channel automatically uses the same port and protocol. If you set the data channel protocol to UDP, you can set the configuration channel protocol to TCP or UDP, and you can use a different port than the data channel.
Keep-Alive Interval
Specify how often the Firebox sends traffic through the tunnel to keep the tunnel active when there is no other traffic sent through the tunnel.
Keep-Alive Timeout
Specify how long the Firebox waits for a response. If there is no response before the timeout value, the tunnel is closed and the client must reconnect.
Renegotiate Data Channel
If a Mobile VPN with SSL connection has been active for the amount of time specified in the Renegotiate Data Channel text box, the Mobile VPN with SSL client must create a new tunnel. The minimum value is 60 minutes.
DNS and WINS Servers
You can use DNS or WINS to resolve the IP addresses of resources that are protected by the Firebox. If you want the Mobile VPN with SSL clients to use a DNS or WINS server behind the Firebox instead of the servers assigned by the remote network they are connected to, type the domain name and IP addresses of the DNS and WINS servers on your network. For more information on DNS and WINS, see Name Resolution for Mobile VPN with SSL.
- Select VPN > Mobile VPN > SSL.
The Mobile VPN with SSL Configuration dialog box appears.
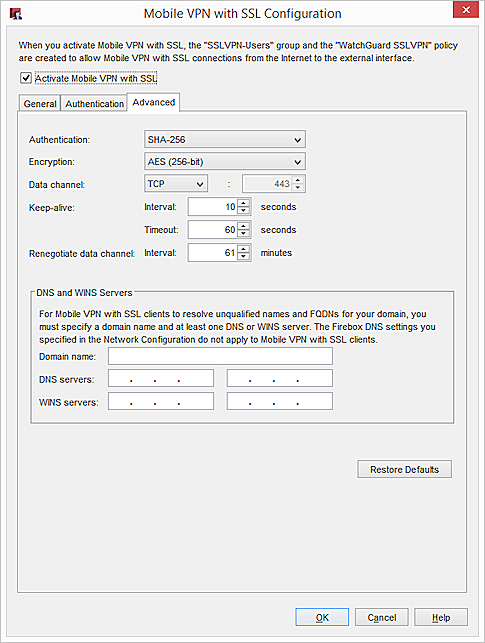
- Select the Advanced tab.
- Configure the advanced settings:
Authentication
Select an authentication method for the connection: SHA-1, SHA-256, and SHA-512. We recommend the SHA-2 variants, SHA-256 and SHA-512, which are stronger than SHA-1.
Encryption
Select an algorithm to encrypt the traffic: 3DES, AES (128-bit), AES (192-bit), or AES (256-bit). We recommend AES encryption. For the best performance, choose AES (128-bit). For the strongest encryption, choose AES (256-bit).
If you select 3DES, be aware of a potential, but unlikely, security attack. For more information, see Sweet32 Vulnerability in the WatchGuard Knowledge Base.
Data channel
Select the protocol and port Mobile VPN with SSL uses to send data after a VPN connection is established. You can use the TCP or UDP protocol. Then, select a port. The default protocol and port for Mobile VPN with SSL is TCP port 443. This is also the standard protocol and port for HTTPS traffic. You can use port 443 for Mobile VPN with SSL as long as the you do not use the same external IP address in an incoming HTTPS policy.
If you change the data channel to use a port other than 443, users must manually type this port in the Mobile VPN with SSL connection dialog box. For example, if you change the data channel to 444, and the Firebox IP address is 203.0.113.2, the user must type 203.0.113.2:444 instead of 203.0.113.2.
If the port is set to the default 443, the user must only type the IP address of the Firebox. It is not necessary to type :443 after the IP address.
For more information, see Choose the Port and Protocol for Mobile VPN with SSL.
Mobile VPN with SSL does not support a UDP data channel for VPN connections to a secondary external interface IP address.
Configuration channel
In Fireware v12.1 and higher, the Configuration Channel appears in the VPN Portal settings and is named the VPN Portal port. For more information about VPN Portal settings, see Configure the VPN Portal Settings.
In Fireware v12.0.1 and lower, select the protocol and port Mobile VPN with SSL uses to negotiate the data channel and to download configuration files. If you set the data channel protocol to TCP, the configuration channel automatically uses the same port and protocol. If you set the data channel protocol to UDP, you can set the configuration channel protocol to TCP or UDP, and you can use a different port than the data channel.
Keep-alive Interval
Specify how often the Firebox sends traffic through the tunnel to keep the tunnel active when there is no other traffic sent through the tunnel.
Keep-alive Timeout
Specify how long the Firebox waits for a response. If there is no response before the timeout value, the tunnel is closed and the client must reconnect.
Renegotiate Data Channel
If a Mobile VPN with SSL connection has been active for the amount of time specified in the Renegotiate Data Channel text box, the Mobile VPN with SSL client must create a new tunnel. The minimum value is 60 minutes.
DNS and WINS Servers
You can use DNS or WINS to resolve the IP addresses of resources that are protected by the Firebox. If you want the Mobile VPN with SSL clients to use a DNS or WINS server behind the Firebox instead of the servers assigned by the remote network they are connected to, type the domain name and IP addresses of the DNS and WINS servers on your network. For more information on DNS and WINS, see Name Resolution for Mobile VPN with SSL.
Restore Defaults
Click to reset the Advanced tab settings to their default values. All DNS and WINS server information on the Advanced tab is deleted.
Configure Policies to Control Mobile VPN with SSL Client Access
When you enable Mobile VPN with SSL, policies to allow Mobile VPN with SSL client access are automatically created. You can change these policies to control Mobile VPN with SSL client access.
WatchGuard SSLVPN
This SSLVPN policy allows connections from a Mobile VPN with SSL client to the Firebox. This policy allows traffic from any host on the specified interfaces to any configured primary or secondary interface IP address of your Firebox on TCP port 443, the port and protocol the Firebox uses for Mobile VPN with SSL.
- In Fireware v12.0.2 and lower, the WatchGuard SSLVPN policy includes the Any-External, Any-Optional, and Any-Trusted interfaces by default.
- In Fireware v12.1 and higher, the WatchGuard SSLVPN policy includes the WG-VPN-Portal alias which specifies only the Any-External interface by default.
For more information about how this policy changes when you upgrade to Fireware v12.1, see SSL/TLS Settings Precedence and Inheritance.
If you want this policy to allow TCP port 443 connections only to a specific interface IP address, edit the To section of the policy to remove the Firebox alias and add the external IP address that your Mobile VPN with SSL clients use to connect.
In Fireware v12.1 or higher, if you delete the WatchGuard SSLVPN policy and create a custom policy with a different name, Mobile VPN with SSL does not function if the Data Channel protocol is configured for TCP.
Allow SSLVPN-Users
This Any policy allows the groups and users you configure for SSL authentication to get access to resources on your network. This policy automatically includes all users and groups in your Mobile VPN with SSL configuration. It has no restrictions on the traffic that it allows from SSL clients to network resources protected by the Firebox.
To restrict VPN user traffic by port and protocol, you can disable or delete the Allow SSLVPN-Users policy. Then, add new policies to your configuration or add the group with Mobile VPN with SSL access to the From section of your existing policies.
All Mobile VPN with SSL traffic is untrusted by default. Even if you assign Mobile VPN with SSL users IP addresses on the same subnet as a trusted network, the traffic from the Mobile VPN with SSL user is not considered trusted. Regardless of assigned IP address, you must create policies to allow Mobile VPN with SSL users access to network resources.
WatchGuard Authentication
In Fireware v11.11.4 and lower, this WG-Auth policy allows users to authenticate with the Firebox on port 4100 to download the Mobile VPN with SSL client software. If the WatchGuard Authentication policy is not already included in your Firebox configuration, it is created automatically when you enable Mobile VPN with SSL. The WatchGuard Authentication policy must allow traffic from Any-External to the Firebox to enable users to connect to the Firebox from an external network.
For more information about this policy, see About the WatchGuard Authentication (WG-Auth) Policy.
In Fireware v11.12 and higher, this policy is not created automatically when you enable Mobile VPN with SSL. Users authenticate with the Firebox on port 443, or on a custom port that you specify, to download the Mobile VPN with SSL client software.
After you upgrade your Firebox to Fireware OS v11.12, if your configuration file includes a WatchGuard Authentication policy, the alias Any-External is automatically removed. If you upgrade with Policy Manager, to make sure the alias is not automatically added to the configuration again when you save the configuration to your Firebox, you must manually reload the configuration from the Firebox after the upgrade completes. The alias Any-External is automatically removed from the WatchGuard Authentication policy, whether you manually added the alias, or whether Mobile VPN with SSL is enabled.
Allow Mobile VPN with SSL Users to Access a Trusted Network
In this example, you add an Any policy that allows members in the SSLVPN-Users group to get full access to resources on all trusted networks.
- Select Firewall > Firewall Policies.
The Policies page appears. - Click Add Policy.
- From the Packet Filter drop-down list, select Any.
- In the Name text box, type a descriptive name for the policy.
- Click Add Policy.
- On the Settings tab, in the From section, select Any-Trusted and click Remove.
- In the From section, click Add.
The Add Member dialog box appears. - From the Member Type drop-down list, select SSLVPN Group.
- Select SSLVPN-Users.
- To close the Add Member dialog box, click OK.
- In the To section, select Any-External. Click Remove.
- In the To section, click Add.
The Add Member dialog box appears. - From the member list, select Any-Trusted.
- Click OK.
- Click Save.
- Click
 .
.
Or, select Edit > Add Policies.
The Add Policies dialog box appears. - Expand the Packet Filters folder.
A list of templates for packet filters appears. - Select Any.
- Click Add.
The New Policy Properties dialog box opens. - In the Name text box, type a descriptive name for the policy.
- On the Policy tab, in the From section, select Any-Trusted. Click Remove.
- In the From section, click Add.
The Add Address dialog box appears. - Click Add User.
- From the two Type drop-down lists, select SSL VPN for the first and Group for the second.
- Select SSLVPN-Users and click Select.
After SSLVPN-Users is the name of the authentication method in parenthesis. - To close the Add Address dialog box, click OK.
- In the To section, select Any-External and click Remove.
- In the To section, click Add.
The Add Address dialog box appears. - From the Available Members list, select Any-Trusted and click Add.
- Click OK twice. Click Close.
- Save the changes to the Firebox.
For more information on policies, see Add Policies to Your Configuration.
Use Other Groups or Users in a Mobile VPN with SSL Policy
To make a Mobile VPN with SSL connection, users must be members of the SSLVPN-Users group or any group you added to the Mobile VPN with SSL configuration. You can use policies with other groups to restrict access to resources after the user connects. If you added groups from a third-party authentication server in your Mobile VPN with SSL configuration, and you want to use those group names in policies to restrict access, you must also add those groups to the Users and Groups list in the Firebox configuration.
- Select Authentication > Users and Groups.
- Add users and groups as described in Use Users and Groups in Policies.
After you add users or groups from the Mobile VPN with SSL configuration to the Users and Groups list, you can edit the automatically generated Allow SSLVPN-Users policy to apply to a specific group or user.
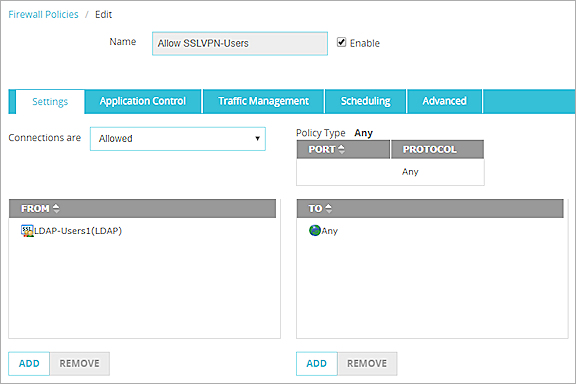
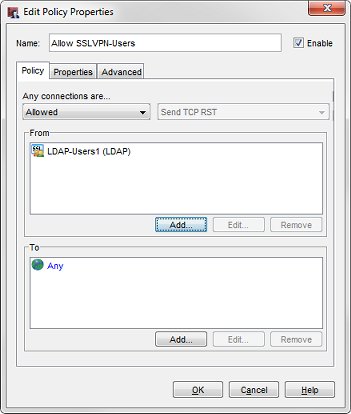
In this example, we modify the Allow SSLVPN-Users policy to apply to only the user group LDAP-Users1:
- Select Authentication > Users and Groups.
- Add the LDAP-Users1 group that you added to the Mobile VPN with SSL configuration.
Make sure to set the Auth Server to LDAP. - Edit the Allow SSLVPN-Users policy.
- In the From section, remove the SSLVPN-Users group.
- In the From section, click Add.
The Add Member dialog box appears. - From the Member Type drop-down list, select SSLVPN Group.
A list of groups appears. - Select the LDAP-Users1 group. Click OK.
The LDAP-Users1 group appears in the From list. - Click OK.
The Allow SSLVPN-Users policy now applies only to the LDAP-Users1 group.
- Select Setup > Authentication > Users and Groups.
- Add users and groups, as described in Use Users and Groups in Policies.
After you add users or groups from the Mobile VPN with SSL configuration to the Users and Groups list, you can edit the automatically generated Allow SSLVPN-Users policy to apply to a specific group or user.
In this example, we modify the Allow SSLVPN-Users policy to apply to only the user group LDAP-Users1:
- Select Setup > Authentication > Users and Groups.
- Add the LDAP-Users1 group that you added to the Mobile VPN with SSL configuration.
Make sure you set the Auth Server to LDAP. - Edit the Allow SSLVPN-Users policy.
- In the From section, remove the SSLVPN-Users group.
- In the From section, click Add.
The Add Address dialog box appears. - Select Add Other.
The Add Member dialog box appears.
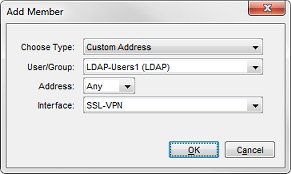
- From the Choose Type drop-down list, select Custom Address.
- From the User/Group drop-down list, select the LDAP-Users1 group. Click OK.
The LDAP-Users1 group appears in the Selected Members and Addresses list. - Click OK.
The Allow SSLVPN-Users policy now applies only to the LDAP-Users1 group.
See Also
Install and Connect the Mobile VPN with SSL Client
Uninstall the Mobile VPN with SSL Client
Video tutorial — Mobile VPN with SSL