
Related Topics
Configure 1-to-1 NAT Through a Branch Office VPN Tunnel
When you create a Branch Office VPN (BOVPN) tunnel between two networks that use the same private IP address range, an IP address conflict occurs. To create a tunnel without this conflict, both networks must apply 1-to-1 NAT to the VPN. 1-to-1 NAT makes the IP addresses on your computers appear to be different from their true IP addresses when traffic goes through the VPN.
1-to-1 NAT creates a map from one or more IP addresses in one range to a second IP address range of the same size. Each IP address in the first range corresponds to an IP address in the second range. In this topic, we refer to the first range as the real IP addresses and to the second range as the masqueraded IP addresses. For more information on 1-to-1 NAT, see About 1-to-1 NAT.
1-to-1 NAT and VPNs
When you use 1-to-1 NAT through a BOVPN tunnel:
- When a computer in your network sends traffic to a computer at the remote network, the Firebox changes the source IP address of the traffic to an IP address in the masqueraded IP address range. The remote network sees the masqueraded IP addresses as the source of the traffic.
- When a computer at the remote network sends traffic to a computer at your network through the VPN, the remote office sends the traffic to the masqueraded IP address range. The Firebox changes the destination IP address to the correct address in the real IP address range and then sends the traffic to the correct destination.
1-to-1 NAT through a VPN affects only the traffic through that VPN. The rules you see when you select Network > NAT do not affect traffic through a VPN.
Other Reasons to Use 1-to-1 NAT Through a VPN
You can also use 1-to-1 NAT through a VPN if the network you want to make a VPN connection to already has a VPN to a network that has the same private IP addresses you use in your network. An IPSec device cannot send traffic to two different remote networks when the two networks have the same private IP addresses. You use 1-to-1 NAT through the VPN to enable the computers in your network to appear to have different (masqueraded) IP addresses. However, unlike the situation described at the start of this topic, you have to use NAT only on your end of the VPN, instead of on both ends.
A similar situation exists when two remote offices have the same private IP addresses, and both remote offices want to make a VPN to your Firebox. In this case, one of the remote offices must use NAT through the VPN to your Firebox to resolve the IP address conflict.
Alternative to NAT
If your office uses a common private IP address range (for example, 192.168.0.x or 192.168.1.x), it is very likely that you will have a problem with IP address conflicts in the future. These IP address ranges are often used by broadband routers or other electronic devices in homes and small offices. We recommend that you change to a less common private IP address range (for example, 10.x.x.x or 172.16.x.x).
How to Set Up the VPN
These steps and the example apply to a branch office VPN that is not configured as a BOVPN virtual interface. For a BOVPN virtual interface, you configure 1-to-1 NAT as you would for a physical interface. For more information, see Configure Firewall 1-to-1 NAT.
- Select a range of IP addresses that your computers show as the source IP addresses when traffic comes from your network and goes to the remote network through the BOVPN. Make sure to consult with the network administrator for the other network to select a range of IP addresses that are not in use.
Do not use any of the IP addresses from:- The trusted, optional, or external network connected to your Firebox
- A secondary network connected to a trusted, optional, or external interface of your Firebox
- A routed network configured in your Firebox policy (Network > Routes)
- Networks to which you already have a BOVPN tunnel
- Mobile VPN virtual IP address pools
- Networks that the remote IPSec device can reach through its interfaces, network routes, or VPN routes
- Configure Manual BOVPN Gateways for the local and remote Fireboxes.
- Configure Manual BOVPN Tunnels.
In the Tunnel Route Settings dialog box for each Firebox, select the 1:1 NAT check box and type its masqueraded IP address range in the adjacent text box.
The number of IP addresses in this text box must be exactly the same as the number of IP addresses in the Local text box at the top of the dialog box. For example, if you use slash notation to specify a subnet, the value after the slash must be the same in both text boxes. For more information, see About Slash Notation.
You do not have to define any parameters in the Network > NAT settings. These settings do not affect VPN traffic.
Example
Suppose two companies, Site A and Site B, want to set up a Branch Office VPN between their trusted networks. Both companies use a WatchGuard Firebox with Fireware. Both companies use the same IP addresses for their trusted networks, 192.168.1.0/24. Both Fireboxes use 1-to-1 NAT through the VPN. Site A sends traffic to the masqueraded range at Site B and the traffic goes outside the local subnet of Site A. Also, Site B sends traffic to the masqueraded range that Site A uses. This solution solves the IP address conflict at both networks. The two companies agree that:
- The Site A trusted network is configured to appear to come from the 192.168.100.0/24 range when traffic goes through the VPN. This is the masqueraded IP address range of Site A for this VPN.
- The Site B trusted network is configured to appear to come from the 192.168.200.0/24 range when traffic goes through the VPN. This is the masqueraded IP address range of Site B for this VPN.
Make sure to configure your internal DNS servers to correctly resolve host names for network resources located at the remote site. For example, you might have an intranet.example.com web server located at Site A. With the IP addresses in our example, if a user at Site A goes to http://intranet.example.com, your DNS server resolves the domain name to 192.168.1.80. If a user at Site B goes to http://intranet.example.com, your DNS server must resolve the domain name to 192.168.200.80, which is the masqueraded IP address given by NAT.
Define a Branch Office Gateway on Each Device
First, you must add a gateway that identifies the remote IPSec device. When you add the gateway, it appears in the list of gateways.
To see the list of gateways from Policy Manager, select VPN > Branch Office Gateways.

To see the list of gateways, from Fireware Web UI, select VPN > Branch Office VPN.

Configure the Tunnel at Site A
Configure the local tunnel on the Site A Firebox to use 1-to-1NAT so that traffic from the Site A trusted network appears to come from the 192.168.100.0/24 range when it goes through the VPN to Site B.
- Select VPN > Branch Office VPN.
The Branch Office VPN page appears.
- In the Tunnel section of the BOVPN page, click Add.
The Tunnel settings page appears.
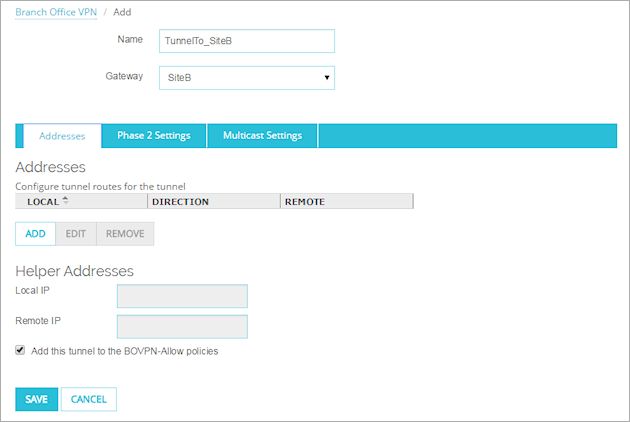
- Type a descriptive name for the tunnel.
For this example, the Name is TunnelTo_SiteB. - From the Gateway drop-down list, select the gateway for the IPSec device of the remote office.
For this example, the Gateway is SiteB. - Select the Phase 2 Settings tab.
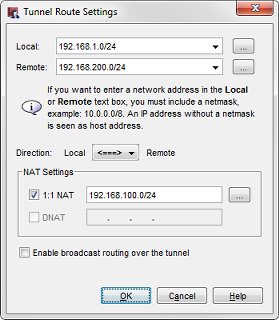
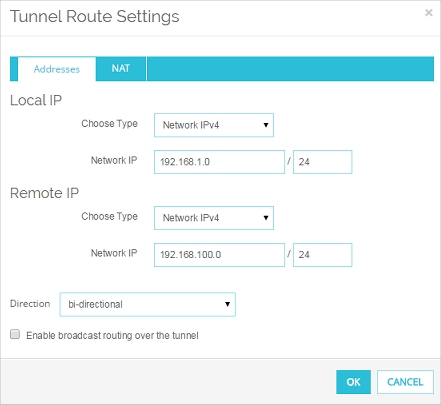
Make sure the Phase 2 settings are the same settings the remote office specifies for Phase 2. - Select the Addresses tab. Click Add and specify the local-remote pair.
The Tunnel Route Settings dialog box appears.
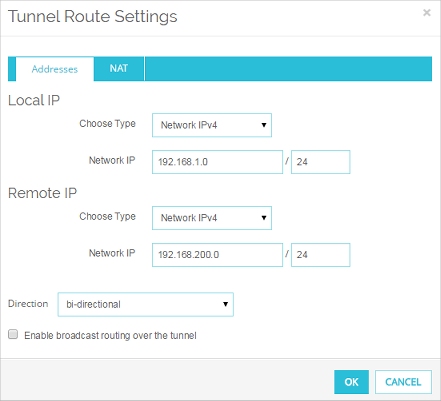
- In the Local IP section, from the Choose Type drop-down list, select Network IPv4.
In the Network IP text box, type the real IP address range of the local computers that use this VPN.
For this example, the real IP address range is 192.168.1.0/24. - In the Remote IP section, from the Choose Type drop-down list, select Network IPv4.
In the Network IP text box, type the private IP address range that the local computers send traffic to.
For this example, the private address range is 192.168.200.0/24.
In this example, the remote office Site B uses 1-to-1 NAT through its VPN. This makes the computers at Site B appear to come from the masqueraded range for Site B, 192.168.200.0/24. The local computers at Site A send traffic to the masqueraded IP address range for Site B. If the remote network does not use NAT through the VPN, type the real IP address range in the Remote text box.
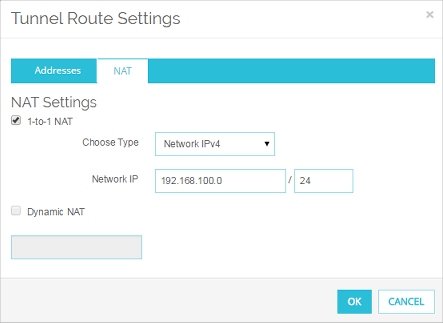
- Select the NAT tab.
- Select the 1:1 NAT check box and type the masqueraded IP address range for this office.
This is the range of IP addresses that the computers protected by this Firebox show as the source IP address when traffic comes from this Firebox and goes to the other end of the VPN.
For this example, the masqueraded IP address range for Site A is192.168.100.0/24.
The 1:1 NAT check box is available after you type a valid host IP address, a valid network IP address, or a valid host IP address range in the Local text box on the Addresses tab.
- Click OK.
The new tunnel is added to the BOVPN-Allow.out and BOVPN-Allow.in policies.
- Select VPN > Branch Office Tunnels.
The Branch Office IPSec Tunnels dialog box appears.

- Click Add.
The New Tunnel dialog box appears.
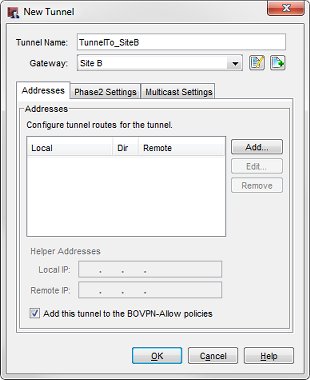
- Type a descriptive name for the tunnel.
For this example, the Name is TunnelTo_SiteB. - From the Gateway drop-down list, select the gateway that points to the IPSec device of the remote office.
For this example, the Gateway is SiteB. - Select the Phase 2 Settings tab.
Make sure the Phase 2 settings are the same settings the remote office specifies for Phase 2. - Select the Addresses tab. Click Add and specify the local-remote pair.
The Tunnel Route Settings dialog box appears. - In the Local text box, type the real IP address range of the local computers that use this VPN.
For this example, the real IP address range is 192.168.1.0/24. - In the Remote text box, type the private IP address range that the local computers send traffic to.
For this example, the private IP address range is 192.168.200.0/24.
In this example, the remote office Site B uses 1-to-1 NAT through its VPN. This makes the computers at Site B appear to come from the masqueraded range for Site B, 192.168.200.0/24. The local computers at Site A send traffic to the masqueraded IP address range for Site B. If the remote network does not use NAT through the VPN, type the real IP address range in the Remote text box.
- Select the 1:1 NAT check box and type the masqueraded IP address range for this office.
This is the range of IP addresses that the computers protected by this Firebox show as the source IP address when traffic comes from this Firebox and goes to the other end of the VPN.
For this example, the masqueraded IP address range for Site A is192.168.100.0/24.
The 1:1 NAT check box is available after you type a valid host IP address, a valid network IP address, or a valid host IP address range in the Local text box.
- Click OK.
The new tunnel is added to the BOVPN-Allow.out and BOVPN-Allow.in policies.
If 1-to-1 NAT must only be configured on one side of the VPN, you do not have to complete the next procedures. The VPN on the Firebox at the other end of the tunnel must be configured to accept traffic from your masqueraded IP address range.
Configure the Tunnel at Site B
To set up 1-to-1 NAT from Site B to Site A, configure the tunnel route on the Site B device to use 1-to-1 NAT. With this configuration, traffic from the Site B trusted network appears to come from the 192.168.200.0/24 address range when it goes through the VPN to Site A.
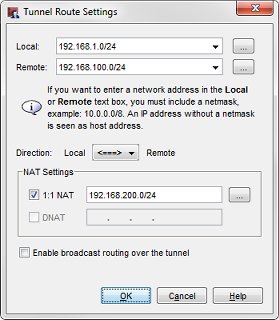
- Follow Steps 1–6 in the previous procedure and add the tunnel on the remote Firebox. Make sure the Phase 2 settings are the same.
- In the Local IP section, from the Choose Type drop-down list, select Network IP.
In the Network IP text box, type the real IP address range of the local computers that use this VPN.
For this example, the real IP address range is 192.168.1.0/24. - In the Remote IP section, from the Choose Type drop-down list, select Network IP.
In the Network IP text box, type the private IP address range that the computers at the remote office send traffic to.
In this example, the Site A VPN has 1-to-1 NAT configured. This makes the computers at Site A appear to come from the masqueraded range, 192.168.100.0/24. The local computers at Site B send traffic to the masqueraded IP address range of Site A.
- Select the NAT tab.
- Select the 1:1 NAT check box and type the masqueraded IP address range for this office.
This is the range of IP addresses that the computers protected by this Firebox show as the source IP address when traffic comes from this Firebox and goes to the other end of the VPN.
For this example, the masqueraded IP address range for Site B is 192.168.200.0/24.

- Click OK.
The new tunnel is added to the BOVPN-Allow.out and BOVPN-Allow.in policies.
- Follow Steps 1–6 in the previous procedure and add the tunnel on the remote Firebox. Make sure the Phase 2 settings are the same.
- In the Local text box, type the real IP address range of the local computers that use this VPN.
For this example, the real IP address range is 192.168.1.0/24. - In the Remote text box, type the private IP address range that the computers at the remote office send traffic to.
In this example, the Site A VPN has 1-to-1 NAT configured. This makes the computers at Site A appear to come from the masqueraded range, 192.168.100.0/24. The local computers at Site B send traffic to the masqueraded IP address range of Site A. - Select the 1:1 NAT check box and type the masqueraded IP address range for this office.
This is the range of IP addresses that the computers protected by this Firebox show as the source IP address when traffic comes from this Firebox and goes to the other end of the VPN.
For this example, the masqueraded IP address range for Site B is 192.168.200.0/24.
- Click OK.
The new tunnel is added to the BOVPN-Allow.out and BOVPN-Allow.in policies.