Applies To: WatchGuard Cloud-managed Access Points (AP130, AP330, AP332CR, AP430CR, AP432)
Some of the features described in this topic are only available to participants in the WatchGuard Cloud Beta program. If a feature described in this topic is not available in your version of WatchGuard Cloud, it is a beta-only feature.
A captive portal is a web page that you redirect clients to when they connect to an SSID on your wireless network. The captive portal web page is called a splash page.
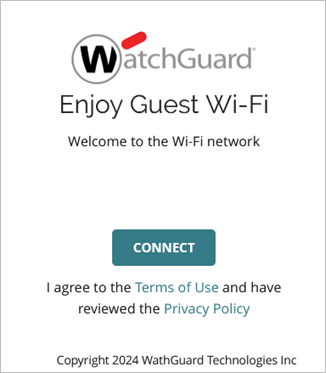
With a captive portal you can restrict Internet-only connectivity for guest wireless clients. You can also enforce policies so that wireless clients can access the Internet only after they review and accept the Terms of Use and Privacy Policy, or provide user details in a web form on the captive portal splash page.
A Guest Analytics report is available with a WatchGuard USP Wi-Fi Management license. The report shows details about the users that connect to a guest Wi-Fi network, including any web form data from a WatchGuard Cloud hosted captive portal. For more information, go to Access Point Guest Analytics Report.
Captive Portal Types
You can add these two types of captive portal:
- WatchGuard Cloud hosted — The captive portal and splash pages are hosted within WatchGuard Cloud. You can create up to 30 unique splash pages that you can use with multiple wireless SSIDs, and you can customize the images and text for each splash page.
- Third-Party hosted — Integrate with a third-party captive portal provider to host your captive portal splash pages. Currently, this feature supports integration with Purple Wi-Fi and Skyfii.
If your captive portal splash page or third-party hosted provider requires RADIUS authentication, make sure you configure your RADIUS servers and add an Authentication Domain before you configure your captive portal. For more information, go to Access Point Authentication Domains.
Add a Captive Portal
To add a captive portal to an SSID, you must enable the Captive Portal option in an Access Point Site.
- Select Configure > Access Point Sites.
The Access Point Sites page opens.
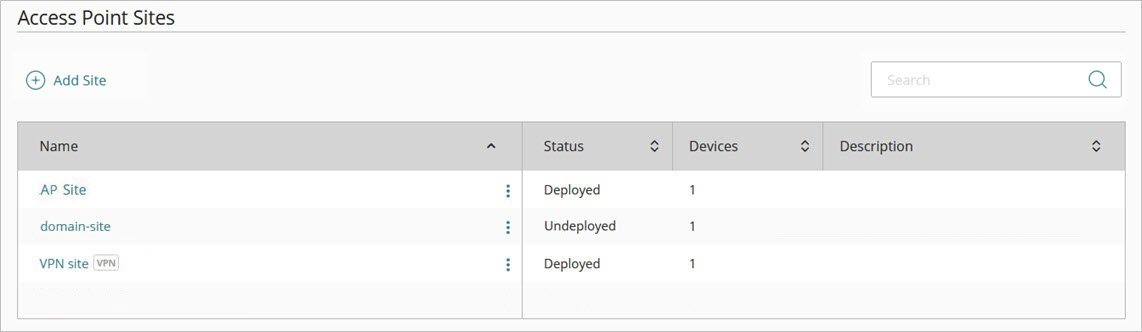
- Edit an existing site, or click Add Site to add a new site.
The Configuration Details page opens.
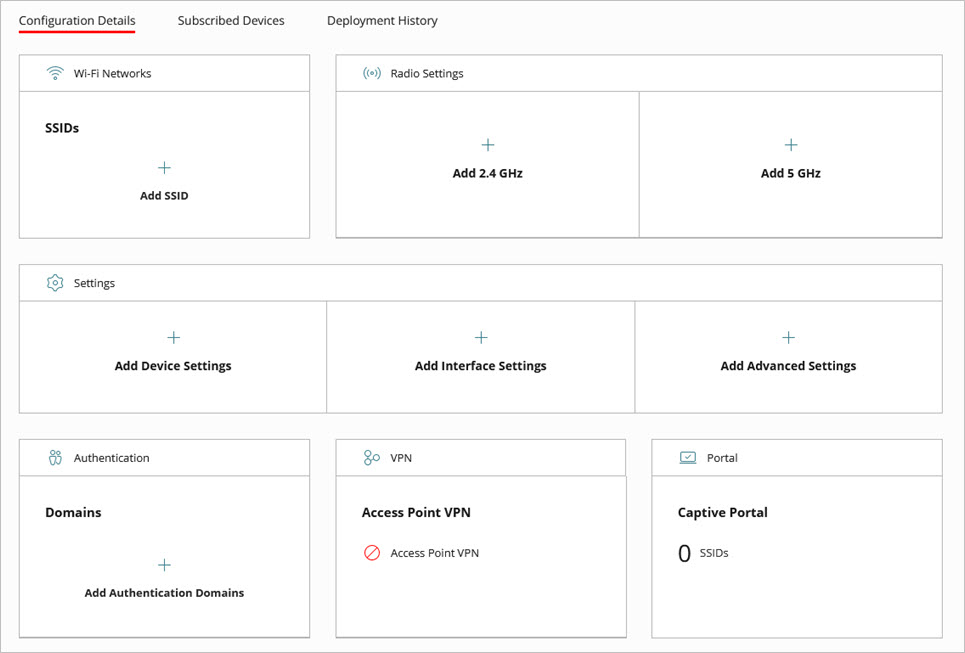
- Click Add SSID to add an wireless network to the site that will use the captive portal.

Configure these basic SSID settings:
- SSID Name — Type the SSID name. This is the name for this wireless network that appears to wireless clients.
- Broadcast SSID — Use the default settings to broadcast the SSID name to wireless clients.
- SSID Type — Select a Private or Guest wireless network. If you select Guest, this also enables client isolation in the advanced SSID settings to prevent direct communication between guest wireless clients.
- Radio — Select the access point radios that will broadcast this SSID. For example, use the default setting of 2.4 GHz and 5 GHz to broadcast on both radios.
- Security — Select the type of security for this SSID. If you want to secure the network, use at least WPA2 Personal or higher security. Many public hotspots use Open, so you do not have to provide a passphrase, but this also allows unauthorized users access to the network. OWE (Opportunistic Wireless Encryption, also known as Enhanced Open) is also available for 802.11ax devices. OWE enables you to create an open network that can encrypt data to provide data privacy without authentication. However, both the access point and client must support OWE. If you use Enterprise authentication, make sure you configure your RADIUS servers and Authentication Domains before you configure your captive portal. For more information, go to Configure RADIUS Authentication for an Access Point.
After you complete the SSID configuration, return to the site configuration settings.
- From the Access Point Site settings page, click Captive Portal.
The Captive Portal settings page opens.
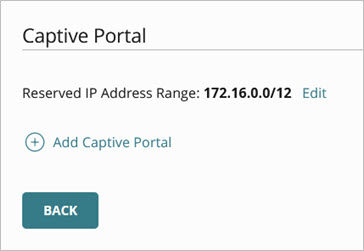
The portal uses an internal Reserved IP Address Range that replaces the NAT settings of the SSID you selected when the wireless client connects to the portal. Select a recommended IP address range (172.16.0.0/12 or 10.0.0.0/8) that is not currently in use by the NAT settings of the SSID or any other network. WatchGuard Cloud determines these recommended reserved IP addresses based on the NAT network settings of SSIDs configured in the site. You must also consider the network where the access point is deployed and any SSIDs created in the device configuration. If your access point receives IP address settings from DHCP, make sure that the DHCP address does not conflict with the reserved IP address range selected for captive portal internal use. If you use RADIUS authentication with Enterprise security, make sure that the RADIUS server address does not conflict with the reserved IP address range selected for captive portal internal use.
- Click Add Captive Portal.
The Add Captive Portal page opens.
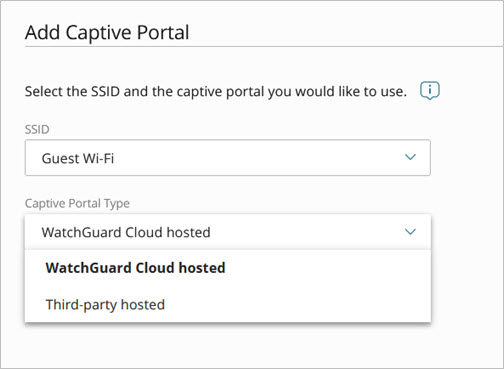
- From the SSID drop-down list, select an SSID to use with the captive portal.
Wireless clients that connect to this SSID are redirected to the captive portal splash page.You cannot configure a captive portal for an SSID if the SSID is already configured for an Access Point VPN with a Firebox, Network Access Enforcement, or Dynamic VLANs.
- From the Captive Portal Type drop-down list, select WatchGuard Cloud hosted or Third-party hosted.
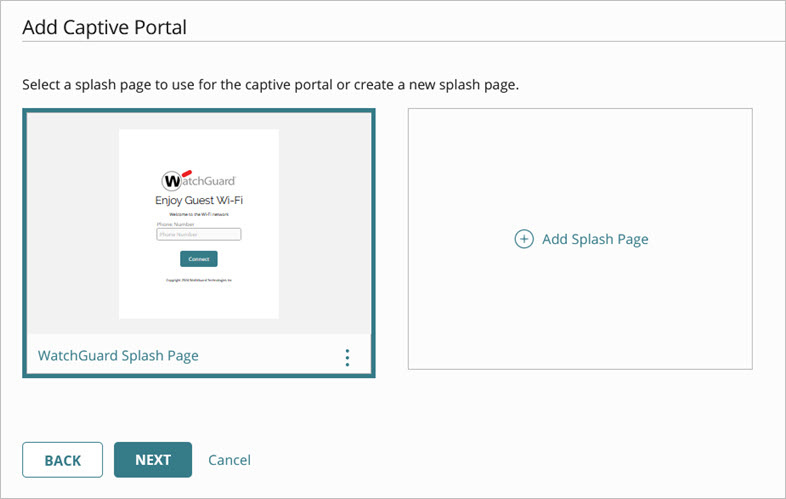
- If you selected WatchGuard Cloud hosted, select a splash page to use with the captive portal, or create a new splash page. For more information on how to create a splash page, go to Add Splash Pages for a Captive Portal.
- If you selected Third-party hosted, configure these settings to integrate with your third-party hosted captive portal provider:
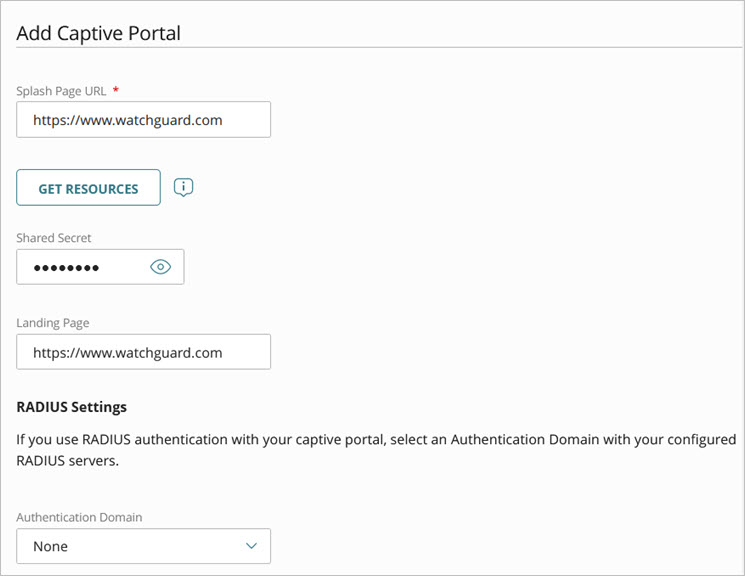
- Splash Page URL — Type the URL for the third-party captive portal. View the instructions provided by your third-party captive portal provider for the correct URL.
- Get Resources — Click Get Resources to scan the splash page URL for the resource domains required for the splash page to display correctly. You can select the specific resources to add to your Walled Garden settings. A Walled Garden is a list of domains that wireless clients can access before they connect through the portal splash page.
- Shared Secret— If required by your third-party captive portal provider, type a shared secret for secure communication between the access point and the third-party provider. This shared secret must match the value in the third-party captive portal configuration.
- Landing Page URL — Type the URL of the website to which the user is redirected after they successfully connect through the splash page.
The third-party hosted captive portal provider might override the Landing Page URL with its own configuration settings.
- In the RADIUS Settings section, from the Authentication Domain drop-down list, select an authentication domain with your configured RADIUS servers if you use RADIUS authentication with your third-party hosted captive portal.
Select None if RADIUS authentication is not required by your third-party captive portal provider.The third-party hosted captive portal provider might override the RADIUS accounting interim update interval settings with its own configuration settings.
- Configure these advanced captive portal settings:
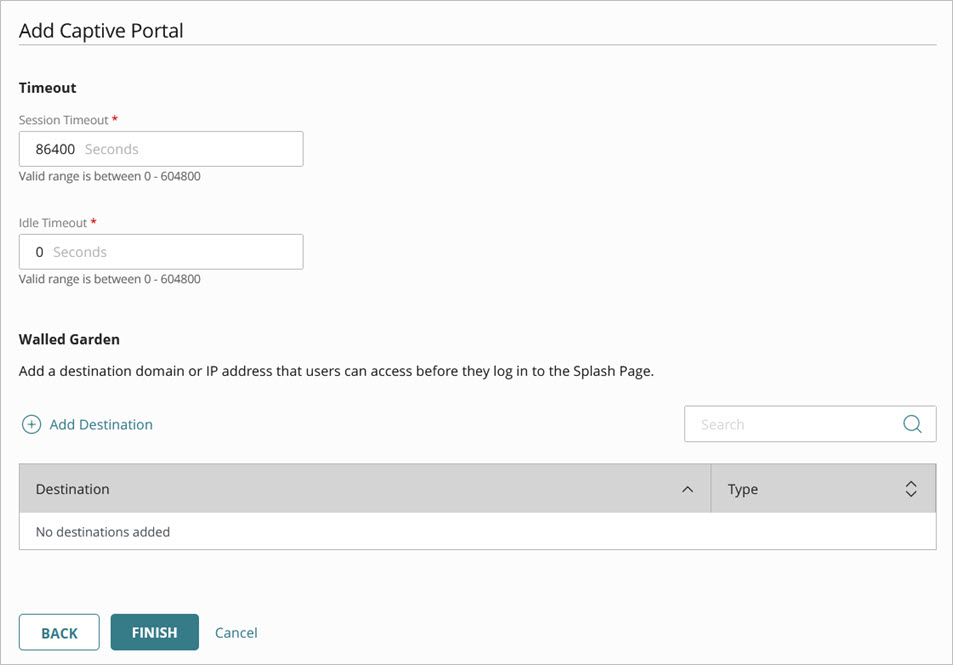
- Session Timeout — Type the time, in seconds, after which the wireless client's captive portal session expires and the client must re-authenticate to the portal splash page. You can enter a value between 0 and 604,800 seconds (7 days). The default is 86,400 seconds (24 hours).
The third-party hosted captive portal provider might override the session timeout settings with its own configuration settings.
When wireless clients authenticate to a captive portal from an access point, and then roam to a different access point, the client does not need to re-authenticate to the captive portal on the new access point unless the captive portal session time has expired. The access points must have the same site configuration to enable captive portal clients to roam without re-authentication.
- Idle Timeout — Type the time, in seconds, after which a wireless client disconnects and must re-authenticate to a captive portal session through the portal splash page. If the client re-establishes a connection before the idle timeout value, the client does not have to re-authenticate with the portal. You can enter a value between 0 and 604,800 seconds (7 days). The default is 0 which means a client will never have to re-authenticate unless the access point or captive portal service is restarted.
The third-party hosted captive portal provider might override the idle timeout settings with its own configuration settings.
- Walled Garden — A Walled Garden is a list of domains and IP addresses that wireless clients can access before they connect through the portal splash page. Add any resources required for the splash page to display correctly, such as images required by the page. Consider adding your company and support websites for users to access help before they connect to your network through the splash page.
Click Add Destination to add a domain name or IP address.
For a third-party hosted captive portal, you can also click Get Resources to scan the Splash Page URL for entries to add to your Walled Garden list.
You can add a maximum of 50 Walled Garden entries.The Walled Garden list does not support wildcards. For example, you cannot specify a domain such as *.watchguard.com.
The Walled Garden already includes default internal domains for branding images from WatchGuard Cloud and fonts from fonts.googleapis.com and fonts.gstatic.com.
- Click Save.
Configure Access Point SSID Settings