Applies To: Cloud-managed Fireboxes
Overview
A policy schedule is a set of times when a firewall policy is active or inactive. You can apply a schedule to more than one policy if you want those policies to be active at the same times. For example, a school might want to give students access to gaming or social media sites only after the school day ends. They can configure and apply schedules so that more restrictive policies are active during the school day and more relaxed policies are active after school hours.
You configure a schedule on the Schedules page in the cloud-managed Firebox configuration or in a Firebox template, then apply the schedule to at least one firewall policy. This workflow enables you to manage schedules in a central location, rather than make changes in each individual firewall policy. For example, if you have multiple policies aligned to the hours of operation at your organization and then the hours of operation change, you only have to update the schedule in one place. You can view the schedule in the firewall policy, but if you want to make changes to the schedule, you make the changes on the Schedules page. For more information about how to manage schedules, go to Configure Schedules for a Cloud-Managed Firebox.
By default, firewall policies are always active. Firewall policies use the default Always On schedule unless you apply a different schedule.
Your operator role determines what you can see and do in WatchGuard Cloud. Your role must have the Devices permission to view or configure this feature. For more information, go to Manage WatchGuard Cloud Operators and Roles.
Configure a Schedule
Before you can apply a schedule to a policy, you must configure the schedule.
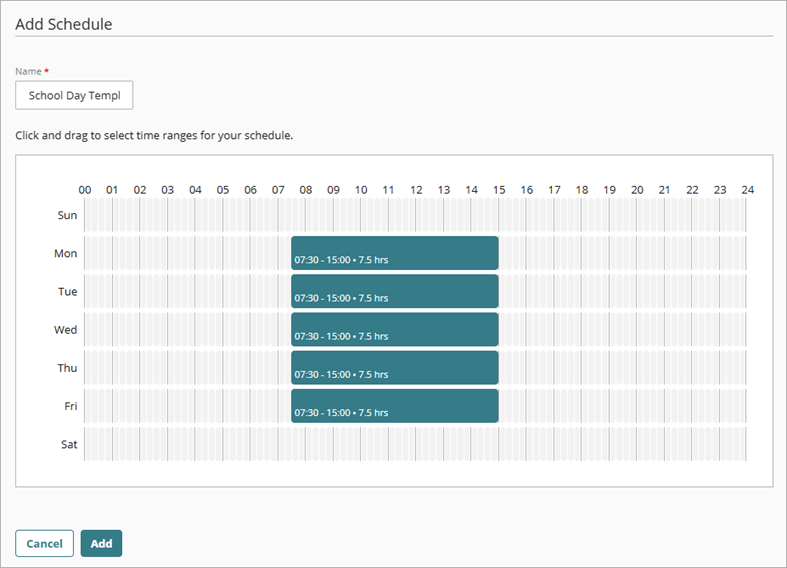
To build a schedule, you use the calendar tool in the Schedules widget. The calendar tool has a row for each day of the week. Each row spans 24 hours and you can click and drag within each row to create as many time slots as you want for that day. You can increase and decrease time slots by 15 minute increments.
To add a schedule for a cloud-managed Firebox:
- In WatchGuard Cloud, select Configure > Devices.
- Select the cloud-managed Firebox.
- Click Device Configuration.
- Click the Schedules widget.
The Schedules page opens.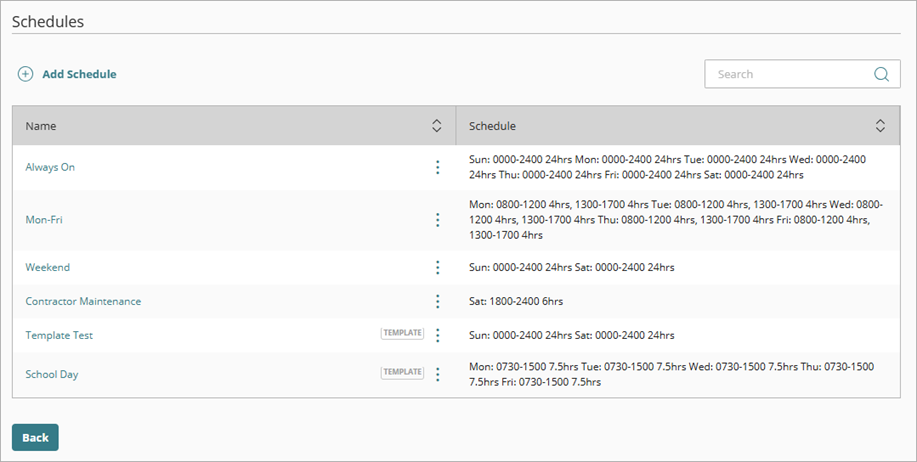
- Click Add Schedule.
- In the Name text box, enter a unique, descriptive name for the schedule.
- In the calendar, click and drag to select the time ranges you want to include in the schedule.
- Click Add.
The schedule is saved and added to the list on the Schedules page.
The schedule is based on the time zone configured for the Firebox. Make sure that the dates and times you select correspond to the local time of the Firebox. For information about the Firebox time zone configuration, go to Configure System Settings for a Cloud-Managed Firebox.
The schedule has no effect until you apply it to a policy. For more information, go to Configure a Schedule for a Firewall Policy in WatchGuard Cloud.
Apply a Schedule to a Firewall Policy
To apply a schedule to a cloud-managed Firebox policy:
- In WatchGuard Cloud, add or edit a firewall policy. For more information, go to Configure Firewall Policies in WatchGuard Cloud.
- In the policy configuration, select the Advanced tab.
- From the Schedule drop-down list, select the schedule you want to apply to the policy.
- To view the details of the schedule, click View Schedule.

- To save the policy, click Save.
Configure Advanced Firewall Policy Settings for a Cloud-Managed Firebox