Applies To: AuthPoint Multi-Factor Authentication, AuthPoint Total Identity Security
Time schedule policy objects enable you to specify the dates and times when authentication policies apply to user authentications. You might configure a time schedule policy object if you want to:
- Allow authentication only during specified times, such as work hours.
- Restrict authentication during specific times, such as non-work hours and holidays.
- Enforce different authentication requirements at different times.
- Use a safe network location to allow users to bypass MFA when they authenticate from the office, but only during specified times, such as work hours.
When you add a time schedule to an authentication policy, the policy only applies when a user authenticates during the specified time schedule. Users who only have a policy that includes a time schedule cannot get access to the resource when they authenticate outside the hours of that time schedule (because they do not have a policy that applies, not because authentication is denied).
When you configure a policy that includes a time schedule, we recommend that you create a second policy without the time schedule for the same groups and resources. The second policy applies to the user authentications that happen outside of the specified time schedule. Make sure the policy with the time schedule has a higher priority than the policy without the time schedule. For more information, see About Policy Precedence.
Configure a Time Schedule
To configure a time schedule policy object, in the AuthPoint management UI:
- From the AuthPoint navigation menu, select Policy Objects.
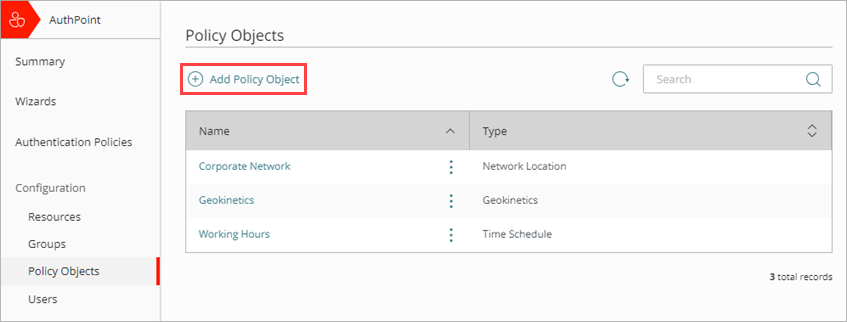
- Click Add Policy Object.
The Add Policy Object page appears.
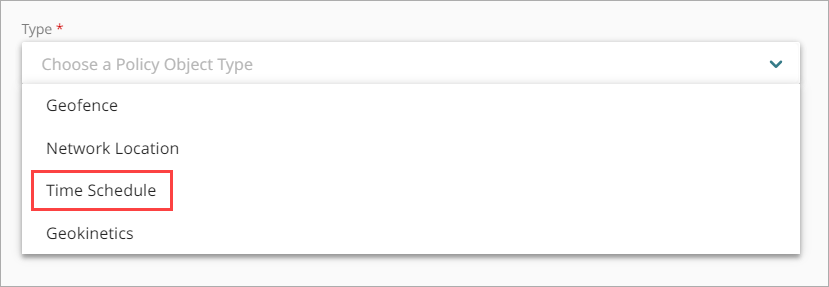
- From the Type drop-down list, select Time Schedule.
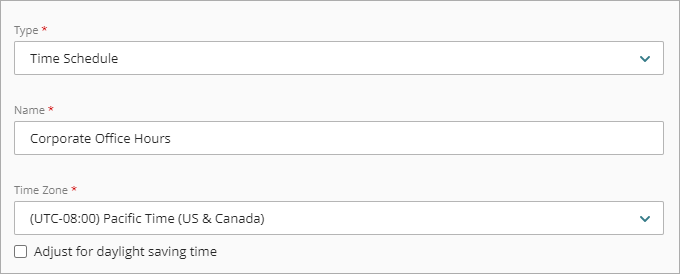
Additional fields appear. - In the Name text box, type a name for this time schedule policy object. This helps you identify the time schedule when you add it to authentication policies.
- From the Time Zone drop-down list, select the time zone that you want to use for this time schedule.
- If you want to adjust the selected time zone for daylight saving time, select the Adjust for daylight saving time check box. When you select this option, the time policy immediately adjusts the selected time zone by plus one hour. For example, a time schedule with the time zone set to Pacific Standard Time, which is UTC -8 hours, immediately adjusts to UTC -7 hours (-8 hours + 1 hour).
AuthPoint does not dynamically adjust for daylight saving time. You must select the Adjust for daylight saving time check box when daylight saving time applies, and clear the check box when daylight saving time does not apply.
- Select an option to specify whether you want to add specific days of the week or a specific date to this time schedule.
- Days of the week — To add specific days of the week to the time schedule, select this option and select the days to include.
- Dates — To add a specific date to the time schedule, select this option and use the Date field to select the date. You can add only one date at a time.
You can add only one option at a time. To add multiple sets of weekdays and one or more dates to the same time schedule, you must add them separately.
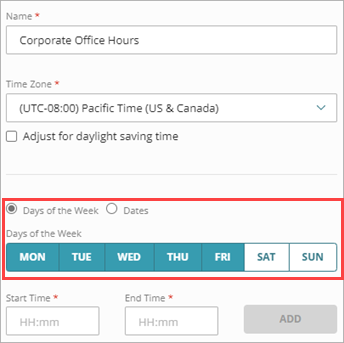
- Enter the Start Time and End Time for when you want the time schedule to apply on the selected days or date. These values must be between 00:00 and 23:59, and the End Time must be later than the Start Time.
The time zone that you select in Step 5 applies to the start and end times for all schedules that you add to the policy object.
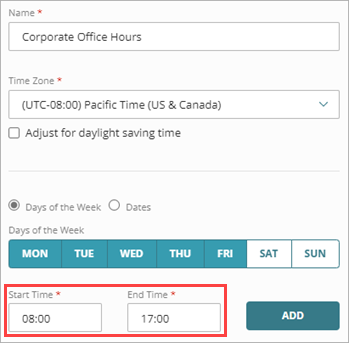
- To add the days and times to your time schedule, click Add. To add additional days or dates, or to specify additional time periods for the same days or dates, repeat Steps 7 — 9.
- Click Save.

- Add this time schedule to the authentication policies that you want it to apply to. For more information, see Add Authentication Policies
We recommend that you create a second policy for the same groups and resources without the time schedule policy object to apply when users authenticate outside of the time schedule. Make sure the policy with the time schedule has a higher priority than the policy without the time schedule. For more information, see About Policy Precedence.
About AuthPoint Authentication Policies