Applies To: WatchGuard Cloud
Before you connect WatchGuard Cloud with HaloPSA, you must create a new API application in your HaloPSA account to enable WatchGuard Cloud to communicate with the HaloPSA server. For WatchGuard Cloud to be able to read and update tickets in HaloPSA, the API user or agent configured for the application must have an Administrator role with the required permissions in HaloPSA.
Verify Permissions for the HaloPSA Agent
You can create a new HaloPSA agent specifically for the API application or you can use an existing agent.
To verify the agent has the required permissions:
- Log in to your HaloPSA account.
- Select Configuration > Teams & Agents > Agents.
- From the list, select the agent.
- Select the Permissions tab.
- In the General Permissions section, make sure Is a HaloPSA Administrator is set to Yes.

- In the Feature Access section, set these permissions:
- Tickets Access Level: Read and Modify
- Customers Access Level: Read and Modify
- Users Access Level: Read and Modify
- CRM Access Level: Read and Modify
- Assets Access Level: Read and Modify
- Products Access Level: Read and Modify
- Sales Access Level: Read and Modify
- Invoices Access Level: Read, Create and Modify
- Customer Agreements Access Level: Read and Modify
- Software Releases Access Level: Read and Modify
- Software Licensing Access Level: Read and Modify
- In the Ticket Permissions section, set these permissions:
- Can Add New Tickets: Yes
- Can Edit Closed Tickets: Yes
- Can View Unassigned Tickets: Yes
- Can View Tickets That are Assigned to Other Agents: Yes
- Can Change a Ticket’s Type: Yes
- Can Re-assign Tickets: Yes
- Editing of Actions: Can Edit All Actions
- Can Assign to Agents in Teams the Agent is Not a Member of: Yes
- Can Edit Tickets Which are Not Assigned to Them: Yes
- Can Override Maximum Priority Escalation at Ticket Type Level: Yes
- Can Always Update Ticket Statuses and Re-assign Tickets Outside of Actions: Yes
- In the Asset Type Restrictions section, set Allow Use of All Asset Types to Yes.
- In the Type Restrictions section, set Allow Use of All Ticket Types to Yes.
- In the Asset Field Restrictions section, set Allow Use of All Asset Fields to Yes.
- In the Configuration section, set these permissions:
- Can Create Custom Fields: Yes
- Can Create SLAs: Yes
- Can Create Asset Fields: Yes
- Can Create Software Products: Yes
- If you made any changes to the permissions, click Save.

Create an API Application in HaloPSA
To create an API application in HaloPSA:
- Log in to your HaloPSA account.
- Select Configuration > Integrations > HaloPSA API.
- Click View Applications.
The Applications list shows. - Click New.

- In the Application Name text box, type a name for the application.

- For the Authentication Method, select Client ID and Secret (Services).
The Client ID and Client Secret values show. - Make a note of the Client ID and Client Secret values. You must have these values to configure your integration in WatchGuard Cloud.
- From the Login Type drop-down list, select Agent.
- From the Agent to Log In As drop-down list, select the agent you want to use.
- Click Save.
- Select the Permissions tab.
- Click Edit.
- Select the check boxes for these permissions:
- admin
- admin:webhook
- read:tickets
- edit:tickets
- read:customers
- edit:customers
- read:contracts
- edit:contracts
- read:items
- edit:items
- read:invoices
- edit:invoices
- read:softwarelicensing
- edit:softwarelicensing
- read:software
- edit:software
- read:assets
- edit:assets
- Click Save.

After you create the new API application, you use your Client ID, Client Secret, and your site to connect WatchGuard Cloud to your HaloPSA tool. The site URL must use this format: https://<your-tenant>.halopsa.com. For more information, go to Connect WatchGuard Cloud to a PSA Tool.
Add Products to Agreements
To send license usage data for WatchGuard Cloud products to HaloPSA, you must add the products to the Customer Agreements in HaloPSA for the accounts mapped from WatchGuard Cloud.
To add products in the HaloPSA Agreements:
- Log in to your HaloPSA account.
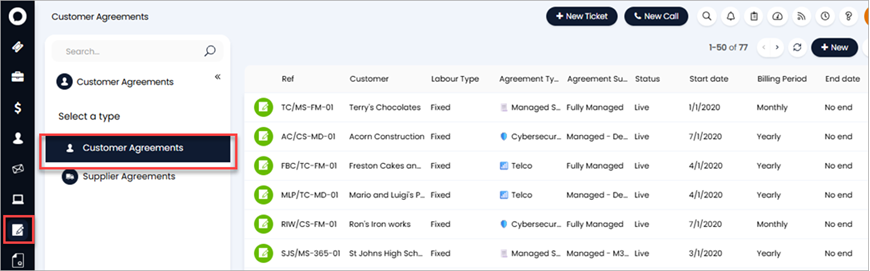
- Select Agreements > Customer Agreements.
- To create a new agreement:
- Click New.
- From the Customer drop-down list, select the customer.
- Click Save.
- To use an existing agreement, select it from the list.
- Select the Recurring Invoices tab.
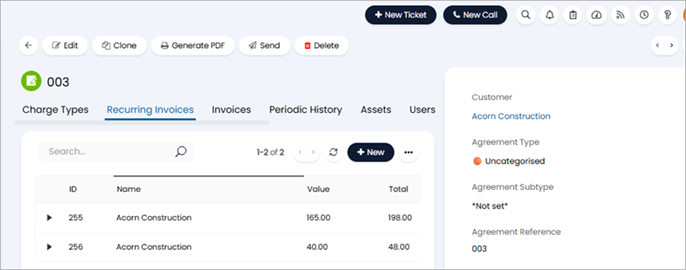
- To create a new recurring invoice:
- Click New.
- Enter the scheduling information. Click Save.
- To add the products to an existing recurring invoice, select it from the list. Click Edit.

- Click Add Product.

- In Quantity text box for the product, enter a quantity.
- Click Select.
- Click Save.
Connect WatchGuard Cloud to a PSA Tool