Applies To: Cloud-managed Fireboxes
A cloud-managed Firebox must connect to a Domain Name System (DNS) server to translate domain names to IP addresses.
The Allow DNS-Forwarding system policy allows DNS traffic from internal networks to the Firebox by default. You can disable the policy on the Allow DNS-Forwarding policy page. For more information on system policies, go to System Firewall Policies on Cloud-Managed Fireboxes.
These Firebox features and clients use DNS settings to resolve DNS queries:
- Firebox connection to WatchGuard Cloud
- Security services
- Network clients on internal and guest networks
To configure DNS settings, from WatchGuard Cloud:
- Select Configure > Devices.
- Select the cloud-managed Firebox.
- Click Device Configuration.
- In the Networking section, click the DNS tile.
The DNS configuration page opens.

For a cloud-managed Firebox, you can configure these DNS settings:
- Public DNS — Add DNS servers to resolve all domain names.
- Internal DNS — Add DNS servers to resolve DNS requests from internal networks for specific domains.
- DNSWatch — Enable DNSWatch to block connections to malicious or filtered domains.
To configure dynamic DNS (DDNS) in WatchGuard Cloud, go to Configure Dynamic DNS.
If you configure the Firebox as a DHCP server, DHCP clients use the IP address of the Firebox as the DNS server. The Firebox forwards DNS requests from DHCP clients to a DNS server specified in the Firebox configuration. DNS requests for internal resources are forwarded to the internal DNS server. DNS requests for external resources are forwarded to a public DNS server.
Configure Public DNS Servers
The public DNS servers are the default DNS servers for all networks and local processes on the Firebox. For a cloud-managed Firebox that does not use DHCP on the external network, the Firebox configuration must include at least one public DNS server. You can add a maximum of three public DNS servers.
If you add a public DNS server to a Firebox that uses DHCP on the external network, the Firebox uses the DNS server you configure before it uses DNS servers assigned through DHCP.
We recommend these best practices for public DNS servers:
- Configure at least two public DNS servers, one with a private IP address, and another with a public IP address.
- We recommend that you list the private DNS server first, so it has higher precedence. If you do not have a private DNS server, we recommend that you specify two public DNS servers from different providers for redundancy.
- Make sure your public DNS servers are accessible from the Firebox internal networks.
To add a public DNS server, from WatchGuard Cloud:
- In the Firebox Device Configuration page, click the DNS tile.
The DNS configuration page opens. - On the Public DNS Server tab, click Add Public DNS Server.
The Public DNS dialog box opens.

- From the Type drop-down list, select Host IPv4 or Host IPv6.
- In the Public DNS Server text box, type the IPv4 or IPv6 address of the DNS server.
- Click Add.
The IP address is added to the Public DNS Server list. - To save the configuration update to the cloud, click Save.
The Firebox uses the public DNS servers in the order they appear in the list. If you have multiple DNS servers, you can change the order of the servers in the list.
To change the order of a public DNS server, from WatchGuard Cloud:
- In the Public DNS Server list, click the move handle
 for the server you want to move.
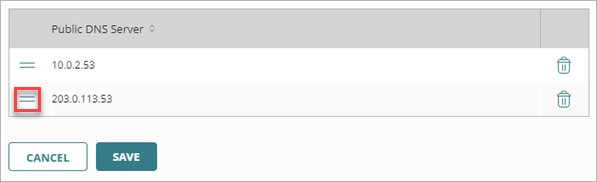
- Drag the DNS server up or down in the list.
- To save the configuration update to the cloud, click Save.
To remove a public DNS server, from WatchGuard Cloud:
- In the row for the DNS server you want to delete, click
 .
. - To save the configuration update to the cloud, click Save.
Configure Internal DNS Servers
Add an internal DNS server when you want the cloud-managed Firebox to forward DNS requests from hosts on an internal network to a specific DNS server, based on the domain name in the DNS request. For DNS requests from internal networks, the internal DNS server takes precedence over the public DNS server and the DNSWatch server.
For redundancy, you can configure more than one internal DNS server for each domain.
When you configure an internal DNS server, you specify these settings:
Domain Name
The domain name in DNS queries received from internal networks.
Internal DNS Server
The IP address of the DNS server.
If you add two internal DNS servers for the same domain name, the Firebox sends DNS requests for that domain to the first server in the list.
To add an internal DNS Server, from WatchGuard Cloud:
- In the Firebox Device Configuration page, click the DNS tile.
The DNS configuration page opens. - Select the Internal DNS tab.
- Click Add Internal DNS Server.
The Internal DNS page opens.
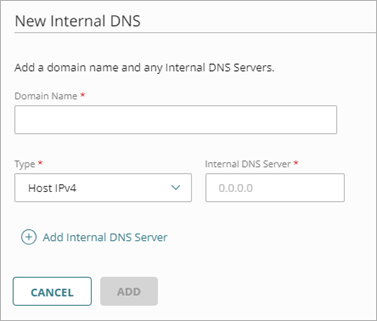
- In the Domain Name text box, type the domain name.
- From the Type drop-down list, select Host IPv4 or Host IPv6.
- In the Internal DNS Server text box, type the IP address of the DNS server to resolve DNS requests for the specified domain name.
- (Optional) Click Add Internal DNS Server and repeat Steps 5–6 to add additional DNS server IP addresses.
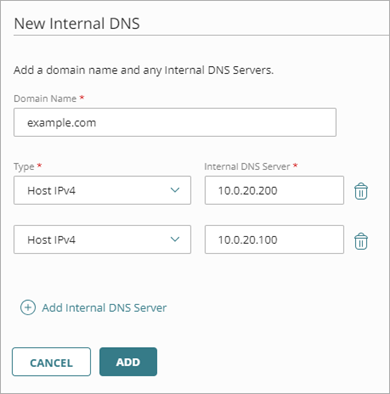
- Click Add.
The Internal DNS Server is added to the list.
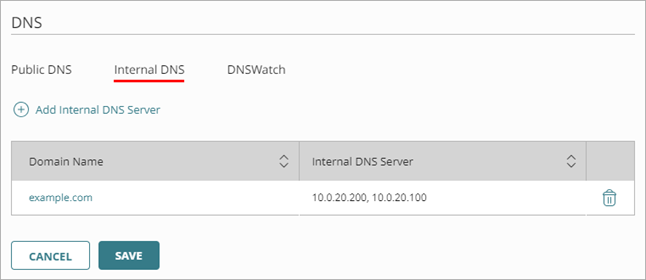
- To save configuration changes to the cloud, click Save.
To edit an internal DNS server, from WatchGuard Cloud:
- In the DNS configuration page, select the Internal DNS tab.
- In the row for the DNS server you want to edit, click the Domain Name.
The Internal DNS page opens with the current settings.

- Edit the settings and click Update.
The updated settings appear in the Internal DNS Server list. - To save the configuration update to the cloud, click Save.
To remove an internal DNS server, from WatchGuard Cloud:
- In the DNS configuration page, select the Internal DNS tab.
- In the row for the DNS server you want to delete, click .
- To save configuration changes to the cloud, click Save.
Enable DNSWatch in WatchGuard Cloud
DNSWatch in WatchGuard Cloud is a subscription service that monitors DNS requests regardless of the connection type, protocol, or port. It blocks connections to domains that are categorized as malicious and can block connections to domains based on content filters.
When DNSWatch is enabled on a cloud-managed Firebox and the Firebox receives a DNS query, it uses DNSWatch as the DNS resolver. If the requested domain is filtered or blocked in the DNSWatch configuration, DNSWatch returns a block page instead of the requested content.
For more information, go to:
- In the Networking section on the Device Configuration page for the Firebox, click the DNS widget.
The DNS configuration page opens. - Select the DNSWatch tab.
- Enable DNSWatch.

- Click Save.