Applies To: WatchGuard Core MDR for Microsoft, WatchGuard Open MDR
If you have a WatchGuard Core MDR for Microsoft or WatchGuard Open MDR license, to enable WatchGuard MDR to monitor Microsoft Defender for Endpoints in your environment, you must complete these steps:
- Verify that You Have the Required Microsoft Licenses
- Allow Permissions for the WatchGuard MDR for MS Defender Application
- Enable WatchGuard MDR to Access Microsoft Defender for Endpoints
- Enable Advanced Features in Microsoft Defender for Endpoints
- Add the Integration in the Managed Services Portal
- Complete the Onboarding Form
WatchGuard MDR integrates only with Microsoft Defender for Endpoint (MDE). This integration does not support other Microsoft Defender products such as Microsoft Defender Antivirus, Microsoft Defender for Office 365, Microsoft Defender for Identity, or Microsoft Defender for Cloud.
Verify that You Have the Required Microsoft Licenses
Microsoft provides various Microsoft Defender for Endpoint versions and licenses. WatchGuard MDR requires that each endpoint you want WatchGuard MDR to monitor has a Defender for Endpoint P1 or Defender for Endpoint P2 license.
To view your Microsoft subscription licenses:
- Go to portal.office.com and log in with a global administrator account.
- In the upper left corner, click
 .
. - Select the Admin app.
- From the left navigation menu, select Billing > Licenses.
- From the Subscriptions tab, view your licenses.
This table lists the Microsoft subscriptions supported by WatchGuard MDR and shows which required Microsoft licenses are included in each subscription for the WatchGuardMDR implementation. It also shows additional required Microsoft licenses you must purchase:
| Recommended Microsoft Subscription | Available with Microsoft Subscription for MDR Implementation | Optional Add-Ons |
|---|---|---|
|
Microsoft 365 Enterprise E3 |
Telemetry Ingestion — Defender for Endpoint Plan 1 SOC Team Access — Entra ID Plan 1 (Azure/EMS) |
Defender for Servers |
|
Microsoft 365 Enterprise E5 |
Telemetry Ingestion — Defender for Endpoint Plan 2 SOC Team Access — Entra ID Plan 2 (Azure/EMS) |
Defender for Servers |
|
Microsoft 365 Business Premium |
Telemetry Ingestion — Defender for Endpoint Plan 1 + Plan 2 SOC Team Access — Entra ID Plan 1 (Azure/EMS) |
Defender for Servers |
Contact your Microsoft vendor to make sure you have the correct licenses.
Allow Permissions for the WatchGuard MDR for MS Defender Application
To allow WatchGuard MDR to monitor your endpoints, you must authorize the WatchGuard MDR for MS Defender application to connect to your Azure Cloud environment.
To allow the WatchGuard MDR for MS Defender application to connect to your Azure Cloud environment:
- Go to Approve WatchGuard MDR for MS Defender and log in to your Microsoft environment with a Microsoft Azure global administrator account.
A Permissions Requested dialog box shows the permissions you must accept for the WatchGuard MDR for MS Defender application . - Read all devices
- Read device local credential passwords
- Read Microsoft Intune device configuration and policies
- Read Microsoft Intune apps
- Read Microsoft Intune devices
- Read Microsoft Intune configuration
- Read all security and routing policies for network access
- Read all security alerts
- Read and write to all security alerts
- Read all users' full profiles
- Sign in and read user profile
- Run advanced queries
- Read alerts
- Read all alerts
- Read and write alerts
- Read file profiles
- Read IP address profiles
- Collect forensics
- Isolate machine
- Run live response on a specific machine
- Read all machine profiles
- Read and write machine information
- Restrict code execution
- Scan machine
- Stop and quarantine a file
- Read remediation tasks
- Read all remediation tasks
- Read Threat and Vulnerability Management score
- Reach all security baselines assessment information
- Read all security configurations
- Read Threat and Vulnerability Management security recommendations
- Read Threat and Vulnerability Management software information
- Read all IOCs
- Read URL profiles
- Read user profiles
- Read Threat and Vulnerability Management vulnerability information
- Get device state and compliance information from Microsoft Intune
- Send device attributes to Microsoft Intune
- Send device threat information to Microsoft Intune
|
|
|
|
- Click Accept.
- Go to Microsoft Entra ID > Properties and find your Tenant ID.
- Copy your Tenant ID to use later in these instructions.
Enable WatchGuard MDR to Access Microsoft Defender for Endpoints
To enable WatchGuard MDR to access your Microsoft Defender for Endpoints environment, you must create a group in the Microsoft Entra ID portal and add a list of 25 WatchGuard accounts to the group. You can use a script to automatically allow access to the required accounts, or you can follow the steps in this document to manually add them.
To download and run the defender-bulk-soc.ps1 script, go to Use a PowerShell script to enable WatchGuard MDR access to Microsoft Defender for Endpoints in the WatchGuard Knowledge Base and run the script in your Microsoft Azure environment.
To manually allow access, follow these steps:
- Create the WatchGuard MDR SOC Group
- Assign the Security Operator Role to the Group
- Invite External Users
- Monitor Invitations and Membership (Optional)
These instructions are based on the current functionality of Entra ID. Microsoft might update or change the interface and steps over time.
Create the WatchGuard MDR SOC Group
Create a group in the Microsoft Entra ID portal for the required WatchGuard accounts.
To create the group:
- Go to https://entra.microsoft.com and log in with a Global Administrator or Privileged Role Administrator account.
- From the navigation menu, go to Groups > All Groups.
- Click New Group.
The New Group dialog box opens. - Configure these options:
- Group Type — Security
- Group Name — WatchGuard MDR SOC
- Group Description — WatchGuard MDR SOC Group
- Azure AD Roles Can be Assigned to the Group — Yes
- Click Create.
Assign the Security Operator Role to the Group
To provide the required permissions to the WatchGuard MDR SOC group, assign the Security Operator role to group.
To assign the role to the group:
- From the navigation menu, select Manage > Roles and Administrators.
- From the search box, find and select Security Operator.
- Click Add Assignments.
- From the Select a Member pane, select the Watchguard MDR SOC group.
- Click Add.
Invite External Users
Add 25 WatchGuard accounts for the WatchGuard SOC analysts to connect to your environment and assign them to the group.
To add the WatchGuard accounts:
- From the navigation menu, go to Users > All Users.
- Click New Guest User.
- Select Invite User.
- In the Email text box, type [email protected]
- In the Display Name text box, type th1
- Select the Assignments tab.
- Click Add Group.
- Select the WatchGuard MDR SOC group.
- Select the Send Invite Message check box.
- Click Review + Invite.
- Repeat these steps for each of the 25 guest users.
For example, [email protected] to [email protected].
Monitor Invitations and Membership (Optional)
Use Audit logs or Access reviews in Entra ID to track user invitations and group membership changes.
Enable Advanced Features in Microsoft Defender for Endpoints
If you have a Microsoft 365 Enterprise E5 or Microsoft 365 Enterprise E3 environment, make sure that you enable the minimum required features.
To enable the required advanced features, in Microsoft Defender for Endpoints:
- Go to Microsoft Defender and log in with an assigned security administrator or global administrator account.
- In the left navigation menu, select Settings > Endpoints > Advanced Features.
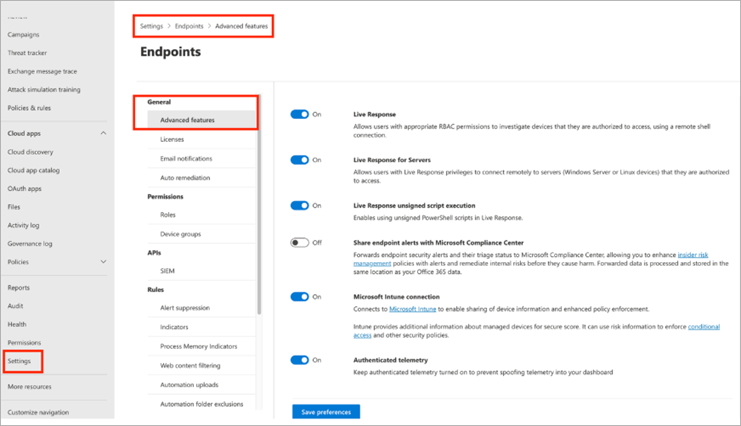
- Make sure the advanced Microsoft Defender features meet these minimum requirements:
- Click Save Preferences.
| Advanced Feature | Requirement |
|---|---|
| Restrict correlation to within-scoped device groups | Optional |
| Enabled EDR in block mode | Required |
| Automatically resolve alerts | Required |
| Allow or block files | Required |
| Custom network indicators | Required |
| Tamper protection | Required |
| Show user details | Required |
| Skype for business integration | Optional |
| Microsoft Defender for Cloud Apps | Required |
| Web content filtering (Managed by the partner's customer) | Required |
| Device discovery | Required |
| Download quarantined files | Required |
| Live response | Required |
| Live response for servers | Required |
| Live response from unsigned script execution | Required |
| Share endpoint alerts with the Microsoft Compliance Center | Optional |
| Microsoft Intune connection | Required |
| Authenticated telemetry | Required |
| Preview features | Optional |
| Endpoint Attack Notifications | Skip |
Add the Integration in the Managed Services Portal
To add the integration:
- In WatchGuard Cloud, select Monitor > Managed Services.
The Managed Services portal opens in a new browser tab. - If you are a Service Provider, select your Subscriber account from the drop-down list.
- In the upper, right corner of the Managed Services portal, click
 .
. - From the drop-down list, select Onboarding.
- From the navigation menu, select Endpoints.
The Onboarding Endpoints page opens.

- If you completed the steps earlier, go to the next step. If you did not complete the steps, click the Microsoft Defender icon and follow the steps in Allow Permissions for the WatchGuard MDR for MS Defender Application.
- In the Tenant ID text box, type the tenant ID from your Microsoft account.
The tenant ID format is: XXXXXXX-XXXX-MXXX-NXXX-XXXX. For instructions from Microsoft to find your tenant ID, go to How to Find Your Microsoft Entra Tenant ID in the Microsoft documentation (external link).
- Click Add.
Complete the Onboarding Form
After you configure your Microsoft environment, complete the MDR Microsoft Defender for Endpoint Onboarding Form (external link). To complete the form, you must have this information from your Microsoft account:
- Microsoft Tenant ID — The tenant ID format is: XXXXXXX-XXXX-MXXX-NXXX-XXXX. For instructions from Microsoft to find your tenant ID, go to How to Find Your Microsoft Entra Tenant ID in the Microsoft documentation (external link).
You also need this information:
- Customer Company Name — The company name of the customer account for this connector.
- Partner Company Name — The company name of the Partner.
- WatchGuard Partner ID — The Partner ID format is: ACC-XXXXXXX.
- Partner Contact Email Address — The Partner contact email address the deployment team can use if they have questions.
- Customer/Subscriber WatchGuard Account ID — The Account ID format is: ACC-XXXXXXX or WGC-X-XXXXXXXXXXXXXXXXXXXX.
If WatchGuard MDR asks you to verify that you configured the connection correctly, make sure you followed the steps in the Invite External Users section to invite the WatchGuard accounts to the WatchGuard MDR SOC group. To verify that access is correctly enabled, confirm that the [email protected] user has attempted to access your Microsoft environment.