Applies To: Locally-managed Fireboxes
To configure rogue access point detection on your wireless Firebox device, you must know the configuration of the other wireless access points on your network. This enables you to identify those access points as trusted in your configuration. You can then set up a schedule for rogue access point detection scans.
For information about how to immediately scan for rogue AP devices and see the results, go to Rogue Access Point Scan Results.
The Rogue Access Point Detection feature for Firebox wireless devices is different than the Rogue Access Point Detection feature designed for WatchGuard APs managed by the Gateway Wireless Controller. For more information on Rogue Access Point Detection on the Gateway Wireless Controller, go to Enable Rogue Access Point Detection with the Gateway Wireless Controller.
For information on the differences between Firebox wireless devices and WatchGuard AP devices, go to WatchGuard Wireless Solutions.
Configure Rogue Access Point Detection
Enable rogue access point detection and add trusted access points.
- Select Network > Wireless.
The Wireless page appears.
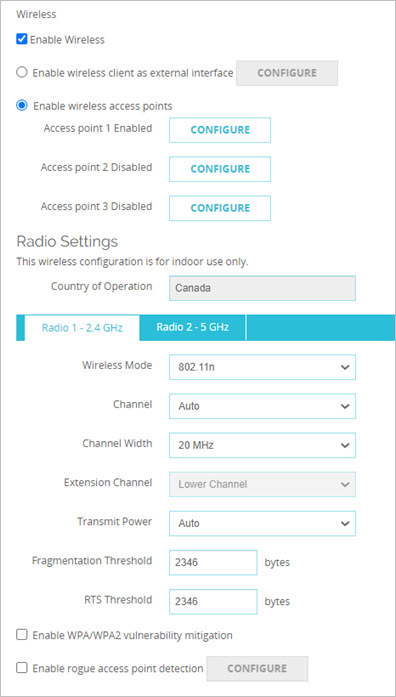
- Select the Enable rogue access point detection check box.
- Adjacent to the Enable rogue access point detection check box, click Configure.
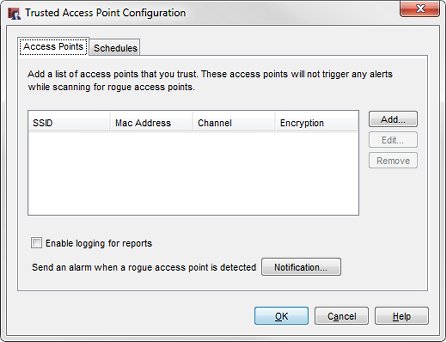
The Trusted Access Point Configuration page appears.
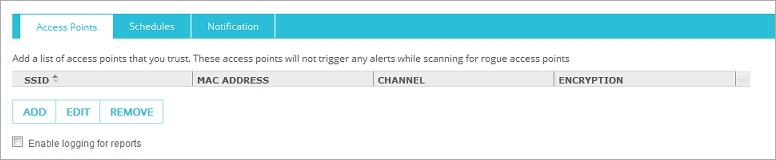
- To add a trusted access point to the list, click Add.
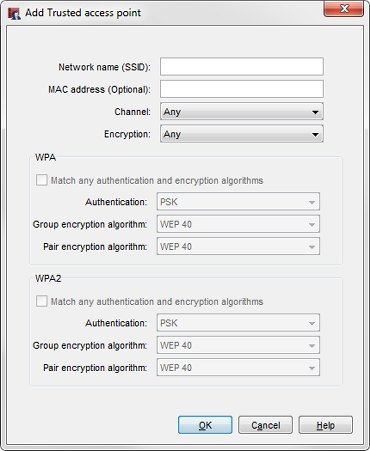
The Add Trusted access point dialog box appears.
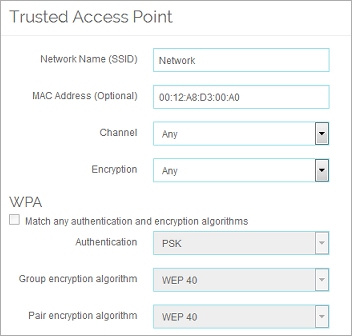
- Configure the settings to identify your trusted access point.
On the Access Points tab, you can add information about all other trusted wireless access points on your network so the rogue access point scan does not identify them as potential rogue access points.
- Select Network > Wireless.
The Wireless Configuration dialog box appears.
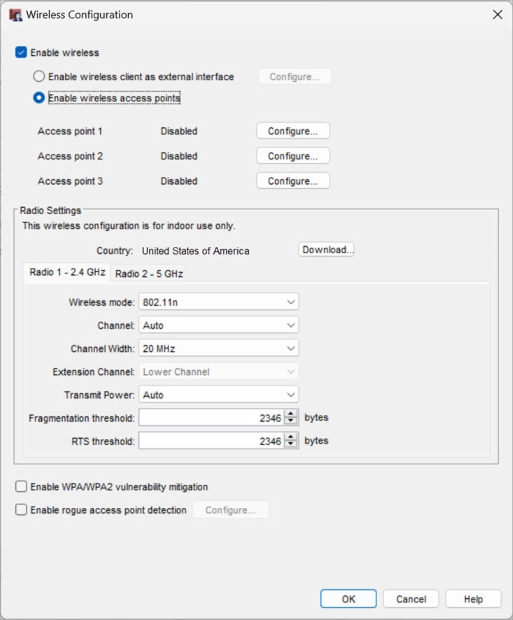
- Select the Enable rogue access point detection check box.
- Adjacent to the Enable rogue access point detection check box, click Configure.
The Trusted Access Point Configuration dialog box appears.
- To add a trusted access point to the list, click Add.
The Add Trusted access point dialog box appears.
- Configure the settings to identify your trusted access point.
On the Access Points tab, you can add information about all other trusted wireless access points on your network so the rogue access point scan does not identify them as potential rogue access points.
Identify a Trusted Access Point
For each trusted access point, provide as much information as you can to identify your trusted access point. The more information you provide, the more likely it is that a rogue access point detection scan can correctly identify a trusted access point.
- In the Network name (SSID) text box, type the SSID of the trusted access point.
- In the MAC address (Optional) text box, type the wireless MAC address of the trusted access point.
If your trusted access point is a wireless Firebox, go to Find the Wireless MAC Address of a Trusted Access Point. - From the Channel drop-down list, select the channel used by the trusted access point. If the trusted access point is a WatchGuard device and the Channel in the radio settings of that trusted wireless device is set to Auto, select Any.
- From the Encryption drop-down list, select the encryption method used by the trusted access point.
The WPA or WPA2 authentication and encryption settings that apply to the encryption method you select are enabled. - If you select WPA or WPA/WPA2 as the encryption method, configure the WPA settings to match the configuration of your trusted access point.
Or, if you do not know these settings, select the Match any authentication and encryption algorithms check box. - If you selected WPA2 or WPA/WPA2 as the encryption method, configure the WPA settings with the same settings you configured on your trusted access point.
Or, if you do not know these settings, select the Match any authentication and encryption algorithms check box. - Click OK.
The trusted access point is added to the list of trusted access points.
For information about how to add a wireless Firebox as a trusted access point, go to Add a Firebox as a Trusted Access Point.
Edit or Remove a Trusted Access Point
To edit a trusted access point:
- Select the access point in the list.
- Click Edit.
- Edit the information used to identify the trusted access point as described in the previous section.
To remove a trusted access point, select the access point in the list and click Remove.
Configure Logging and Notification
To see information about rogue access point scans in a report, you must enable logging. When you enable logging, the log message includes the start and stop time, and the results of each scan. To enable logging, select the Enable logging for reports check box.
You can also configure the Firebox to send a notification message to you when a rogue access point is detected.
To configure notification, from Fireware Web UI:
- Select the Notification tab.
- Select a notification method: SNMP trap, email message, or pop-up window.
To configure notification, from Policy Manager:
- Click Notification.
- Select a notification method: SNMP trap, email message, or pop-up window.
For more information about notification settings, go to Set Logging and Notification Preferences.
Set the Scan Frequency
If you enable rogue access point detection on a wireless Firebox that is also configured as a wireless access point, you can schedule a rogue access point scan so that the Firebox alternates between the two functions. When a rogue access point scan is not in progress, the Firebox operates as a wireless access point. When a rogue access point scan begins, the Firebox is temporarily disabled as an access point, and wireless clients cannot connect to the Firebox until the scan completes.
You cannot set the scan frequency to Always scan if your Firebox is configured as a wireless access point or wireless client. Only use this option to dedicate your wireless Firebox for rogue access point scans.
- In the Trusted Access Point Configuration dialog box, select the Schedules tab.
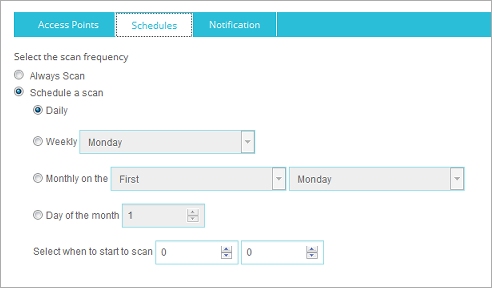
- Select the scan frequency.
- Always scan — Automatically run a scan for rogue access points every 15 minutes.
- Schedule a scan — Run a scan on a periodic schedule.
- If you selected Schedule a scan, select how often the scan should run (daily, weekly, or monthly) and select the time of day to start the scan.
- Click Return to Main Page.
- Click Save.
- In the Trusted Access Point Configuration dialog box, select the Schedules tab.
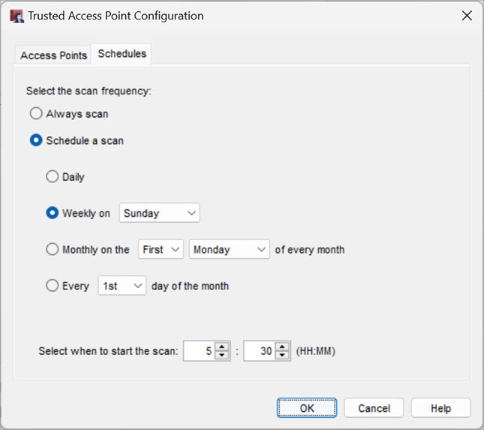
- Select the scan frequency.
- Always scan — Automatically run a scan for rogue access points every 15 minutes.
- Schedule a scan — Run a scan on a periodic schedule.
- If you selected Schedule a scan, select how often the scan should run (daily, weekly, or monthly) and select the time of day to start the scan.
- Click OK.
If you have added information about some trusted access points, but do not have all the information for other trusted access points, you might not be ready to enable the rogue access point scan. To disable rogue access point detection scans, in the Wireless Configuration settings, clear the Enable rogue access point detection check box. When you disable rogue access point detection, your trusted access point information is saved, but the Firebox does not scan for rogue access points.