Configure DLP Sensors
Applies To: Locally-managed Fireboxes
Data Loss Prevention (DLP) is end-of-life as of 26 February 2025. For Fireboxes that run Fireware v12.11.3, WSM and Fireware Web UI no longer include DLP configuration settings in the user interface. For Fireboxes that run Fireware v12.11.2 or lower, DLP is required by the configuration schema but is no longer functional if your DLP license is expired. For more information, go to this Product and Support News Blog post.
To detect data that matches specific content categories you can create DLP sensors. You apply a DLP sensor to one or more policies to monitor or enforce adherence to your organization's information security policy. Each DLP sensor contains rules, actions, and settings.
When you first start to use the Data Loss Prevention service, we recommend that you configure the DLP sensor to allow content that matches the selected content control rules, and to send a log message when a DLP violation is detected. This enables you to monitor the activity on your network before you configure DLP to drop, block, or quarantine content that matches the rules configured in the DLP sensor. For more information, go to Monitor DLP Activity.
DLP and Device Performance
When enabled, the Data Loss Prevention service adds more scanning load and consumes additional memory on your appliance. Some DLP rules are very resource-intensive. If you enable many sensors and rules, the performance of the device could be noticeably affected. Each DLP sensor requires additional space in memory, and the number of DLP rules that are configured on each sensor also impacts the amount of memory used by the appliance. Only select those rules that are appropriate for your region and the use case that is relevant to your industry. This will also help to minimize any potential false positives.
Rules
For each sensor, you select which of the predefined content control or custom rules to enable. A content control rule is a set of conditions that describes content that the rule can identify in a file. The content control rules are based on the DLP signature set, and are updated over time as the DLP signatures are updated. Custom rules are rules you create to search for phrases specific to your organization.
Each content control rule has four properties.
Name
For each rule, the rule name briefly describes the type of data the rule identifies. Some rules look for a single type of data, such as telephone numbers, or social security numbers. Other rules look for a combination of related data, such as credit card numbers near personally identifiable information.
Region
Each rule applies to a specific region. Some types of data are only applicable to a specific region. Other types of data are formatted differently in different regions. For example, there are several driver's license rules for different regions. If a rule can identify the specified data type for multiple regions, the region is set to Global. You can filter the rules list by region.
Category
For each rule, the category describes which general type of data the rule can identify.
Quantity
Each content control rule has an associated quantity value, that is a measure of the weighted number of matches the rule must find in a scanned object in order to trigger a DLP violation. You can look up the quantity values for each rule on the WatchGuard Security Portal.
For information, go to Look Up DLP Rules on the Security Portal.
You cannot modify the default quantity of matches for DLP rules in your configuration.
Actions
For each sensor you define actions to take if the sensor detects content that matches the rules enabled in the sensor. You specify one action to take for content detected in email traffic, and another action to take for content detected in non-email traffic.
Actions for email traffic:
- Allow — Allows the email
- Lock — Locks the email attachment. A file that is locked cannot be opened easily by the user. Only the administrator can unlock the file.
- Remove — Removes the attachment and sends the rest of the message to the recipient. Replaces the removed attachment with the deny message configured in the SMTP proxy.
- Quarantine — Sends the original message to the Quarantine Server. Removes the message part (message body or file attachment) that triggered the DLP violation and sends the modified message to the recipient. The removed message part is replaced with the deny message configured in the SMTP proxy. If the Quarantine Server cannot be contacted, the message is temporarily rejected.
- Deny — Denies the request and drops the connection. A notification is sent to the source of the content.
- Drop — Denies the request and drops the connection. No notification is sent to the source of the content.
- Block — Denies the request, drops the connection, and adds the IP address of the sender to the Blocked Sites list.
Recipients cannot see or manage messages quarantined due to a DLP violation. Only the administrator can manage messages quarantined by DLP. For more information, go to Manage Quarantined Messages.
Actions for non-email traffic:
- Allow — Allows the connection
- Drop — Denies the request and drops the connection. No information is sent to the source of the content.
- Block — Denies the request, drops the connection, and adds the IP address of the content source to the Blocked Sites list.
By default, a DLP sensor contains one DLP action, which applies to scanned content from all sources and destinations. You can configure multiple actions for the same DLP sensor. This enables you to configure different actions based on the source or destination of the traffic. For each action, you can also configure whether to generate a log message and whether to send an alarm when the sensor detects content that matches the enabled rules in the sensor.
Settings
In the DLP settings, you can set the scan limit, and configure the actions to take if content cannot be scanned for any of these reasons:
- content exceeds the scan limit
- a scan error occurs
- content is password protected
For each of these three conditions, you can set different actions for content detected in email and non-email traffic.
Sensor Types
DLP includes two sensor types: built-in sensors, and user-defined sensors. The built-in sensors enable the content rules related to compliance with HIPAA (the Health Insurance Portability and Accountability Act) and PCI (Payment Card Industry) information security standards. The built-in sensors are configured to allow all traffic, and to create a log message each time they detect content that matches the content control rules.The built-in sensors do not block any content, even if the content cannot be scanned.
The two built-in sensors are:
- HIPAA Audit Sensor — Detects content related to compliance with HIPAA security standards
- PCI Audit Sensor — Detects content related to compliance with PCI security standards
You cannot edit or delete the built-in sensors, but you can clone them, and edit the clone.
Any sensor you create is a user-defined sensor. To create a user-defined sensor, you can clone an existing sensor or add a new one. When you configure a sensor, you select the content control and custom rules, actions, and settings that make sense for your organization.
Add a Sensor
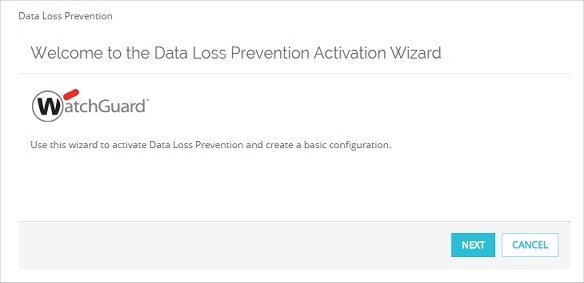
When you add a DLP sensor, the Data Loss Prevention Wizard helps you to create the sensor, and apply it to proxy policies. The wizard shows different pages depending on whether you already have proxy policies in your configuration. If you do not, the wizard helps you create one or more proxy policies.
To add a DLP sensor:
- Select Subscription Services > Data Loss Prevention.
The Data Loss Prevention dialog box appears. - In the Sensors tab, click Add.
The Data Loss Prevention Wizard starts.
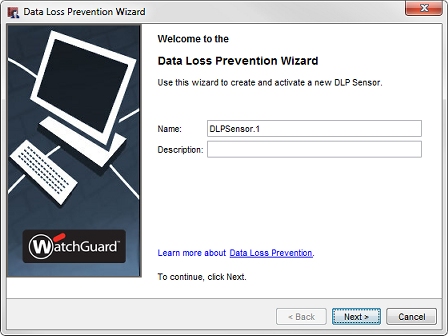
DLP Sensor Wizard in Policy Manager
- In the Name text box, edit the name of the sensor.
- (Optional) In the Description text box, type a description for this sensor.
- Click Next.
A list of configured FTP, SMTP, HTTP, and HTTPS proxy policies appears. If your configuration does not include any policies that support DLP, the wizard skips this step.
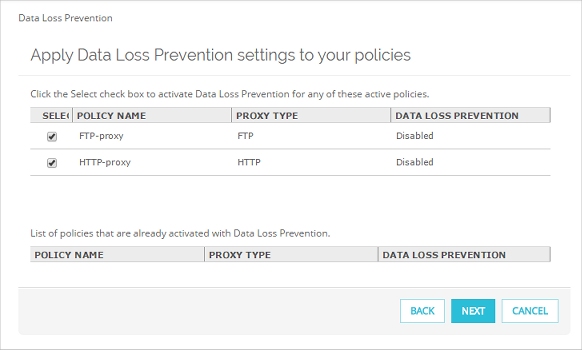
DLP Policies in Fireware Web UI
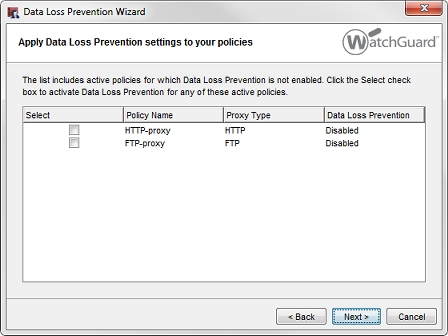
DLP Policies in Policy Manager
- To enable Data Loss Prevention for a policy, select the check box adjacent to any policy that does not already have Data Loss Prevention enabled.
- Click Next.
If your configuration does not already include an HTTP, FTP or SMTP proxy policy, the wizard asks if you want to create new proxy policies. If your configuration already includes all of the proxy policy types supported by DLP, the wizard skips this step.
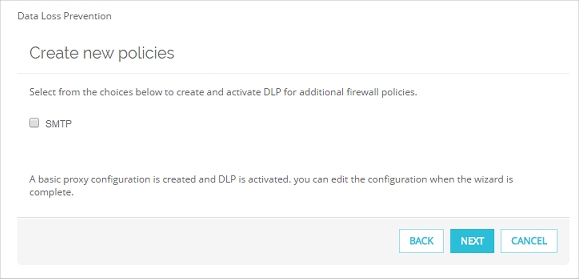
DLP create new policies in Fireware Web UI
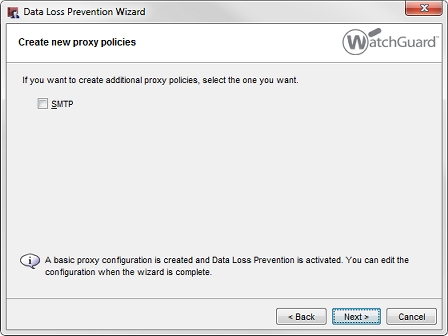
DLP create new policies in Policy Manager
- Select the check box adjacent to each policy you want the wizard to create. You cannot use the wizard to add a proxy policy of a type that already exists.
- Click Next.
The list of content control rules appears.
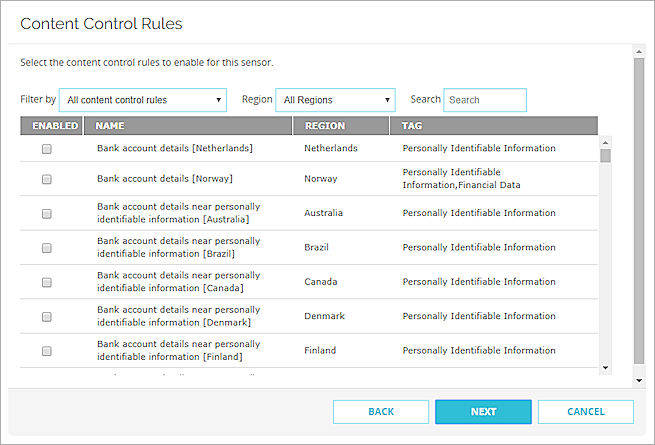
DLP Rules in Fireware Web UI
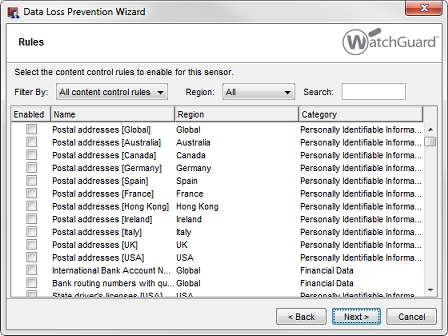
DLP Rules in Policy Manager
- In the list of rules, select the check box for each content control rule or custom rule you want to enable for this sensor.
There are several ways you can change the list view to find the rules you want to enable:- To filter the list, from the Filter By drop-down list, select All content control rules to show the complete list, or Configured rules to show only the configured rules for this sensor.
- To search for rules for a particular region, select the region from the Region drop-down list.
- To search for a rule that contains specific text in the Name, Region, or Category description, type the text in the Search text box.
- Click a column heading to sort the list by the contents of that column.
- Click Next.
The Actions settings appear.
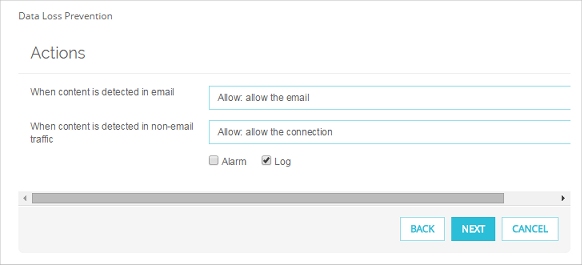
DLP Actions in Fireware Web UI
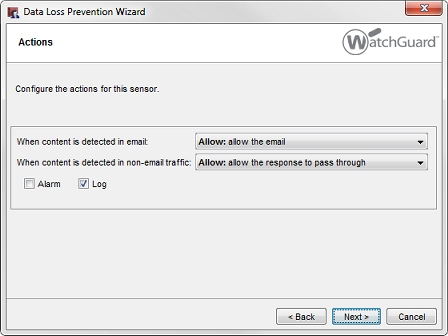
DLP Actions in Policy Manager
- From the When content is detected in email drop-down list, select the action to take when content in an email message matches the enabled rules in this sensor.
- From the When content is detected in non-email traffic drop-down list, select the action to take when content in non-email traffic matches the enabled rules in this sensor.
- To trigger an alarm when this sensor detects content, select the Alarm check box.
- To create log messages when this sensor detects content, select the Log check box.
- Click Next.
- Click Finish to close the wizard.
The new sensor appears in the Sensors tab in the Data Loss Prevention dialog box.
Clone a Sensor
To make a copy of an existing sensor, you clone it. This creates another user-created sensor that you can edit.
To clone a sensor:
- Select the sensor to copy.
- Click Clone.
- Edit the sensor, as described in the next sections.
Edit a Sensor
You can edit any of the user-created sensors. To edit a sensor:
- Select Subscription Services > Data Loss Prevention.
The Data Loss Prevention dialog box appears. - In the Sensors tab, select a user-defined sensor, and click Edit.
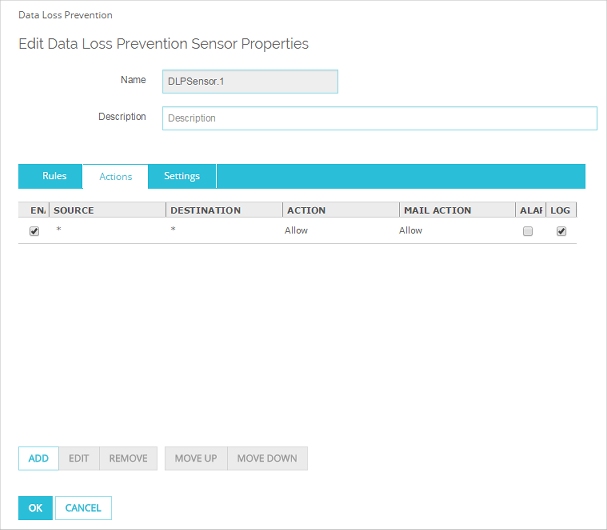
The Edit Data Loss Prevention Sensor dialog box appears.
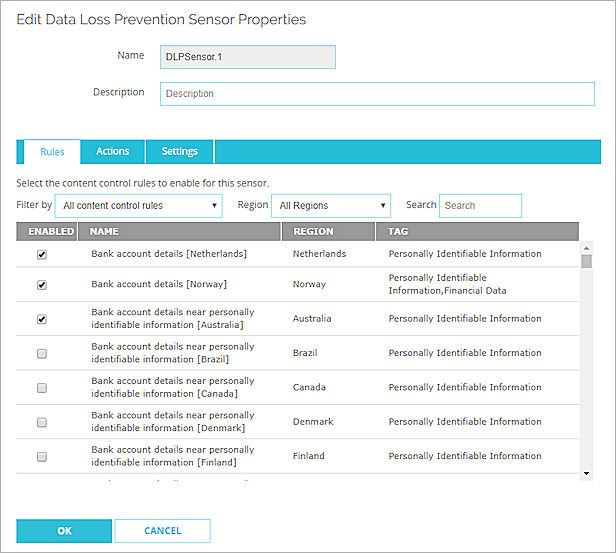
DLP Sensor properties in Fireware Web UI
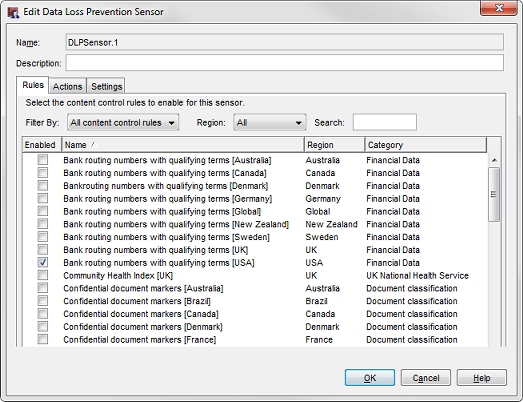
DLP Sensor properties in Policy Manager
- On the Rules tab, select the check box for each content control or custom rule to enable for this sensor.
Or, clear the check box to disable an enabled rule.
To change the list view to find the rules to enable:- To filter the list, from the Filter By drop-down list, select All content control rules to show the complete list, or Enabled rules to show just the enabled rules for this sensor.
- To search for rules for a particular region, select the region from the Region drop-down list.
- To search for a rule that contains specific text in the Name, Region, or Category description, type the text in the Search text box.
- Click a column heading to sort the list by the contents of that column.
- Edit the sensor actions and settings as described in the next sections.
Add or Edit Sensor Actions
The first action in a new sensor applies to all traffic from any source to any destination. When you edit and add sensor actions, you can add multiple actions that each apply to traffic from different sources or to different destinations. For each action, you can set the source and the destination to one of these types:
- Host IP — A single IP address
- Network IP — A network IP subnet
- Email address — An email address, such as user@example,com, or *@example.com
- Authenticated user — The user name of an authenticated user
- URL — Any URL
- Any — Any source or destination. A source or destination of Any appears as * in the Actions list
To add or edit actions when you edit a sensor:
- Select the Actions tab.
The list of actions enabled for this sensor appear.
DLP Actions in Fireware Web UI
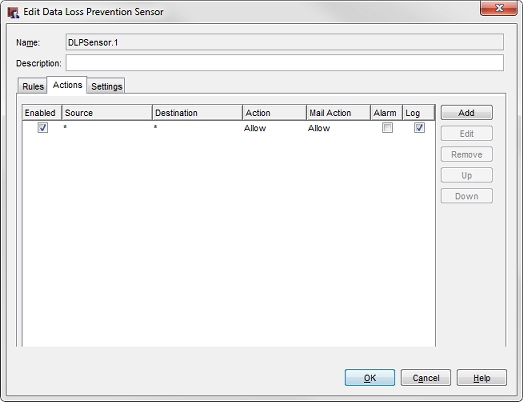
DLP Actions in Policy Manager
- To add a new action, click Add.
Or, to edit an existing action, select the action and click Edit.
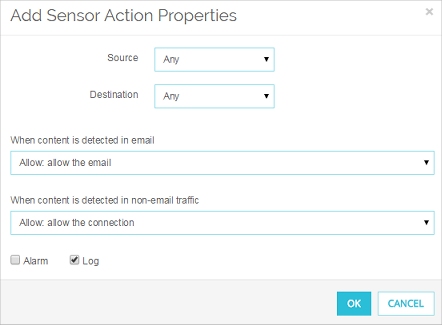
DLP Sensor Action properties in Fireware Web UI
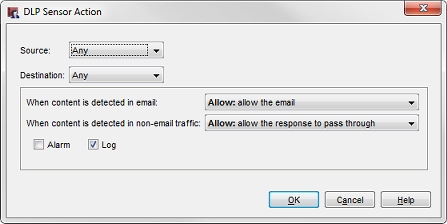
DLP Sensor Action properties in Policy Manager
- From the Source drop-down list, select the type of source address to define for this action.
- If you select a source other than Any, type the source address in the text box adjacent to the Source drop-down list.
- From the Destination drop-down list, select the type of destination address to define for this action.
- If you select a destination other than Any, type the destination address in the text box adjacent to the Destination drop-down list.
- From the When content is detected in email drop-down list, select the action to take when content in an email message matches the enabled rules in this sensor.
- From the When content is detected in non-email traffic drop-down list, select the action to take when content in non-email traffic matches the enabled rules in this sensor.
- To trigger an alarm when this sensor detects matching content, select the Alarm check box.
- To create log messages when this sensor detects matching content, select the Log check box.
- Click OK.
The new action appears in the Actions tab for the sensor.
Reorder Sensor Actions
If you add more than one action to a DLP sensor, DLP uses the actions in priority order from the top down. If you add multiple sensor actions, make sure that the action that applies to a more specific source or destination appears higher in the list than an action that applies to a less specific source and destination. For example, if you use the DLP action that applies to traffic from any source to any destination, make sure that any other actions you add are higher in the list.
To change the order of actions in a DLP sensor:
- Select the Actions tab.
- Click the Source or Destination of the action to move.
- Click Up or Down to move the selected action higher or lower in the list.
Configure Sensor Scan Settings
In each user-defined DLP sensor, you can change the settings that control how DLP scans content, and what action to take if content cannot be scanned. To configure the scan settings, select the Settings tab.
For more information about these settings, go to Configure DLP Scan Settings.
Delete a Sensor
To delete a sensor:
- Select Subscription Services > Data Loss Prevention.
- Select the sensor to delete.
- Click Remove.
You cannot delete the built-in sensors, or a sensor that is used by a policy.