Configure a Secondary PPPoE Interface
Applies To: Locally-managed Fireboxes
When you configure an external interface to use PPPoE, you can optionally add up to 25 secondary PPPoE interfaces. This enables the Firebox to establish multiple PPPoE sessions on the same external interface. Each secondary PPPoE interface must be associated with an external interface that is configured to use PPPoE. The external interface is the primary PPPoE interface. The primary PPPoE interface must be a physical interface. You cannot associate a secondary PPPoE interface with a Link Aggregation or VLAN interface.
You can use a PPPoE secondary interface in most of the same ways that you use a physical interface. For example, you can use it in the configuration of policies, multi-WAN, VPN, and NAT.
A secondary PPPoE interface cannot be a member of a Bridge, VLAN, or Link Aggregation interface.
Add a Secondary PPPoE Interface
To add a secondary PPPoE interface, from Policy Manager:
- Select Network > Configuration.
- Make sure at least one external interface is configured to use PPPoE.
For more information, go to Configure an External Interface. - Select the PPPoE tab.
A list of configured primary and secondary PPPoE interfaces appears. - Click Add.
The New PPPoE Properties dialog box appears.
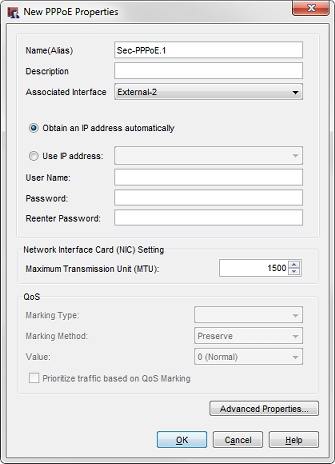
- In the Name (Alias) text box, type a name for this interface.
- (Optional) In the Description text box, type a description for this interface.
- In the Associated Interface drop-down list, select an external interface.
Only external interfaces that are configured to use PPPoE appear in the list. - Select an IP address option:
- Obtain an IP address automatically
- Use IP address (supplied by your Internet Service Provider)
- If you selected Use IP Address, in the adjacent text box, type or select the IP address.
- Type the User Name and Password. Type the password again.
ISPs use the email address format for user names, such as [email protected]. - Click OK.
The new secondary PPPoE interface is added to the PPPoE tab.
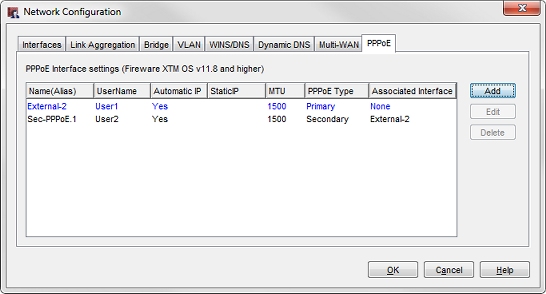
The primary PPPoE interface appears in the list of interfaces on the PPPoE tab, but you cannot edit it from there. To edit the settings for the primary PPPoE interface, select the Interfaces tab and edit the external interface settings.
Configure MTU Settings
To change the Maximum Transmission Unit for a secondary PPPoE interface:
- In the PPPoE tab, select the PPPoE secondary interface to edit.
- Click Edit.
- In the Maximum Transmission Unit (MTU) text box, select the maximum packet size, in bytes, that can be sent through the interface. We recommend that you use the default, 1500 bytes, unless your network equipment requires a different packet size.
You can set the MTU from a minimum of 68 to a maximum of 9000. - Click OK.
Configure QoS Settings
Before you can configure QoS settings for a PPPoE secondary interface, you must first enable QoS in the global settings. For more information, go to About Traffic Management and QoS
To configure QoS for a secondary PPPoE interface:
- In the PPPoE tab, select the PPPoE secondary interface to edit.
- Click Edit.
- In the Marking Type drop-down list, select either DSCP or IP Precedence.
- In the Marking Method drop-down list, select the marking method:
- Preserve — Do not change the current value of the bit. The Firebox prioritizes the traffic based on this value.
- Assign — Assign the bit a new value.
- Clear — Clear the bit value (set it to zero).
- If you selected Assign in the previous step, select a marking value.
If you selected the IP precedence marking type you can select values from 0 (normal priority) through 7 (highest priority).
If you selected the DSCP marking type, the values are 0–56. - Select the Prioritize traffic based on QoS Marking check box.
- Click OK.
Configure PPPoE Options
The PPPoE options you can configure for a secondary PPPoE interface are the same as for a primary external PPPoE interface. Your ISP can tell you if you must change the timeout or LCP values.
To configure PPPoE options for a secondary PPPoE interface:
- In the PPPoE tab, select the PPPoE secondary interface to edit.
- Click Edit.
- To configure PPPoE options, click Advanced Properties.
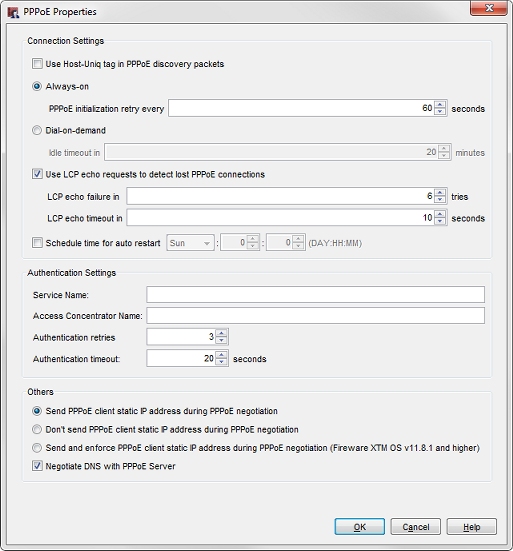
-
- Always-on — The Firebox keeps a constant PPPoE connection. It is not necessary for network traffic to go through the external interface.
If you select this option, type or select a value in the PPPoE initialization retry every text box to set the number of seconds that PPPoE tries to initialize before it times out. - Dial-on-demand — The Firebox connects to the PPPoE server only when it gets a request to send traffic to an IP address on the external interface.
If your ISP regularly resets the connection, select this option.
If you select this option, in the Idle timeout in text box, set the length of time a client can stay connected when no traffic is sent.
If you do not select this option, you must manually restart the device each time the connection resets.
- Always-on — The Firebox keeps a constant PPPoE connection. It is not necessary for network traffic to go through the external interface.
- If your ISP requires the Host-Uniq tag for PPPoE discovery packets, select the Use Host-Uniq tag in PPPoE discovery packets check box.
- To use LCP echo requests to detect lost PPPoE connections, select the Use LCP echo requests to detect lost PPPoE connections check box.
This is enabled by default.you can configure a physical external interface with a default gateway on a different subnet than the interface IP address. - In the LCP echo failure in text box, type or select the number of failed LCP echo requests allowed before the PPPoE connection is considered inactive and closed.
- In the LCP echo timeout in text box, type or select the length of time, in seconds, that the response to each echo timeout must be received.
- To configure the Firebox to automatically restart the PPPoE connection on a daily or weekly basis, select the Schedule time for auto restart check box.
- From the Schedule time for auto restart drop-down list, select Daily to restart the connection at the same time each day, or select a day of the week to restart weekly. Select the hour and minute of the day (in 24 hour time format) to automatically restart the PPPoE connection.
- In the Service Name text box, type a PPPoE service name.
This is either an ISP name or a class of service that is configured on the PPPoE server. Usually, this option is not used. Select it only if there is more than one access concentrator, or you know that you must use a specified service name. - In the Access Concentrator Name text box, type the name of a PPPoE access concentrator, also known as a PPPoE server. Usually, this option is not used. Select it only if you know there is more than one access concentrator.
- In the Authentication retries text box, type or select the number of times that the Firebox can try to make a connection.
The default value is three (3) connection attempts. - In the Authentication timeout text box, type a value for the amount of time between connection attempt retries.
The default value is 20 seconds between each connection attempt. - If you configure the PPPoE settings to use a static IP address, you can select one of three options for PPPoE IP address negotiation:
- Send PPPoE client static IP address during PPPoE negotiation — This option configures the device to send the PPPoE client IP address to the PPPoE server during PPPoE negotiation. This is the default setting.
- Don't send PPPoE client static IP address during PPPoE negotiation — This option configures the device not to send the PPPoE client IP address to the PPPoE server.
- Send and enforce PPPoE client static IP address during PPPoE negotiation — This option configures the device to send the PPPoE client IP address to the PPPoE server, and use the configured IP address even if another IP address is obtained from the PPPoE server.
- To configure the Firebox to negotiate DNS with the PPPoE server, select the Negotiate DNS with PPPoE Server check box. This is enabled by default. Clear this check box if you do not want the device to negotiate DNS. Tip!
For information about DNS servers on the Firebox, go to About DNS on the Firebox. - Click OK.