Applies To: Endpoint Security Elite, Endpoint Security 360, Endpoint Security Prime, Endpoint Security Basic
You can create a scheduled scan task to scan the computers and devices on your network for malicious programs and viruses.
Your operator role determines what you can see and do in WatchGuard Cloud. Your role must have the Launch Scans and Disinfect permission to view or configure this feature. For more information, go to Manage WatchGuard Cloud Operators and Roles.
For information on how to scan a computer immediately, go to Start a Scan Now .
Create a Scheduled Scan Task
To create a scheduled scan, from the Tasks page:
- In WatchGuard Cloud, select Monitor > Endpoint Security.
- Select Tasks.
- Click Add Task > Scheduled Scan.
The New Task dialog box opens.
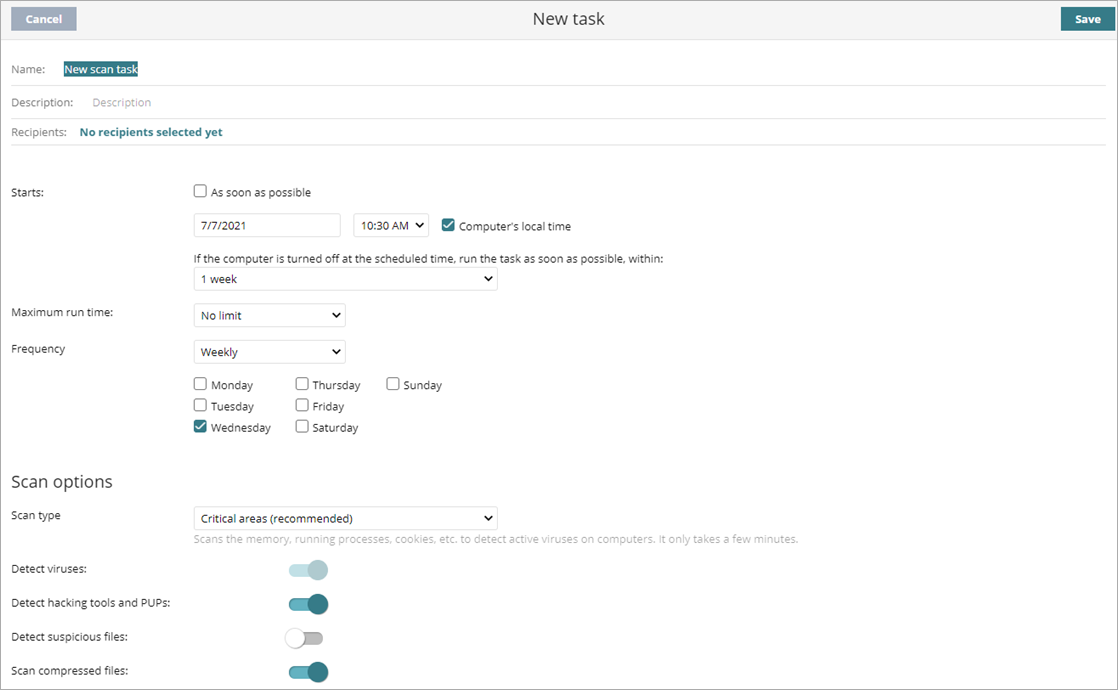
- In the Name text box, type a name for the scan task.
- In the Description text box, type a description of the scan task.
- Select when the scan will start.
- To start the scan as soon as possible, select the check box.
- To start the scan at a specific time, select the date and time.
-
To specify the time based on the time on the discovery computer, select the Computer's Local Time check box.
If you do not select this check box, the time is based on WatchGuard Cloud server time.
- From the Maximum Run Time drop-down list, select how long to retain the scan task when the computer is not connected to the WatchGuard Cloud at the selected time.
- From the Frequency drop-down list, select how often you want the scan to run (One Time, Daily, Weekly, Monthly).
- If you select Weekly, specify the day or days of the week to run the scan each week.
- If you select Monthly, specify the day or date to run the scan each month.
- Select scan options.
For more information, go to Scan Options. - In the upper-right corner, click Save.
- Assign recipients.
To assign recipients:
- Select the task you just created.
- Click the recipients or, if there are no recipients, click No Recipients Selected Yet.

-
To add computer groups, above the box, click +.
The Add Group dialog box opens. - Select the computer groups you want to scan.
-
Click Add.
The selected groups show in the Computer Groups box. - To filter the task to apply to specific device types, select the check boxes for the device type you want to include (for example, Workstation, Laptop, Server, Mobile Device).
-
To add additional computers, above the box, click +.
The Add Computers dialog box opens. - Select additional computers you want to scan.
-
Click Add.
The selected groups show in the Computer Groups box. - Click Back.
- Click Save.
Lower Versions of Endpoint Security
If the recipient computers have a lower version of Endpoint Security installed, they might not correctly interpret frequency settings. Computers with lower versions of Endpoint Security interpret the task frequency settings as follows.
- Daily Tasks — Unchanged.
- Weekly Tasks — Recipient computers ignore the days selected in the task by the administrator in the latest software. The first run occurs on the specified start date and then runs again every 7 days.
- Monthly Tasks — Recipient computers ignore the days selected in the task by the administrator in the latest software. The first run occurs on the specified start date indicated and then runs again every 30 days.