RapidDeploy Configuration Manager is a page on the WatchGuard website that you can use to upload and manage configuration files for RapidDeploy of Firebox appliances. On the RapidDeploy Configuration Manager page, you can upload a configuration file for RapidDeploy, and associate that configuration file with multiple devices activated in your account for RapidDeploy. A configuration file you assign to an appliance on the RapidDeploy Configuration Manager page also appears in the RapidDeploy section of the Product Details page for each appliance.
Before you upload a configuration file to RapidDeploy Configuration Manager, make sure the configuration file is compatible with the appliances you want to assign it to. For more information, go to Create a Configuration File for RapidDeploy
To upload a configuration file to RapidDeploy Configuration Manager:
- Open a web browser and go to https://www.watchguard.com/archive/RapidDeployManager.aspx.
- Log in with your WatchGuard account.
The RapidDeploy Configuration Manager page appears.
Upload a Configuration File
Because the configuration file does not include the Device Management user account passphrases, you must set the passphrases to use on the device when you upload the file.
After an appliance downloads the configuration file, the passphrases are changed to the passphrases you set when you upload the file. The passphrase reset occurs even if the appliance rejects the configuration file. For more information, go to Connect the Firebox for RapidDeploy.
To upload a configuration file:
- Click Upload Configuration File.
The Upload a Configuration File dialog box appears. - Click Choose File or Browse to select the configuration file to upload.
The button name depends on the browser you use. - Browse to and select the .XML configuration file you want to use.
- Click Next.
- Specify the passphrases you want to set on appliances that download this configuration file.
- Type and confirm the passphrase to use for the status Device Management user account (read-only access).
- Type and confirm the passphrase to use for the admin Device Management user account (read-write access).
- Type and confirm the passphrase to use for the status Device Management user account (read-only access).
- Click Finish.
The uploaded file is added to the list of RapidDeploy configurations.
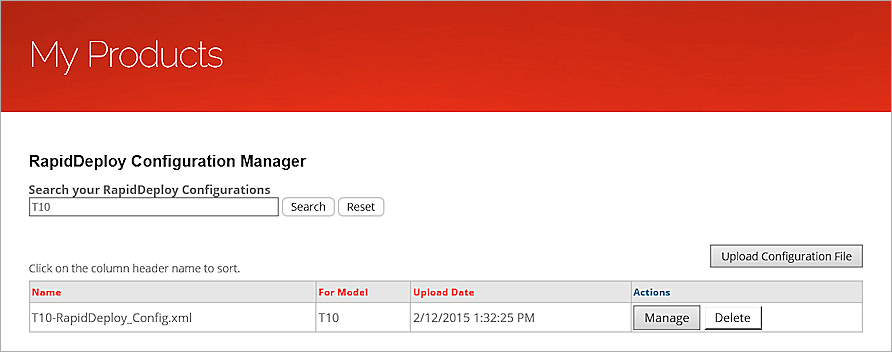
Search the Configuration List
To search for a RapidDeploy configuration you have already uploaded:
- Type the configuration file name or model number in the search box.
- Click Search.
The list is filtered to show only configuration files or models that match what you searched for. - To clear the search filter, click Reset.
Assign a Configuration File
To assign the configuration file to appliances registered in your account:
- In the Actions column for the uploaded configuration file, click Manage.
The RapidDeploy Configuration Assignment dialog box appears. The Unassigned Appliances list contains the serial numbers of registered appliances that can use this file for RapidDeploy.
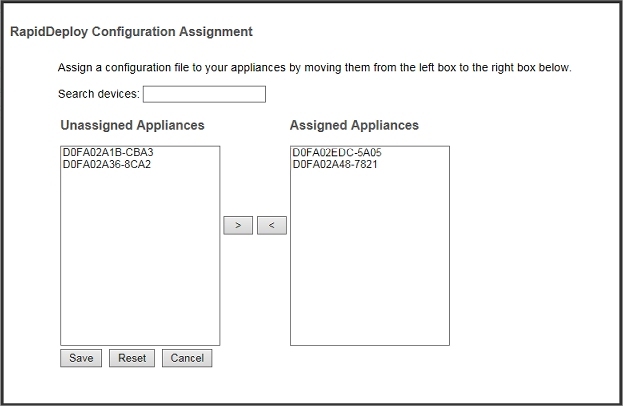
- In the Unassigned Appliances list, select the serial number of a device you want to assign this file to. You can use the Ctrl and Shift keys to select multiple serial numbers.
- Click the right arrow to move the selected appliances to the Assigned Appliances list.
- Click Save.
The file is uploaded and validated. RapidDeploy is enabled for all appliances you selected.
If the file you select is not a valid XML configuration file, an error message appears and the file is not uploaded. Make sure that you select a valid device configuration file.
After the file has been uploaded, you can connect the appliance to a network with Internet access. Any time a device that supports RapidDeploy is powered on with factory-default settings, the device automatically tries to download the RapidDeploy configuration file, the feature key, and device passphrases. For more information, go to Connect the Firebox for RapidDeploy.
After you connect the device, you can:
Delete a Configuration File
When you delete a configuration file, RapidDeploy is disabled for any appliances the configuration file was assigned to. Before you delete a configuration file, you might want to click Manage in the Actions column to see whether it is assigned to any appliances. There is no warning if you delete a file that is assigned to appliances.
To delete a configuration file:
- In the Actions column for the uploaded configuration file, click Delete.
A confirmation dialog box appears. - Click OK to confirm you want to delete the file.
The file is removed, and RapidDeploy is disabled for any appliances the file was assigned to.
For more information about RapidDeploy, go to Use RapidDeploy to Upload a Configuration File.