Applies To: Wi-Fi Cloud-managed Access Points (AP120, AP125, AP225W, AP320, AP322, AP325, AP327X, AP420)
On the Plug-In Settings page, you can configure how a guest user logs in to your network from the portal splash page.
If you enable any of these plug-in options, you must enable and configure the corresponding option in the portal configuration in Analyze. If you do not configure these options in Analyze, these options you have enabled in a splash page in Engage may be ignored and result in an insecure configuration.

Select a check box for a specific plug-in to display it on your splash page:
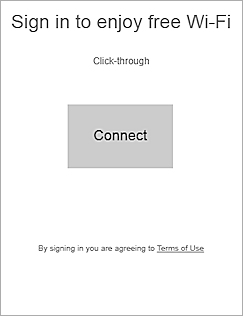
Click-through
A Click-through page is a simple access page where a user does not need to authenticate, but they must read and accept any terms of use or privacy policy before access is allowed.
Social
You can select the Social Media plug-ins that appear on your splash page.
Select the social media icon to activate the service and display the social media site icon on your page. Select the icon again to deselect the plug-in.
You must configure the Social Media Plug-Ins in Analyze. For more information, see Configure Portal Social Media Plug-Ins.

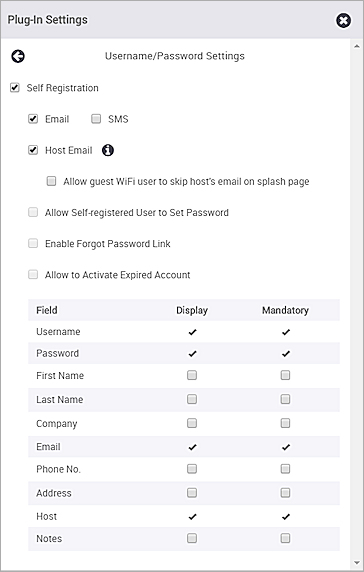
Username/Password
You can maintain a private guestbook and allow users to log in to your wireless network with defined guest user account credentials. The guestbook can also include other user-specific information.
You can also enable self-registration that enables guests users to self-register for the guestbook. For more information, see Guestbook Self-Registration.
You must configure the Guestbook plug-in in Analyze. For more information, see Guestbook Plug-in.
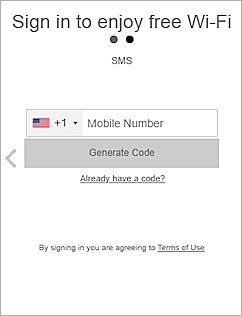
Passcode through SMS
The SMS plug-in enables a guest to obtain an Internet access code through SMS on a mobile device number and use this code to access the Internet. If the SMS plug-in is configured on the portal, guests can enter the mobile number where they want to receive a passcode.
You must configure the SMS plug-in in Analyze. For more information, see Configure Portal SMS Plug-In.
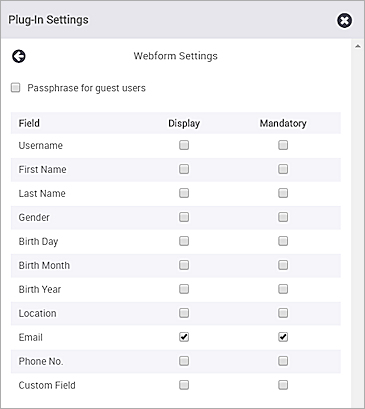
Webform
You can use the Web Form plug-in on your portal to make sure the guest provides personal information, such as an email address, before Internet access is allowed.
Select the fields that the user must complete on the Web Form. You can choose the fields to display and the fields that are mandatory. If required, enable a passphrase for guest users.
Access can be allowed with or without authentication. You can set a common passphrase in the portal configuration in Analyze that guest users must provide for authentication. For more information, see Configure Portal Web Form Plug-In.
If you enable a Webform passphrase for guest users on the splash page in Engage, you must configure the passphrase in the portal configuration in Analyze. If you do not configure a passphrase, this field will be ignored and guest users can access the portal without a passphrase.
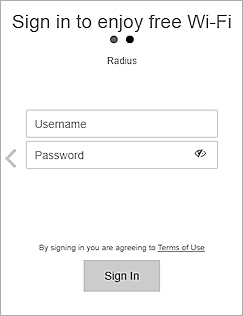
RADIUS
With the RADIUS plug-in, guest users can obtain access to the wireless network with their username and password configured on a RADIUS server. Guests are authenticated by the RADIUS server that communicates the authentication results to Wi-Fi Cloud devices.
You cannot use other plug-ins at the same time as the RADIUS plug-in. Either the RADIUS plug-in or the other selected plug-ins will be active based on the Wi-Fi profile configured for a splash page.
You must configure the RADIUS plug-in in Analyze. For more information, see Configure Portal RADIUS Plug-In.
Default Country Code
The default country code defines the country code to use for the SMS, Web Form, and Guestbook plug-ins that require the use of phone numbers for SMS text messages and registration.
Text Color
You can change the text color for active text links that are used across all plug-ins, such as registration links.
Marketing Opt-in / Opt-out
By default, Wi-Fi users are opted-in to receive marketing communications for promotions.
To allow Wi-Fi users to choose if they can opt-in or opt-out of marketing promotions:
- Select the Give Wi-Fi users the choice to explicitly opt-in or opt-out check box, then select Opt-in or Opt-out.
- If you choose Opt-in, select the Keep the opt-in checkbox selected by default check box to have the opt-in selection enabled by default for the user.
- If you choose Opt-out, select the Keep the opt-out checkbox selected by default check box to have the opt-out selection enabled by default for the user.
- In the Opt-in Text or Out-out Text field, type the text to describe what occurs when the user selects to opt-in or opt-out to marking communications.