Configure Location Folders with the Navigator
Applies To: Wi-Fi Cloud-managed Access Points (AP120, AP125, AP225W, AP320, AP322, AP325, AP327X, AP420)
You can also create your own AP Groups that can span across folders and floors. For example, you can create an AP group of dedicated WIPS sensors, or a group for APs in a mesh network. For more information, see AP Groups.
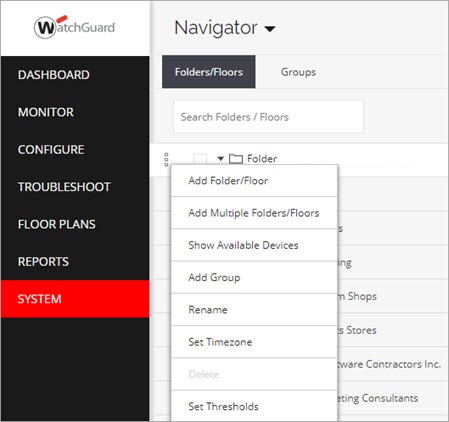
To configure locations and floors, select System > Navigator, then right-click on a folder or floor to perform actions on the location hierarchy.
The default location folder where new APs appear when they are deployed is the Staging Area. You can add new locations and subfolder locations to the tree, and move APs to these folders.
Add a Folder or Floor
You can add one or more folder and floors below the root Locations folder or below other folders. You cannot add a folder or a floor to the Staging Area folder that is dedicated for new deployed APs.
You can add multiple folders and floors at the same time.
To add a folder or floor:
- Select System > Navigator.
- Select a folder below which you want to add a new folder or floor.
- Right-click the folder, then select Add a Folder/Floor or Add Multiple Folders/Floors.
For a single folder or floor:
- Select Folder to add a folder, or select Floor to add a floor.
- Type the name of the folder or floor, then click Add.
For multiple folders:
- In the new Folders/Floors text box, type the folder and floor names in the text box that you want to add. Use the tab key to create a hierarchy level.
- When finished, click Add.
Delete Folders and Floors
You can delete folders and floors that are no longer applicable to your deployment.
To delete a folder or floor:
- Select System > Navigator.
- Select the folders and floors you want to delete.
- Right-click any of the selected folders or floors, then select Delete.
- Click Delete to confirm.
Rename a Folder or Floor
To rename a folder or floor:
- Select System > Navigator.
- Select the folders or floor you want to rename.
- Right-click the selected folder or floor, then select Rename.
- Type the new name of the folder or floor, then click Rename to save the changes.
Search for a Folder or Floor
You can search for a specific location or floor in the Navigator.
To search the Location Navigator:
- Select System > Navigator.
- In the Search Folders / Floors text box, type a search string to match the name of a folder or floor.
The folders or floors matching the pattern of the search string are displayed and include the parent folder.
Special characters such as * and ? are not supported.
Set Location Properties
You can set these location properties for each location folder:
- Location Timezone — Set the appropriate timezone for the location folder. You cannot set a time zone for a floor. The time zone set for the immediate parent folder of a floor is the time zone applied to the floor.
- Location Tag — A location tag is the location identifier that you can append to the circuit ID when you use mDNS (multicast DNS) tagging or DHCP Option 82 on an SSID. For DHCP Option 82, if %l is used in the circuit ID the AP replaces this variable with the location tag.
For more information on mDNS tagging and DHCP option 82, see the SSID network settings in Configure SSID Settings. - Venue ID — Set the venue ID for the location.
Set Thresholds
Thresholds are global settings and can only be configured for the top location folder. The same threshold values are inherited by all the folders and floors in the Navigator.
- Low RSSI — Clients with a signal strength below the RSSI threshold are classified as Low RSSI clients. For example, if the threshold value is -70 dBm, clients below this RSSI threshold are classified as Low RSSI clients.
- Low Data Rate — Clients with a measured data rate below the Data Rate threshold are classified as Low Data Rate clients. For example, if the threshold value is 20 Mbps, clients with a data rate below this threshold are classified as Low Data Rate clients.