Floor Plans
Applies To: Wi-Fi Cloud-managed Access Points (AP120, AP125, AP225W, AP320, AP322, AP325, AP327X, AP420)
You cannot add APs that are located in the Staging Area folder to a floor plan. You must move the APs to a new location folder.

- Place Access Points — Drag and drop APs onto the floor plan and perform actions on the APs. For more information, see Add APs to a Floor Plan and Perform AP Actions from a Floor Plan.
- RF Heat Maps — Generate and view RF heat maps of your location to visualize the AP coverage, link speed, and channel coverage. For more information, see Heat Maps.
- Locate Devices — Locate APs and clients and show their location on the floor plan. For more information see, Locate APs and Clients.
- Add Note — Add a descriptive note to the floor plan.
You can also drag and drop location sub-folders on to the floor plan from the Locations widget.
Add A Floor Plan
To add a floor plan to a location:
- Select the location folder or floor where you want to add the floor plan from the Locations tree.
The AP cannot be located in the Staging Area folder. - Select Floor Plans.
- Click Add New Floor Plan.
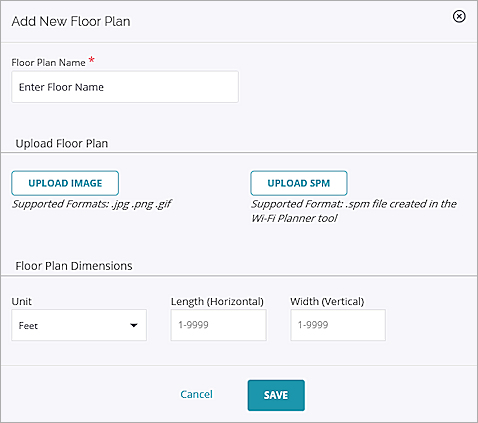
- In the Floor Plan Name text box, type a descriptive name for the floor plan.
- In the Upload Floor Plan section, click Upload Image, then select the file you want to upload.
SPM files are not available for use in Discover.
- In the Floor Plan Dimensions section, from the Unit drop-down list, select the unit of measure, then type the Length (Horizontal) and Width (Vertical) of the floor plan.
- Click Save.
Add APs to a Floor Plan
To add APs to a floor plan:
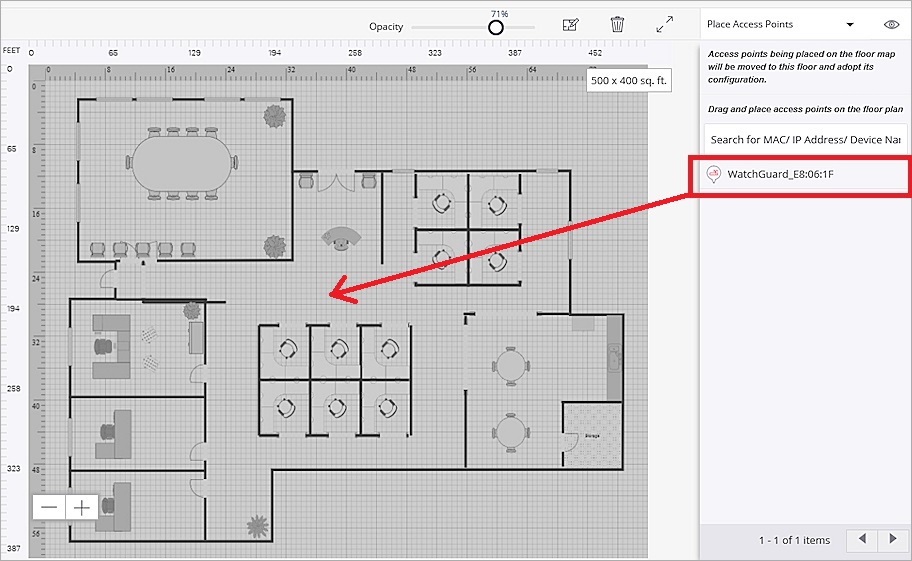
- Select the location of the floor plan.
- Select Floor Plans, then open the floor plan.
- From the right panel, drag and drop APs to their location on the floor plan.
You can add both managed and unmanaged authorized APs to the floor plan.
Perform AP Actions from a Floor Plan
You can perform several actions on an AP from a floor plan.
To perform actions on the AP:
- Select the location for the floor plan.
- Select Floor Plans, then open the floor plan.
- Right-click on an AP on the floor plan, then select the action to perform.
- Troubleshoot
- Run Client Connectivity Test — Run a client connectivity test on the AP. For more information, see Client Connectivity Test.
- Capture Packet Trace — Perform a packet trace on an AP. For more information, see Capture Packet Trace.
- Packet Trace History — View the packet trace history for a selected AP.
- View Event Logs — View the AP event logs. For more information, see Access Point Event Logs.
- Download Debug Logs — Download the AP debug logs. For more information, see Debug Logs.
- Debug Logs History — View the debug logs history for the AP.
- Spectrum Analysis — Start spectrum analysis for an AP to visually display RF frequencies in the APs area. For more information, see Spectrum Analysis.
- View RF Explorer — View the details of what an AP sees in its RF neighborhood. For more information, see RF Explorer.
- Open Web Shell — Opens an SSH connection to the AP to perform commands with the command line interface (CLI). You can only use SSH access for an AP in conjunction with WatchGuard Technical Support for troubleshooting purposes.
- Customize
- Customize Transmit Power or channel — Manage the transmission power of the AP.
- Additional VLAN Monitoring — Manage additional VLAN monitoring on the selected AP. You can create a static IP address for the AP or use DHCP on the specified VLAN. For more information, see How to set a static IP address for an AP in WatchGuard Wi-Fi Cloud.
- Remove from Floor Plan — Remove the AP from the floor plan.
- Update Firmware — Update the firmware on an AP. For more information, see Update AP Firmware in Wi-Fi Cloud.
- Assign/Reassign to a Group — Add or remove the AP from a group. For more information, see AP Groups.
- Remove Access Points from Group — Removes the selected AP from a group.
- Reboot — Reboots the AP.
- Rename — Renames the AP.
- Delete — Deletes the AP from the list of available APs.
- Modify Tag — Modify the tag for the AP.
- View Access Point Details — Display details about the AP.