Applies To: Wi-Fi Cloud-managed Access Points (AP120, AP125, AP225W, AP320, AP322, AP325, AP327X, AP420)
Real-time guest profile information can be sent to third party applications when a user gets access to a portal and successfully authenticates using one of the plug-ins defined for the portal. This information is sent in the form of key-value pairs and can be stored in any format in the third-party application. For example, you can store the data as a JSON file, an XML file, or other database format.
The Third-Party Endpoint system can then be mapped to authentication plug-ins available within a captive portal.
The Analyze service provides a predefined set of values for a guest profile based on the information it captures. The individual fields in the guest profile can be mapped to relevant keys or field names in a third-party application. Keys are the identifiers derived from the third-party application where you want to store this information. An endpoint is the destination to which the guest profile information is to be sent. When you configure the endpoint, you specify the destination URI, the HTTP method to use for data transfer, and the information to be sent to this endpoint.
For example, if you want to store the name of a Facebook user with the user's profile photo and phone number, you must configure an endpoint with notification parameters that use the parameter type as Guest Manager, and the values First Name, Last Name, Picture URL and Phone Number. You must provide the keys for these values, and then select the endpoint as the Facebook plug-in endpoint for the respective portal.
To configure a third party application endpoint, select Admin > Third Party Integration.
Pre-Validation with Third-Party Endpoints
You can perform pre-validation of guest users to a third-party endpoint based on information gathered by the authentication plug-in:
- Web Form Plug-in — You can use an external HTTP endpoint as a pre-validation step for the Web Form plug-in to authenticate a guest user based on the information the guest provides in the web form.
- SMS Plug-in — You can use an external HTTP endpoint as an additional pre-validation step for the SMS plug-in to authenticate the user before the user is sent a one-time password through SMS for Wi-Fi access.
The guest user makes a request for Wi-Fi access through the SMS plug-in from the portal splash page. A request is then sent to the third-party endpoint to validate the guest user details. If the user is successfully authenticated, the server sends a successful message to allow the guest user to log in.
You can specify the primary parameters that perform the authentication. For the SMS plug-in, you require a valid phone number for the user that receives the one-time password for Wi-Fi access. You can also define additional parameters for successful authentication depending on what information you require from users on your portal splash page.
For the validation node, the system uses Raw Body with the defined parameters and request headers along with the form-data. The Raw Body only emerges when the call is a POST call. For more information, see Validation Parameters (SMS Plug-in).
If the Analyze service fails to receive a response from the third-party server, Analyze submits the request again (up to three times) for the specified response time.
Add Endpoint
You can add an endpoint for third-party integration that is the destination to which guest profile information is sent. The guest profile information can be sent to the endpoint using the HTTP GET method, HTTP POST method, or the redirect method. You can send guest profile information that is collected by Analyze. or custom data that specifies your own keys and corresponding key values.
If you select the parameter type as Guest Manager, you must select a value from the predefined list of values. You must enter at least one notification parameter for the endpoint.
A notification preview is displayed as you type the values for each field on the Add Endpoint page. This is a preview of the actual form in which the data is sent to the third party application using HTTP.
To add an endpoint for third party integration:
- Select the Admin tab and then select Third Party Integration.
- Click Add Endpoint.
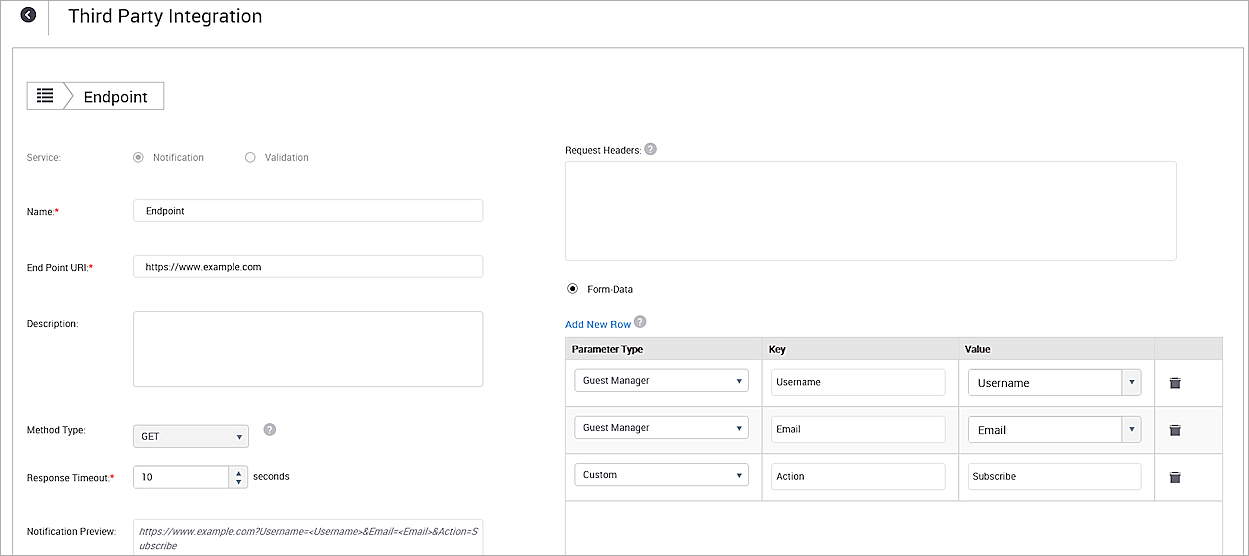
- Provide the endpoint details:
- Name — Name of the endpoint.
- End Point URI — The URI of the endpoint.
- Description — Description about the endpoint.
- Method Type — Select the method type for how to send guest profile information to the endpoint URI.
- Select the POST option to use the HTTP POST method to send guest profile information to the endpoint URI. The notification data will be sent as HTTP form data to the endpoint.
- Select the GET option to use the HTTP GET method to send guest profile information to the endpoint URI. The notification data will be sent to the endpoint as parameters appended to the Endpoint URL
- Select the Redirect option to send data to the redirect URI when the endpoint is chosen as the Redirect URL in the Plug-in QoS tab for a portal. For more information, see Endpoint Plug-In Configuration. The Redirect method should be used when the Endpoint URL is going to be used as a Redirect URL. The notification data will be sent to the endpoint appended to the Redirect URL. This Redirect URL will receive the highest precedence over other Redirect URLs. The advantage of this Redirect URL is to utilize the notification parameters by the Third-Party endpoint system to present any offers, coupons, or membership to customers.
- Response Timeout — The timeout, in seconds, for which data to be sent to the endpoint is cached. After the timeout period, the data is deleted from the cache. The default value is 10 seconds. The maximum is 60 seconds.
- Notification Preview — A notification preview is displayed as you enter values for the endpoint. This data is a preview of the actual form in which the data is sent to the third-party application using HTTP. For example: http://www.example.com/members/subscribe.aspx?Username=<Username>&Email_address=<Email>&action=subscribe
- Select Form-Data.
- Click Add new row to add Notification Parameters. If you want to delete a notification parameter, click the delete icon for the parameter row.
- Parameter Type — The type of parameter to pass to the third-party application.
- Guest Manager — Select this option to pass a parameter captured by the Analyze service.
- Custom — Select this option to pass a custom key value pair to the third-party application.
- Key — The field name from the respective third-party application that maps to the field name selected to Value under Notification parameters.
- Value — The parameter to pass to the third-party application. Select a predefined value from the drop-down list if the parameter type is Guest Manager. If the parameter type is Custom, you can type any string here.
In this example, the End Point URI is a subscription landing page that uses the username and email address of the guest user and a custom subscribe value to forward to a member subscription URL.
- Click Save.
Endpoint Plug-In Configuration
After you add the Endpoint, you must map the endpoint to a specific portal that will be used as the input. The Endpoint can be mapped to any plug-in. For more information, see Configure QoS for Plug-In.
- From Analyze, select the Portals tab.
- Select a portal to edit.
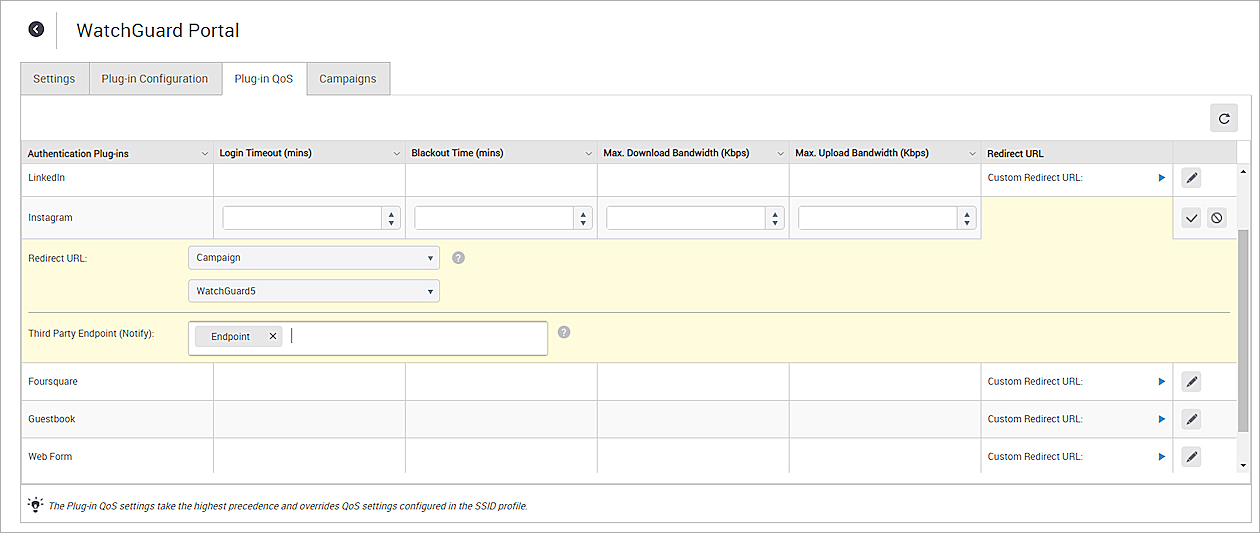
- Select the Plug-in QoS tab.
- Click
 for the specific plug-in you want to configure. For example, you can configure the Endpoint in the Facebook or Twitter plug-in.
 - From the Redirect URL drop-down list, select a Custom redirect URL, Third-party Endpoint set to "Redirect", or Campaign to select a campaign you created in Engage that contains a landing page. In this example, we select Campaign.
- From the Third Party Endpoint (Notify) drop-down list, select the name of the Endpoint you configured. On successful authentication, the notification parameters are sent to the End Point URI of the third-party Endpoint using the configured method type.
In this example, we use the Endpoint we configured in the previous section for the subscriber landing page. - Click
 to update and save the plug-in configuration.
Validation Parameters (SMS Plug-in)
For validation, you can select Raw Body and define the JSON parameters sent to the third-party validation endpoint for the SMS plug-in.
The parameters must be specified within {{ }} brackets.
Sample JSON:
{"InputKey" : "ZA3998833",
"Mobile" : "{{phone_number}}"}
The available parameters are:
- portal_name
- visit_count
- birth_day email
- ap_mac private_
- data friends_count
- languages
- first_name
- plugin_name
- last_visit
- birth_month
- gender
- ap_ssid membership_id
- followers_count
- location
- last_name
- client_mac date_created
- phone_number
- picture_url
- username
- marketing_optin
- birth_year
- login_location age_range