Applies To: Cloud-managed Fireboxes
For a cloud-managed Firebox, an external network specifies settings for how the Firebox connects to a network that is not protected by the Firebox, such as the Internet. External network settings specify which interfaces connect to the external network and how the Firebox gets an external IP address.
To maintain a connection to WatchGuard Cloud, the Firebox configuration must have a valid external network and DNS server.
If a change to the Firebox configuration or external network causes the Firebox to lose the connection to WatchGuard Cloud, you can use the Web UI on the Firebox to recover the connection. For more information, see Recover the Firebox Connection to WatchGuard Cloud.
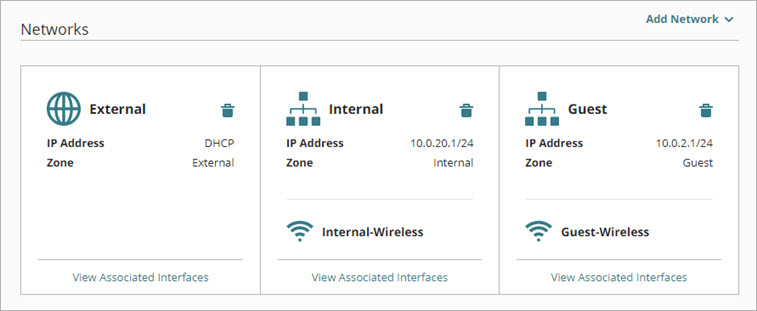
An External network is in the External zone. It is a member of the built-in alias Any-External. For more information about aliases, see Configure Firebox Aliases.
Edit or Add an External Network
By default, a cloud-managed Firebox has one external network. You can edit the default external network and add additional networks.
To open the Networks configuration, from WatchGuard Cloud:
- Select Configure > Devices.
- Select the cloud-managed Firebox.
- Click Device Configuration.
- Click the Networks tile.
The Networks configuration page opens.
To edit an External network, from WatchGuard Cloud:
- On the Networks page, click the tile of the external network to edit.
The network configuration page opens. - Configure the network settings, as described in the next section.
- To save configuration changes to the cloud, click Save.
To add an External network, from WatchGuard Cloud:
- At the top of the Networks page, click Add Network.
- From the drop-down list, select Add External Network.
The Add External Network page appears.

- In the Name text box, type a name for the network.
- Configure other network settings as described in the next section.
- To save configuration changes to the cloud, click Save.
Configure Network Settings (IPv4)
In the Network tab, you can configure the network IPv4 address, VLAN settings, and associated interfaces.
Configure Network Address Settings
For an External network, you can assign a static IP address, or you can configure the Firebox to use DHCP or PPPoE to get an IP address.
To configure a Firebox external network to use a static address, from WatchGuard Cloud:
- Add or edit an External network.
- From the IP Address Configuration drop-down list, select Static IP Address.
- In the IP Address text box, type the IP address and netmask to use for this network.
- In the Gateway text box, type the IP address of the default gateway.
To configure a Firebox external network to use DHCP to get an IP address, from WatchGuard Cloud:
- Add or edit an External network.
- From the IP Address Configuration drop-down list, select DHCP.

- Select whether to assign a specific IP address.
- To configure the Firebox to request an IP address from a DHCP server, select Obtain an IP address automatically.
- To manually assign an IP address to the Firebox, select Use this IP address, and type the IP address to use.
- If your ISP or external DHCP server requires a client identifier, such as a MAC address, in the Client Name text box, type that information.
- To specify a host name for identification, in the Host Name text box, type the host name.
- To show advanced DHCP settings, click Advanced DHCP Settings.
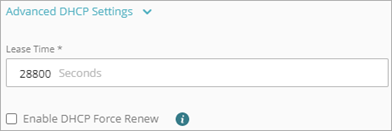
- To change the DHCP lease time, in the Lease Time text box, type the number of seconds.
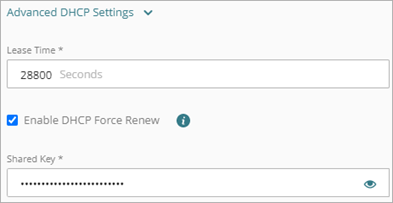
You can optionally enable the DHCP Force Renew option. This feature enables the Firebox to handle a FORCERENEW message from your ISP or DHCP provider. The DHCP server sends a FORCERENEW message to request that the DHCP client renew the leased IP address sooner than it ordinarily would, based on the configured lease time. If your ISP or DHCP provider requests that you enable this option, they might also specify a shared key. The shared key is optional, but recommended. If you specify a shared key, it must match the shared key in the FORCERENEW message. If you do not specify a shared key, the Firebox responds to any FORCERENEW message, whether a shared key is present or not.
To enable the Firebox to manage a DHCP FORCERENEW request, from WatchGuard Cloud:
-
In the DHCP Advanced Settings, select the DHCP Force Renew check box.
The Shared Key text box appears. - (Optional) In the Shared Key text box, type the shared key. The shared key is encrypted and stored in the Firebox configuration.
To configure an external network to use PPPoE to get an IP address, from WatchGuard Cloud:
- Add or edit an External network.
- From the IP Address Configuration drop-down list, select PPPoE.
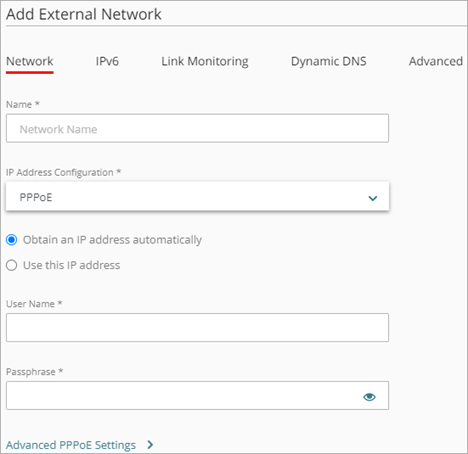
- Select whether to assign a specific IP address.
- To configure the Firebox to request an IP address from a PPPoE server, select Obtain an IP address automatically.
- To manually assign an IP address to the Firebox, select Use this IP address, and type the IP address to use.
- In the User Name text box, type the user name for PPPoE authentication. Tip!
- In the Passphrase, type the password for PPPoE authentication. To see the passphrase as you type it, click
 .
.
After you save the settings, you cannot see the previously saved passphrase. You can only set a new one.
- To see advanced PPPoE settings, click Advanced PPPoE Settings.
In the advanced PPPoE settings, you can configure:
- Connection Settings
- Retry Settings
- Authentication Settings
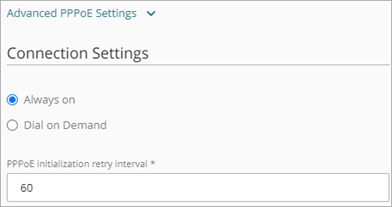
In the PPoE Connection Settings, select one of these options to configure when the Firebox connects to the PPPoE server:
Always-on
Select this option if you want the Firebox to keep a constant PPPoE connection. It is not necessary for network traffic to go through the external network.
If you select this option, in the PPPoE initialization retry interval text box, type the number of seconds that PPPoE tries to initialize before it times out. The default value is 60 seconds.
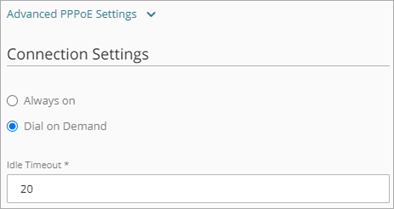
Dial-on-demand
Select this option if you want the Firebox to connect to the PPPoE server only when it gets a request to send traffic to an IP address on the external network. If your ISP regularly resets the connection, select this option.
If you select this option, in the Idle Timeout text box, type the number of seconds a client can stay connected when no traffic is sent.
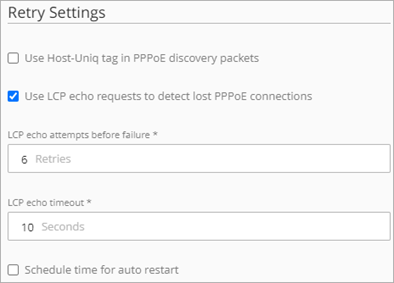
In the PPPoE Retry Settings, configure settings for PPPoE connection retries.
To configure PPPoE retry settings, from WatchGuard Cloud:
- If your ISP requires the Host-Uniq tag for PPPoE discovery packets, select the Use Host-Uniq tag in PPPoE discovery packets check box.
- To use LCP echo requests to detect lost PPPoE connections, select the Use LCP echo requests to detect lost PPPoE connections check box.
This is enabled by default. - In the LCP echo attempts before failure text box, type or select the number of failed LCP echo requests allowed before the PPPoE connection is considered inactive and closed. The default is 6 retries.
- In the LCP echo timeout text box, type or select the length of time, in seconds, that the response to each echo timeout must be received. The default is 10 seconds.
- To configure the Firebox to automatically restart the PPPoE connection, select the Schedule time for auto restart check box.
The Day and Restart Time check boxes appear. - From the Day drop-down list, select a day of the week to restart weekly.
- Select Restart Time to specify the hour and minute of the day (in 24-hour time format) to automatically restart the PPPoE connection.

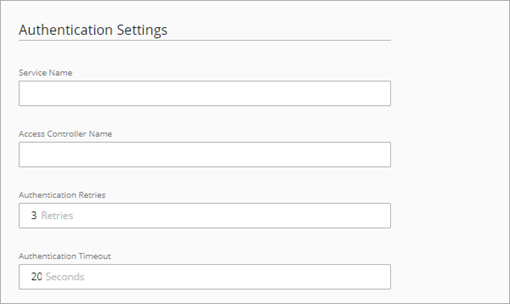
In the PPPoE Authentication Settings, configure settings for the Firebox to authenticate to the PPPoE server.
To configure PPPoE authentication settings, from WatchGuard Cloud:
- In the Service Name text box, type a PPPoE service name.
This is either an ISP name or a class of service that is configured on the PPPoE server. Usually, this option is not used. Select it only if there is more than one access concentrator, or you know that you must use a specific service name. - In the Access Concentrator Name text box, type the name of a PPPoE access concentrator, also known as a PPPoE server. Usually, this option is not used. Select it only if you know there is more than one access concentrator.
- In the Authentication retries text box, type or select the number of times that the Firebox can try to make a connection.
The default value is three connection attempts. - In the Authentication timeout text box, type the number of seconds between connection attempt retries.
The default value is 20 seconds.
The Authentication settings also include settings for PPPoE IP address and DNS negotiation.

To configure PPPoE negotiation settings, from WatchGuard Cloud:
- If you configure the PPPoE settings to use a static IP address, select one of these options for PPPoE IP address negotiation:
- Send PPPoE client static IP address during PPPoE negotiation — This option configures the device to send the PPPoE client IP address to the PPPoE server during PPPoE negotiation. This is the default setting.
- Don't send PPPoE client static IP address during PPPoE negotiation — This option configures the device not to send the PPPoE client IP address to the PPPoE server.
- Send and enforce PPPoE client static IP address during PPPoE negotiation — This option configures the device to send the PPPoE client IP address to the PPPoE server, and use the configured IP address even if another IP address is obtained from the PPPoE server.
- To configure the Firebox to negotiate DNS with the PPPoE server, select the Negotiate DNS with PPPoE Server check box. This is enabled by default. If you do not want the device to negotiate DNS, clear this check box. Tip!
For information about DNS servers on the Firebox, see Configure Firebox DNS Settings.
Configure VLAN Settings
You can configure any Firebox network as a virtual local area network (VLAN). When you enable VLAN for an external network, all interfaces associated with the network are configured to handle tagged VLAN traffic by default. You can edit each interface to change whether it handles tagged or untagged VLAN traffic for this network.
For more information, see Configure Firebox VLANs.
Configure Network Interfaces
In the network settings, you select which Firebox interfaces are associated with the network.
When you add an External network, the lowest numbered available interface is automatically associated with the network.
In the settings for a network, the Interfaces section shows which interfaces are currently associated with the network, and which are available.
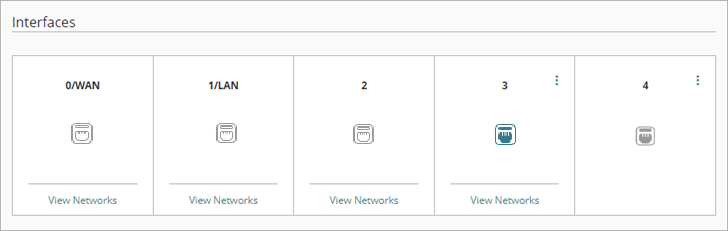
The interface icon color indicates interface status in relation to this network.
|
|
Interface is associated with another network |
|
|
Interface is associated with this network |
|
|
Interface is available to associate with this network |
To see associated networks for an interface, point to View Networks for the interface.
By default, all interfaces are associated with a network. Before you can associate an interface with a different network, you must remove that interface from the network it was previously associated with.
If you associate more than one interface with a network, network traffic is bridged between all associated interfaces.
To configure the interface settings for a network, from WatchGuard Cloud:
- In the tile for an associated or available interface, click
 .
.
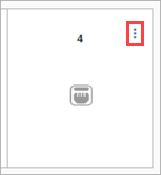
- Select one of these options:
- No Traffic — Remove the interface from this network.
- Add Network Traffic — Add the interface as the first interface associated with this network.
- Bridged Network Traffic — Add this interface to a network that already has another associated interface or SSID.
For a VLAN, the interface options are Untagged VLAN or Tagged VLAN. For more information, see Configure Firebox VLANs.
Configure IPv6
On the IPv6 tab, you can enable IPv6 for the network, add one or more IPv6 addresses to the configuration, and configure other IPv6 settings.
In Fireware v12.9.2 or higher, you can use an IPv6 static address to configure an interface when you have a link-local address as the default gateway.
For information about IPv6 address formats, see About IPv6.
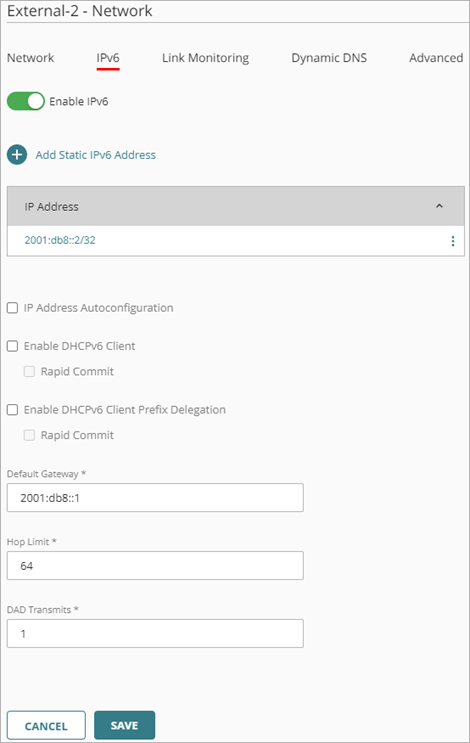
To enable IPv6, from WatchGuard Cloud:
- Select the IPv6 tab.
- Select Enable IPv6.
- Click Add Static IPv6 Address.
The Add Static IPv6 Address dialog box opens. - In the IP Address text box, type an IPv6 address and prefix length.
- Click Add.
- To add more IPv6 addresses, repeat Steps 3–5.
- To edit an IPv6 address, click it.
- (Optional) To automatically assign an IPv6 link-local address to this interface, select IP Address Autoconfiguration.
- (Optional) To enable DHCPv6 clients to request an IPv6 address, select DHCPv6 Client. By default, DHCPv6 clients use a four-message exchange (solicit, advertise, request, reply).
- (Optional) To enable DHCPv6 clients to use a two-message exchange (solicit, reply) to request an IPv6 address, select Rapid Commit.
- (Optional) To enable DHCPv6 clients to request an IPv6 prefix, select Enable DHCPv6 Client Prefix Delegation.
- (Optional) To enable DHCPv6 clients to use a two-message exchange (solicit, reply) to request a prefix, select Rapid Commit.
- Enter the Default Gateway.
- Enter the Hop Limit, which is the number of network segments a packet can travel over before a router discards the packet. The default value is 64.
- Enter the DAD Transmits, which is the number of Duplication Address Detection transmits for this link. The default value is 1.
Configure Link Monitoring
On the Link Monitoring tab, you can enable link monitoring. When link monitoring is enabled, the Firebox sends traffic to a link monitor target to test network connectivity.
For more information, see Configure Firebox Network Link Monitoring.
Configure Dynamic DNS
On the Dynamic DNS tab, you can enable dynamic DNS (DDNS) and configure a connection to a DDNS service provider. WatchGuard Cloud supports several DDNS service providers.
For more information, see Configure Dynamic DNS.
Configure Advanced Settings
On the Advanced tab you can configure these network settings:
- Web UI Access
- Ping
- MAC Access Control
- Secondary Networks
For more information, see Configure Advanced Network Settings.