From WatchGuard Server Center, you can configure the report generation settings for your Report Server. These settings apply to Available Reports and On-Demand Reports.
Reports are generated in XML files that you can view with Log and Report Manager. To control which reports are generated and when they are generated, you can create groups of reports and report schedules. When you create a report group, you specify which devices to include in the group, the specific types of reports to generate, and the directory where the generated reports are saved. When you create a report schedule, you select the devices and groups for which to generate the reports, the reports to generate, the time to generate them, and whether to generate the reports in PDF or HTML format. You can also specify whether to run the report recurrently, and whether to send a notification message when the report generation is completed to the email addresses you specify.
- In the Servers tree, select Report Server.
- Select the Report Generation tab.
The Report Generation page appears.
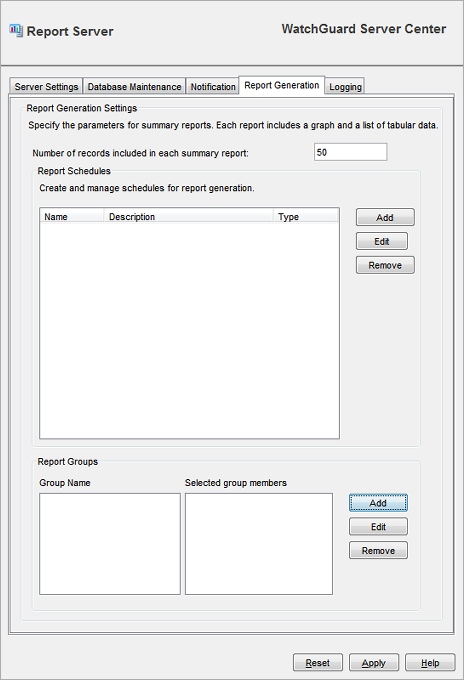
- In the Number of records included in each summary report text box, type the number of records you want to appear in your Summary reports. The allowed range is 25–100 records.
This setting applies to Summary reports only. - To configure the settings for report schedules and groups, follow the procedures in the next sections.
- Click Apply to save your changes.
Manage Report Schedules
When you configure a Firebox to send log messages to your Log Server, the Daily Appliance Reports and Weekly Appliance Reports schedules are automatically added to the Report Schedules list. When you configure a WatchGuard server to send log messages to your WatchGuard Log Server, the Daily Server Reports schedule is automatically added to the Report Server Report Schedules list.
You can add, edit, and delete schedules for report generation. This applies both to automatically created schedules and the schedules you create manually. When you add, edit, or remove a schedule, the Report Server generates a log message about this activity.
For each report schedule, you specify these parameters:
- Devices and groups to include
- Reports to generate
- Time when reports are generated and recurrence
- Format for report output (PDF or HTML)
- Notification email settings for completed reports
To include a report group in your report schedule, you must create the group before you create the schedule. For instructions to create a report group, go to the Manage Groups section.
To send reports to ConnectWise, you must create a report schedule that includes all four ConnectWise reports and select to send the reports to ConnectWise.
Create a Report Schedule
You can create report schedules to generate reports for your devices on the dates and times you specify.
- In the Report Schedules section, click Add.
The New Schedule dialog box appears with the Schedule Settings tab selected.
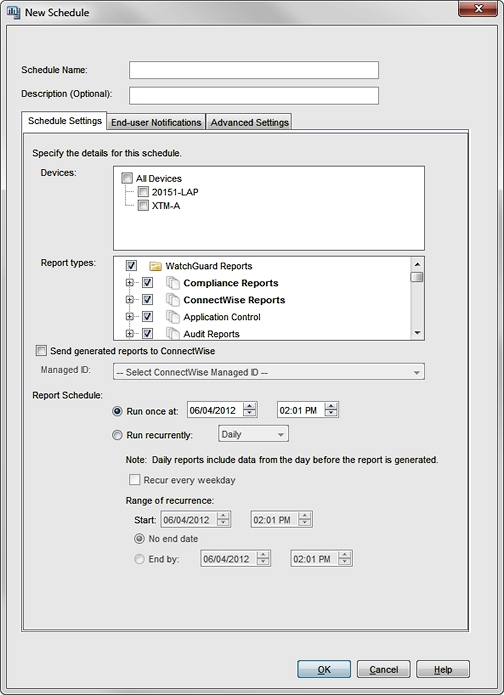
- In the Schedule Name text box, type a name for this schedule.
- (Optional) In the Description (Optional) text box, type a description to help you identify this schedule.
- In the Devices list, select the check box for each device, device group, or FireCluster to include in the group.
- In the Report types list, select the check box for each report you want to generate.
- (Optional) To send the report types you selected to ConnectWise:
This option only appears if you have enabled ConnectWise integration for your Report Server.- Select the Send generated reports to ConnectWise check box.
- From the Managed ID drop-down list, select the ConnectWise managed ID for a company you added to the Company Names list on the Server Settings tab.
- From the Report Schedule options, select when to run the scheduled report:
- Run once at
- Run recurrently
- If you select Run once at, specify the date and time for the report to run.
If you select Run recurrently, select how often to run the report and specify the range of recurrence:- Daily
- Select the start and end date and time.
- To only run the report on weekdays, select the Recur every weekday check box.
- Weekly
- Select the start and end date and time.
- From the Recur every week on drop-down list, select the day of the week to run the report.
- Custom
- Select the start and end date and time.
- In the Range of recurrence text box and drop-down list, type how often to run the report and select the interval: Hours, Days, Weeks, or Months.
- In the Report time span will be last text box and drop-down list, type the amount of time to include in the report and select the interval: Hours, Days, Weeks, or Months.
- To configure email notifications for scheduled reports, follow the procedure in the Configure Email Notifications section.
- To configure settings to generate reports for external use, follow the procedure in the Configure Advanced Settings section.
- Click OK to save your settings.
The schedule appears in the Report Schedules list.
If you create a report schedule to run daily or weekly, you can view those reports on the Log and Report Manager Available Reports pages. For more information, go to View Reports in Report Manager.
If you create a report schedule to run recurrently for a custom time range that does not repeat every 1 day or every 1 week, you can view those reports on the Log and Report Manager Custom Time Range page. For more information, go to View Custom Time Range Reports.
Configure Email Notifications
You can specify which end-users receive email notification messages when reports are generated or a schedule is modified.
In the New Schedule dialog box:
- Select the End-user Notifications tab.
The settings for email notifications appear.
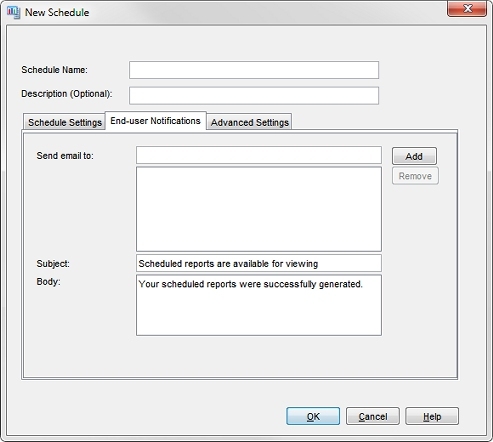
- In the Send email to text box, type the email address where you want to send notifications when a scheduled report is generated or a schedule is modified. Click Add.
The email address is added to the Send email to list. Repeat this step to add more email addresses. - To delete an email address from the Send email to list, select the email address. Click Remove.
- In the Subject text box, type the text to include in the subject line of the notification messages.
- In the Body text box, type the text of the notification messages.
- Click OK.
The new schedule appears in the Report Schedules list.
Configure Advanced Settings
To generate reports that you can review in applications other than Log and Report Manager Web UI, such as on your web server, you can configure Advanced Settings for your scheduled reports.
In the New Schedule dialog box:
- Select the Advanced Settings tab.
The Advanced Settings appear.
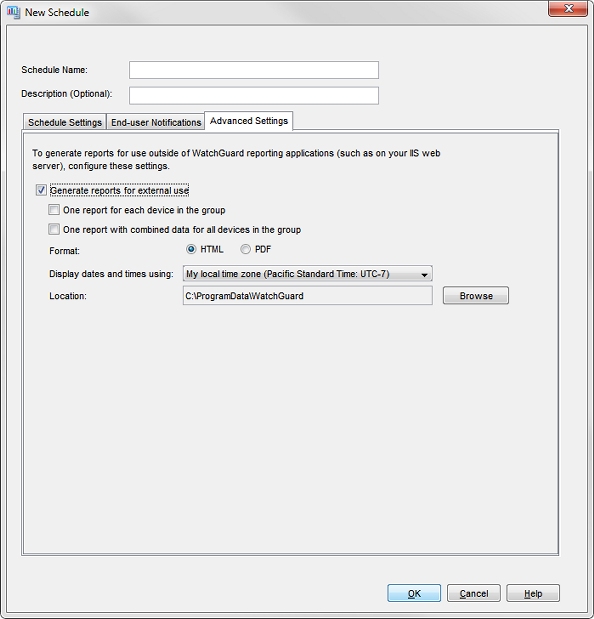
- Select the Generate reports for external use check box.
- Select an option for how reports are generated:
- One report for each device in the group
- One report with combined data for all devices in the group
- Select a Format option for the report: HTML or PDF.
- In the Location text box, type the path to the directory where you want to save reports.
Or, click Browse and select the directory.
Change the Settings for a Schedule
On the Schedule Settings tab:
- From the Report Schedules list, select a schedule.
- Click Edit.
The Edit Schedule dialog box appears. - Modify the report schedule settings.
- Click OK.
Delete a Schedule
From the Schedule Settings tab:
- From the Report Schedules list, select a schedule.
- Click Remove.
A confirmation dialog box appears. - Click Yes.
The schedule is removed from the Report Schedules list.
Manage Groups
You can add, edit, or delete groups of Fireboxes to include in the reports generated by the Report Server. When you add, edit, or delete a group, the Report Server generates a log message about the activity.
Create a Group
- In the Report Groups section, click Add.
The Group Setting dialog box appears.
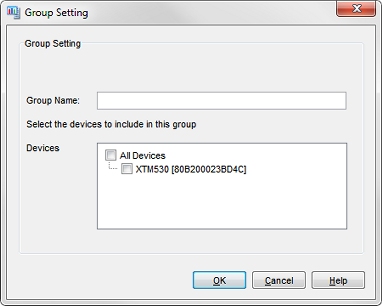
- In the Group Name text box, type a descriptive name to identify the group.
- From the Devices list, select the check box for each device to include in the group.
- Click OK.
The group you added appears in the Group Name list on the Report Generation tab. The devices you included in the group appear in the Selected group members list.
Change the Settings for a Group
- In the Group Name list, select a group.
- Click Edit.
The Group Setting dialog box appears. - Modify the group settings.
- Click OK.
Delete a Group
- In the Group Name list, select a group.
- Click Remove.
A confirmation dialog box appears. - Click Yes.
The group is removed from the Group Name list.
Configure Server Settings for the Report Server
Configure Report Deletion Settings and Database Settings