About Role-Based Administration
Role-based administration enables you to share the configuration and monitoring responsibilities for your organization among several individuals. A role has two parts: a set of tasks and a set of Fireboxes on which these tasks can be performed. Role policies combine the sets of tasks and Fireboxes with the users who have the privileges to perform those roles.
Dimension includes the roles in this list for role-based administration that you can assign to Dimension users to give them access to specific areas of Dimension.
| Role | Applies To | Allowed Actions |
|---|---|---|
| Super Administrator | All Fireboxes connected to Dimension |
All access to all Fireboxes, Groups, VPNs, and Servers on the Home pages Configure all Dimension settings in the Administration pages:
Has privileges for all other roles, which includes Global Administrator and Anonymization Officer roles |
| Global Administrator | All Fireboxes connected to Dimension |
Manage all Fireboxes, groups, VPNs, and schedule reports; view log messages and reports Includes all privileges for the Device Administrator, VPN Administrator, and Report Administrator roles |
| Global Monitor | All Fireboxes connected to Dimension |
Monitor Fireboxes, groups, and VPNs; view log messages and reports Includes all privileges for the Device Monitor, VPN Monitor, View All Logs, and View All Reports roles |
| Report Administrator | All Fireboxes connected to Dimension |
Schedule reports, manage groups, view logs, view reports Configure Report Settings
Configure IP Address Mapping |
| Dimension Administrator | Dimension system |
Manage the Dimension system from these Administration pages:
Does not have privileges to view devices, log messages, or reports |
| Anonymization Officer | All Fireboxes connected to Dimension |
Only available after Anonymized Mode is enabled Only temporarily disables Anonymized Mode; cannot see any data without additional role privileges |
| View All Logs | All Fireboxes connected to Dimension | View all log messages for Fireboxes connected to Dimension |
| View All Reports | All Fireboxes connected to Dimension | View all reports for Fireboxes connected to Dimension |
| Device Administrator | Specific Fireboxes and Device Groups, as specified in the role definition | Manage and monitor the specified Firebox(es) |
| Device Monitor | Specific Fireboxes and Device Groups, as specified in the role definition | Monitor the specified Firebox(es) |
| VPN Administrator | Specific Fireboxes and Device Groups, as specified in the role definition | Manage VPNs between the specified Firebox(es) |
| VPN Monitor | Specific Fireboxes and Device Groups, as specified in the role definition | Monitor VPNs between the specified Firebox(es) |
| View Logs | Specific Fireboxes and Device Groups, as specified in the role definition | View log messages for the specified Firebox(es) |
| View Reports | Specific Fireboxes and Device Groups, as specified in the role definition | View reports for the specified Firebox(es) |
Add a User or Group
When you add a user or group, you must first select the type of the user or group, which specifies the location of the user account or group. The types of user and group accounts include:
- Local User — A user account created and managed on Dimension
- AD User — A user account created and managed on your Active Directory server
- AD Group — A user group created and managed on your Active Directory server
- RADIUS User — A user account created and managed on your RADIUS server
- RADIUS Group — A user group created and managed on your RADIUS server
After you select the type of user or group, you can specify a user or group name and select the roles for the user or group. The format you must use for the user or group name depends on where the account information is located.
| Server | User Name Format | Group Name Format |
|---|---|---|
| Local Dimension database | Type any text for the user name | Type any text for the group name |
|
Active Directory server |
User Principal Name format: [email protected] |
Distinguished Name format: cn=group,ou=grouplocation,dc=companyname,dc=com Canonical Name format: companyname.com/grouplocation/group |
| RADIUS server | Specify the user name as it appears on the RADIUS server | Specify the group name as it appears on the RADIUS server |
To select specific Fireboxes that this user or group can monitor or manage in Dimension, you must select the Fireboxes before you select the role for this user or group. If you select the Super Administrator or Report Administrator roles, the user or group can automatically manage all Fireboxes.
When you add a user or group, you must specify either the group membership or a role policy. You can add one user to many groups and include a group in another group. You can also specify one or more network addresses that each user can use to connect to Dimension.
If you add a local user account, you can also enable the user to change the passphrase for the user account.
To configure settings for a new user or group, you add the user account information, specify policies and roles for the user account, and configure settings for access control.
Add a New User or Group
When add a new user or group, you must first select where the user account is located and then specify the user credentials. You can then specify roles or group membership, and access control settings.
- Select

 > Administration > Administration > Access Management.
The Access Management page opens, with the Users & Groups page selected. - To unlock the configuration so you can make changes, click
 .
.
For more information about how to unlock and lock the Dimension configuration, go to Lock and Unlock the Dimension Configuration. - Click Add.
The Add User or Group dialog box opens with the Account tab selected.
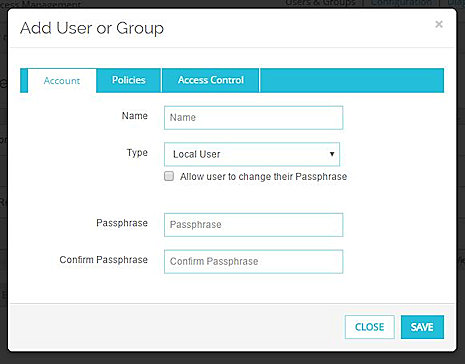
- From the Type drop-down list, select an account type:
- Local User
- Local Group
- AD User
- AD Group
- RADIUS User
- RADIUS Group
The user or group options change based on the account type you select.
Local User Account options
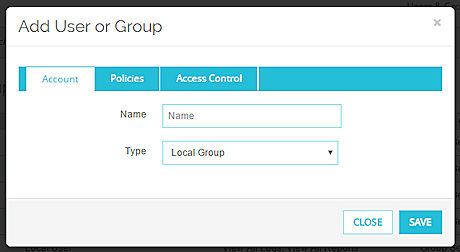
Local Group Account options
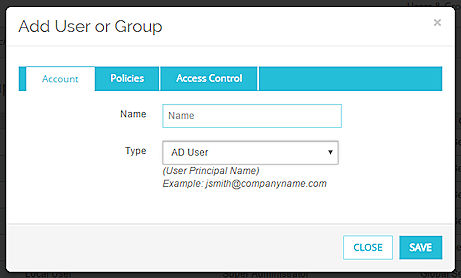
AD User Account options

AD Group Account options

RADIUS User Account options

RADIUS Group Account options
- In the Name text box, type the name in the correct format for the type you selected.
- If you select Local User, you must specify the passphrase settings:
- In the Passphrase and Confirm Passphrase text boxes, type the passphrase for the user account.
- To enable the user to change the passphrase for this user account, select the Allow user to change the account passphrase check box.
- To specify a role or group membership for the user account or group, complete the settings in the Specify Roles or Group Membership section.
- To specify access control settings, complete the settings in the section.
- Click Save.
The new user or group appears in the Manage Users and Groups list.
For information about how users can change their passphrases, see Log Out or Change a User Account Passphrase.
Specify Roles or Group Membership
After you specify where the user account or user group is located, and if necessary, specify the user name and passphrase for the account, you can select a role or group for the user account or user group. You must add a group to Dimension before you can add a user or group to that group.
- Select the Policies tab.
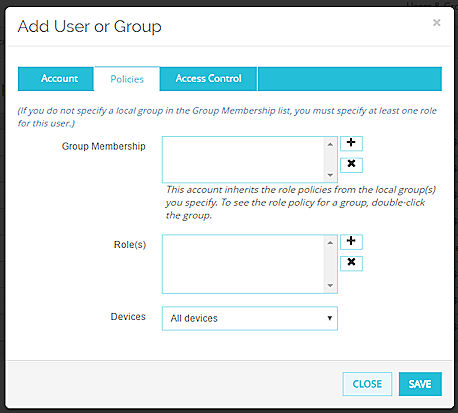
- If you have configured user groups and want to add this user or group to an existing group, adjacent to the Group Membership list, click
 and specify the groups to assign to this user or group.
 - If you did not specify the Group Membership for this user or group, adjacent to Role(s) list, click and select the role to assign to this user or group:
- Super Administrator
- Global Administrator
- Global Monitor
- Report Administrator
- Anonymization Officer
This role is only available when Anonymized Mode is enabled in Dimension, and has not been temporarily disabled. - View Logs
- View Reports
- From the Devices drop-down list, select an option:
- All devices
- Specify devices — Click and select the Fireboxes.
For more information about Anonymized Mode, see Anonymize Reports in Dimension.
Specify Access Control Settings
When you add a user or group, you can specify the networks that the user or group members can use to connect to Dimension. If you configure global access restrictions in Dimension, make sure to either specify the addresses for users with administrative privileges in the global settings, or in the Access Control settings for user or group with administrative privileges.
For more information about the global Access Control settings for Dimension, see Configure Dimension Access Control Settings.
To configure the Access Control settings for a user or group:
- Select the Access Control tab.
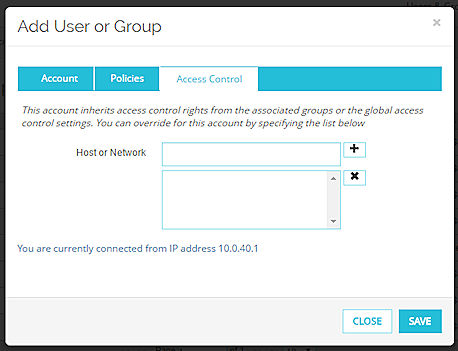
- In the Host or Network text box, type an IP address or host name that this user or group can use to connect to Dimension. Click .
The address you specified appears in the Host or Network list. - To remove an address from the Host or Network list, select the address and click
 .
.
Edit a User or Group
When you edit a user account or group, you can change the passphrase, group membership, role policies, access control list, and Fireboxes for the user or group. You cannot change the name or type. If you have enabled the local user account lockout feature, and a user account is locked, you can also unlock that user account.
For information about how to enable the local user account lockout feature, go to Configure User Lockout Settings.
To edit a user or group:
- From the Manage Users and Groups list, select the row of a user or group.
- Click Edit.
The Edit User or Group dialog box opens, with the Account tab selected. - To unlock a locked user account, clear the Account Locked check box.
- To change the passphrase for a local user account:
- Select the Change Passphrase check box.
- In the Passphrase and Confirm Passphrase text boxes, type a new passphrase for the user.
- To change the roles or groups specified for this user or group, select the Policies tab.
- Adjacent to the Group Membership list, click or to add or remove groups from the list.
- To change the roles specified for a user or group, adjacent to the Role(s) list, click or to add or remove roles from the list.
- To change the specified Fireboxes for a user or group, in the Devices section, click or to add or remove devices from the list.
- Adjacent to the Group Membership list, click
- To change the access control settings for a user or group, select the Access Control tab.
- To add an address to the Host or Network list, click .
- To remove an address from the Host or Network list, click .
- To add an address to the Host or Network list, click
- Click Save.
The Manage Users and Roles list appears with a message that the user account or group has been updated.
Delete a User or Group
To permanently delete a user or group:
- From the Manage Users and Roles list, select the row of a user or group.
- Click Remove.
A confirmation message appears. - Click OK to delete the user or group.
The user or group is deleted from the Manage Users and Groups list.
Manage Dimension System Settings
Configure Access Management Settings
Configure Authentication Settings