To configure the General settings for your Dimension server:
- Select

 > Administration > Administration > Server Management.
The Server Management pages open with the Status tab selected. - Select the Configuration tab.
The Configuration pages open with the General tab selected.
- To unlock the configuration so you can make changes, click
 .
.
For more information about how to unlock and lock the Dimension configuration, go to Lock and Unlock the Dimension Configuration. - Configure the settings as described in the next sections.
- Click Save.
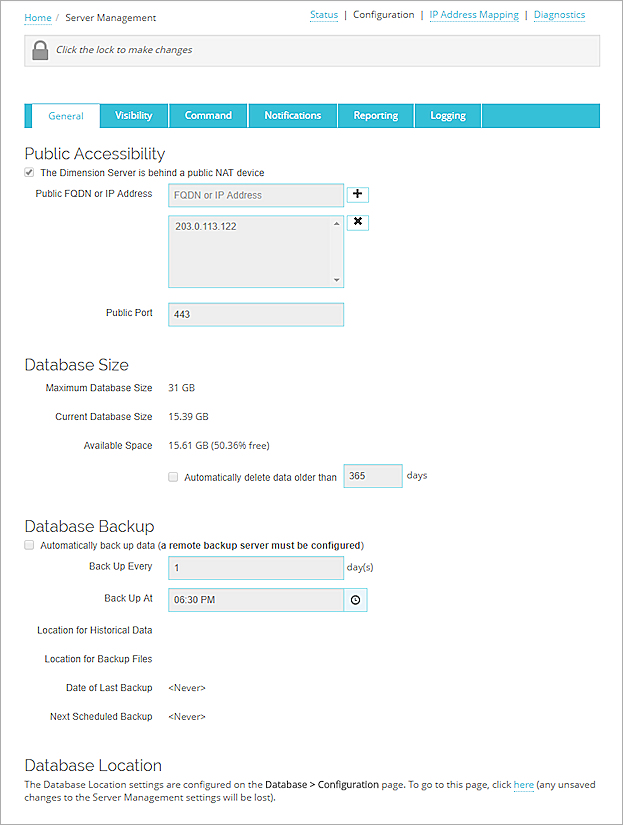
Manage Public Accessibility to Dimension
If your instance of Dimension is located behind a firewall (gateway Firebox or another NAT device), to make sure that your Fireboxes can connect to Dimension for logging and management, you must specify in the Dimension configuration the public address of the firewall that Dimension is behind. You can include a maximum of five addresses, and can specify either the public FQDN (fully-qualified domain name) or the IP address of the firewall. You can also specify the port number to use for connections to Dimension through the firewall.
The public addresses you specify are then included in the management settings .WGD file that you import to your Fireboxes after you add them to Dimension, which enables your Fireboxes to connect to Dimension.
When you specify a port for connections to Dimension other than port 443, that port is included in the .WGD file for connections from your managed devices to Dimension. Dimension will, however, continue to listen for connections only over port 443. To make sure your managed devices can connect to Dimension over the new port, you must configure the NAT device that Dimension is behind (such as a gateway Firebox) to forward connections from the new port to port 443. If your NAT device is not a Firebox, you can follow the instructions provided with your NAT device to configure the NAT device to forward connections to the new port. If your instance of Dimension is behind a Firebox, you must include an SNAT action in the Firebox configuration that routes traffic from the new port to port 443. For more information, see Configure Static NAT (SNAT).
WatchGuard recommends that you do not change the port for connections to Dimension from port 443 if your instance of Dimension is not behind a public NAT device. If Dimension is not behind a public NAT device, and you change the port number from 443, connections from your managed devices will not be forwarded to Dimension.
In the Public Accessibility section:
- Select the The Dimension server is behind a public NAT device check box.
- In the Public FQDN or IP Address text box, type the FQDN or IP address of the NAT device. Click
 . Tip!
The address appears in the FQDN or IP Address list. - To change the port for connections to Dimension, in the Public Port text box, type a new port number.
Specify the Database Size
In the Database Size section, the maximum database size, current database size, and space available in the Dimension server database appear. Also in this section, you can configure the Dimension server to automatically delete log messages that are older than the number of days you specify.
When you select to use the built-in Dimension server database, the database size is set automatically, based on the size of the Dimension data disk. You cannot modify the database size settings, but you can specify when log messages from your Fireboxes and WatchGuard servers are deleted from the database. The maximum database size for the Dimension server is automatically set based on the size of the data disk for the Virtual Machine where Dimension is installed. The database cannot exceed 80% of the total file system size on the data disk. Dimension manages the size of the database to make sure the database does not exceed 95% of the currently configured maximum database size setting. When the database size reaches the 95% threshold, the Dimension server deletes the oldest log messages from the database. If you have configured Dimension to back up historical data, the Dimension server backs up the log message data before the oldest messages are deleted from the database.
When you select to use an external database for your Dimension server, you can specify both the maximum database size and when log messages are deleted.
To specify the maximum size for the Dimension external database:
- Follow the instructions to specify the location of an external log message database in the Configure the Database Location topic.
- In the Maximum Database Size text box, type or select the size in GB for the Log Server database.
To specify when log messages are deleted from the built-in or external database:
- Select the Automatically delete logs older than check box.
- In the text box, specify the number of days to keep the log messages before they are deleted.
Configure Automatic Database Back Up Settings
You can enable your Dimension server to automatically create a backup copy of the historical data in the database, and specify when and how often the historical data is backed up. You can select to run automatic database backups in the daily increments you specify, at the same time each day. Each backup file is saved in the database backup file directory on your Dimension system as a ZIP file that includes the date in the file name.
The Directory for Backup Files setting specifies the external directory location where the backup file is saved. You cannot change this value in the Database Backup settings. To specify the location for database backup files, you must configure the Remote Backup settings on the System Settings > Configuration page. For more information, see Configure Remote Backup Settings.
After you configure the General database settings, the date a backup file was last created, and the date the next automatic backup will run, appear in the Database Backup Settings section.
To configure the automatic backup settings for historical data in your Dimension server:
- Select the Automatically back up data check box.
- In the Back Up Every text box, type the number of days to wait before data is backed up.
- In the Back Up At text box, type or select the time of day to back up the data.
The date and time of the next scheduled backup appears.
All logs on a Dimension server are in UTC time. When a back up is made, the logs are exported and time stamped in UTC time. If a Firebox is sending logs from a different time zone, the logs are converted to UTC on arrival. Dimension uses your web browser settings to determine what time zone logs and reports should be presented in when they are queried.
You can also create scheduled tasks to back up or restore the historical data in your Dimension database. Scheduled tasks can be run one time, or on a recurring schedule. For more information, see Back Up and Restore Historical Data.
For information about database backup files, see Manage the Dimension Database.