Install and Configure the Terminal Services Agent
When you have more than one user who connects to your Terminal Server or Citrix server and then connects to your network or the Internet, it can be difficult to control the individual traffic flows from these users based on their user names or group memberships. This is because when one user authenticates to the Firebox, the device maps that user to the IP address of the Terminal Server or Citrix server. Then, when another user sends traffic from the Terminal Server or Citrix server IP address, it appears to the Firebox that this traffic also came from the first user that authenticated. There is no way for the Firebox to distinguish which of the several users who are concurrently logged on to your Terminal Server or Citrix server generated any particular traffic.
To make sure that your users are correctly identified, you must:
- Install the WatchGuard Terminal Services Agent on your Terminal Server (2012 or later) or Citrix server.
For operating system compatibility, see the Release Notes for the version of Fireware on your Firebox. - Configure your Firebox to authenticate users to the authentication portal over port 4100.
- Enable Terminal Services settings in your Firebox configuration file.
After you complete these configuration settings, when each Terminal Server or Citrix server user authenticates to your Firebox, the device sends the Terminal Services Agent (TO Agent) a user session ID for each user who logs in. The Terminal Services Agent is also known as the TO (Traffic Owner) Agent. The Terminal Services Agent monitors traffic generated by individual users (traffic owners) and reports the user session ID to the device for each traffic flow generated by a Terminal Server or Citrix server client. Your device can then correctly identify each user and apply the correct security policies to the traffic for each user, based on user or group names.
For more information about how to enable your Firebox to authenticate users over port 4100, go to Configure Your Firebox as an Authentication Server and About the WatchGuard Authentication (WG-Auth) Policy.
When you use the Terminal Services Agent, your Firebox can enforce policies based on user or group names only for traffic that is authenticated. If traffic comes to the device without session ID information, the device manages the traffic in the same way it manages any other traffic for which it does not have the user name mapped to an IP address. If there is a policy in your configuration file that can process traffic from that IP address, the device uses that policy to process the traffic. If there is no policy that matches the source IP address of the traffic, the device uses the unhandled packet rules to process the traffic.
For more information about how to configure settings for unhandled packets, go to About Unhandled Packets.
If you use the Terminal Services Agent, your Firebox cannot automatically redirect users to the Authentication Portal.
To enable your Firebox to correctly process system related traffic from the Terminal Server or Citrix server, the Terminal Services Agent uses a special user account named Backend-Service, which is part of the Terminal Services Agent. The Terminal Services Agent identifies the traffic generated by system processes (instead of user traffic) with the Backend-Service user account. You can add this user to the Authorized Users and Groups list in your Firebox configuration and then use it in a policy to allow traffic to and from your server. For example, you can add a custom packet filter policy that is similar to the default Outgoing policy. Configure the policy to use the TCP-UDP protocol and allow traffic from the Backend-Service user account to Any-External.
In Fireware v11.11.2 and higher, the Backend-Service user account is automatically added when you enable Terminal Services in the Terminal Services global authentication settings on the Firebox. If you use an earlier version of Fireware, you must add this user manually. For more information about how to add the Backend-Service user account to your Firebox configuration, go toUse Users and Groups in Policies. Make sure to select Any from the Auth Server drop-down list.
For more information about how to add a policy, go to Add Policies to Your Configuration.
Make sure the updates on your Terminal Server or Citrix server are scheduled to run as the system, local service, or network service user account. The Terminal Services Agent recognizes these user accounts as the Backend-Service account and allows the traffic. If you schedule updates to run as a different user account, that user must manually authenticate to the application portal for the server to receive the updates. If that user is not authenticated to the authentication portal, the traffic is not allowed and the server does not receive the update.
The Terminal Services Agent cannot control ICMP, NetBIOS, or DNS traffic. It also does not control traffic to port 4100 for Firebox Authentication. To control these types of traffic, you must add specific policies to your Firebox configuration file to allow the traffic.
Terminal services support is not available if your Firebox is in bridge mode or is a member of an active/active FireCluster.
About Single Sign-On for Terminal Services
The WatchGuard terminal services solution also supports a single sign-on option with the Terminal Services Agent. When a user logs in to the domain, the Terminal Services Agent collects the user information (user credentials, user groups, and domain name) from the Windows user logon event and sends it to the Firebox. The device then creates the authentication session for the user and sends the user session ID to the Terminal Services Agent, so the user does not have to manually authenticate to the Authentication Portal. When the user logs off, the Terminal Services Agent automatically sends the logoff information to the device, and the device closes the authenticated session for that user.
The single sign-on option for the Terminal Services Agent does not use any of the WatchGuard Single Sign-On solution components (SSO Agent, SSO Client, Event Log Monitor, Exchange Monitor). You do not have to install any of the WatchGuard Single Sign-On components to use the single sign-on option for the Terminal Services Agent.
Terminal services single sign-on enables your users to log in once and automatically have access to your network without additional authentication steps. With single sign-on for terminal services, users do not have to manually authenticate to the Authentication Portal. Users who are logged in through terminal services can, however, still manually authenticate with different user credentials. Manual authentication always overrides single sign-on authentication with the Terminal Services Agent.
Though the Terminal Services Agent does not interact with the WatchGuard Single Sign-On solution components, if you do use the WatchGuard Single Sign-On solution components and the Terminal Services Agent, WatchGuard recommends that you add any of your terminal servers that you use with the Terminal Services Agent to the SSO Exceptions list. For more information, go to the Define SSO Exceptions section in the topic Enable Active Directory SSO on the Firebox.
Before You Begin
Before you install the Terminal Services Agent on your Terminal Server or Citrix server, make sure that:
- The server operating system is Windows Server 2012 or later
- Terminal services or remote desktop services is enabled on your server
- Ports 4131–4134 are open
Install the Terminal Services Agent
You can install the Terminal Services Agent on a Terminal Server or Citrix server with either a 32-bit or a 64-bit operating system. There is one version of the Terminal Services Agent installer for both operating systems.
To install the Terminal Services Agent on your server:
- Go to the WatchGuard Software Downloads Center.
- Find the software downloads page for your Firebox.
- Download the latest version of the Terminal Services Agent installer and copy it to the server where you have installed Terminal Services or a Citrix server.
- Start the installer.
The TO Agent wizard appears. - To start the wizard, click Next.
- Complete the wizard to install the Terminal Services Agent on your server.
- Reboot your Terminal Server or Citrix server.
Configure the Terminal Services Agent
After you install the Terminal Services Agent on your Terminal Server or Citrix server, you can use the TO Settings tool to configure the settings for the Terminal Services Agent.
- Select Start > All programs > WatchGuard > TO Agent > Set Tool.
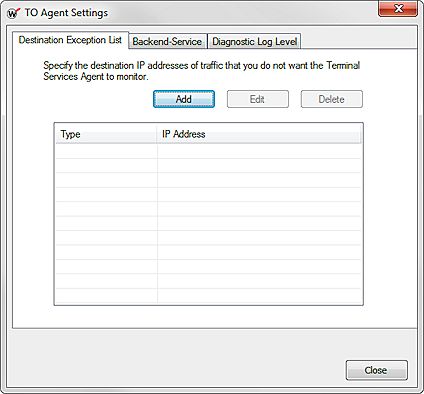
The TO Agent Settings dialog box appears, with the Destination Exception List tab selected.
- To configure settings for the Terminal Services Agent, follow the instructions in the next sections.
- Click Close.
Manage the Destination Exception List
Because it is not necessary for the Terminal Services Agent to monitor traffic that is not controlled by the Firebox, you can specify one or more destination IP addresses, or a range of destination IP addresses, for traffic that you do not want the Terminal Services Agent to monitor. This is usually traffic that does not go through your Firebox, such as traffic that does not include a user account (to which authentication policies do not apply), traffic within your network intranet, or traffic to your network printers.
You can add, edit, and delete destinations for traffic that you do not want the Terminal Services Agent to monitor.
To add a destination:
- Select the Destination Exception List tab.
- Click Add.
The Add Destination Exception dialog box appears.
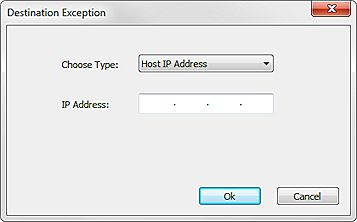
- From the Choose Type drop-down list, select an option:
- Host IP Address
- Network IP Address
- IP Address Range
- If you select Host IP Address, type the IP Address for the exception.
If you select Network IP Address, type the Network Address and Mask for the exception.
If you select IP Address Range, type the Range start IP address and Range end IP address for the exception. - Click Add.
The information you specified appears in the Destination Exception List. - To add more addresses to the Destination Exception List, repeat Steps 4–7.
To edit a destination in the list:
- From the Destination Exception List, select a destination.
- Click Edit.
The Destination Exception dialog box appears. - Update the details of the destination.
- Click OK.
To delete a destination from the list:
- From the Destination Exception List, select a destination.
- Click Delete.
The selected address is removed from the list.
Specify Programs for the Backend-Service User Account
The Terminal Services Agent identifies traffic generated by system processes with the Backend-Service user account. By default, this includes traffic from SYSTEM, Network Service, and Local Service programs. You can also specify other programs with the EXE file extension that you want the Terminal Services Agent to associate with the Backend-Service account so that they are allowed through your firewall. For example, clamwin.exe, SoftwareUpdate.exe, Safari.exe, or ieexplore.exe.
The Backend-Service user account is part of the Terminal Services Agent. You do not have to create this user account.
To specify the programs for the Terminal Services Agent to associate with the Backend-Service user account:
- Select the Backend-Service tab.
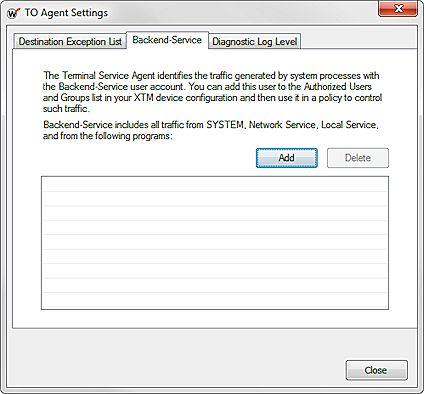
- Click Add.
The Open dialog box appears. - Browse to select a program with an EXE extension.
The path to the program appears in the Backend-Service list. - To remove a program from the Backend-Service list, select the program and click Delete.
The program path is removed from the list.
Set the Diagnostic Log Level and View Log Messages
You can configure the diagnostic log level for the Terminal Services Agent (TO Agent) and the TO Set Tool applications. The log messages that are generated by each application are saved in a text file.
The size of the log file is limited to 10MB. When a log file reaches the maximum size of 10MB, it is compressed in GZIP format to approximately 1MB in size, and moved to an archive folder, which is a subfolder in the \LOGS directory for your instance of the TO Agent. There can be a maximum of 30 compressed files in the archive folder. When the maximum of 30 files is reached and a new compressed GZIP file is added to the folder, the oldest GZIP file is deleted to make room for the new file.
To see the log messages generated for the TO Agent or the TO Set Tool, you can open the log file for each application from the Diagnostic Log Level tab.
- Select the Diagnostic Log Level tab.
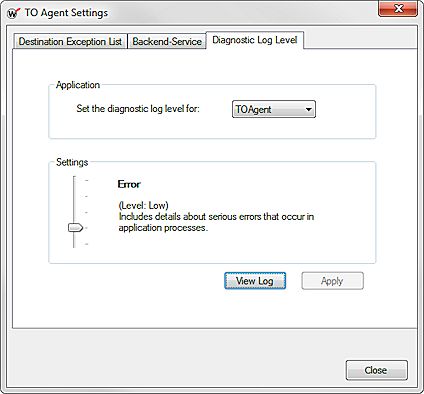
- From the Set the diagnostic log level for drop-down list, select an application:
- TOAgent (This is the Terminal Services Agent.)
- TO Set Tool
- Move the Settings slider to set the diagnostic log level for the selected application.
- To see the available log files for the selected application, click View Log.
A text file opens with the available log messages for the selected application. - To configure settings and view log messages for the other application, repeat Steps 2–4.
For detailed steps on how to complete the Terminal Services configuration for your Firebox, go to Configure Terminal Services Settings.
Configure Terminal Services Settings
Configure Active Directory Authentication