Nerdio for Azure provides deployment, management, and optimization technologies to help you build a successful Microsoft Azure practice. This document describes the deployment of Firebox Cloud on Microsoft Azure using a network provided by Nerdio.
Platform and Software
The hardware and software used to complete the steps outlined in this document include:
- WatchGuard Firebox Cloud
- Nerdio for Azure
Add a Nerdio For Azure (NFA) account on Nerdio
- Log in to Nerdio Admin Portal as an administrator.
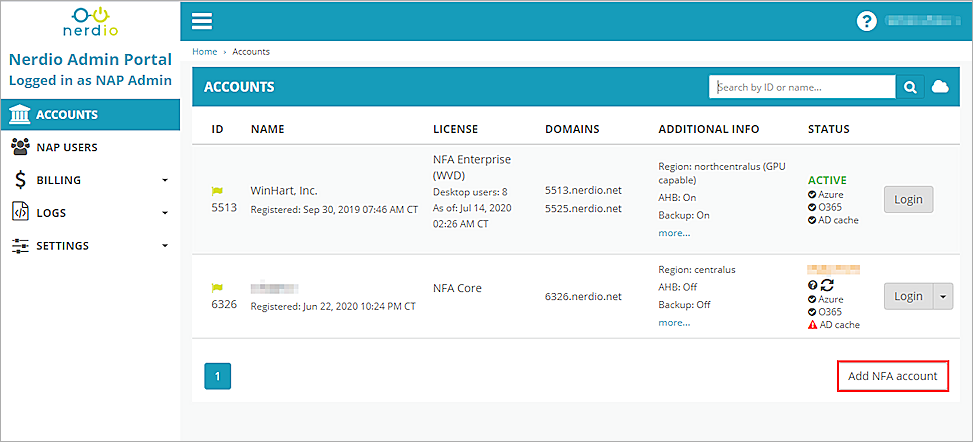
- Select Add NFA account.
The ADD NFA ACCOUNT dialog box opens. - Select the type of Azure IT environment you want to deploy. In our example, we select NFA Enterprise.
The NFA Core Azure IT environment does not include SafeDNS.
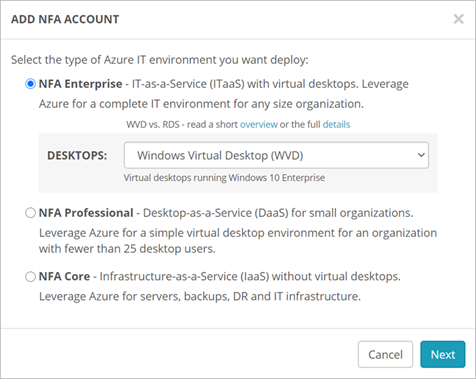
- Click Next.
The Tip dialog box opens. - Click Next.
The One more thing dialog box opens. - Click Close.

- Click Connect and associate your account to grant access to Azure AD, Office 365 and Azure subscription.
- From the REGION drop-down list, select a region.
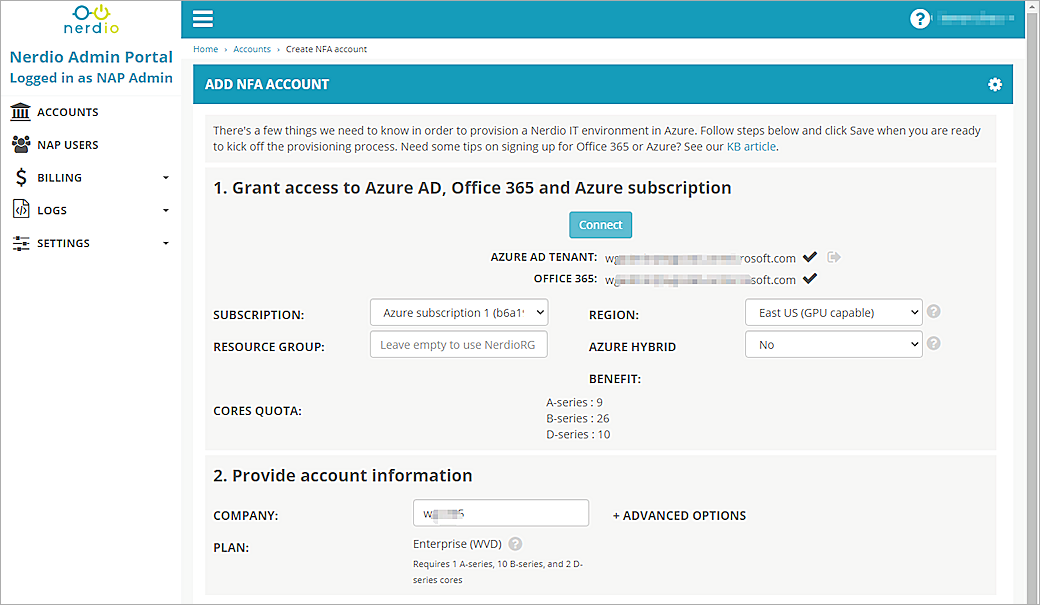
- Keep the default values for all other settings. Click Save.
- Click OK.
Once the NFA account is deployed, a resource group will be created on your Azure account named NerdioRG. In the NerdioRG, you can view and manage the security rules in NSG-LAN and NSG-DMZ network security groups. You will see the SafeDNS rule created by default in the NSG-LAN.
Deploy WatchGuard Firebox Cloud on Azure
Before you deploy Firebox Cloud, you must identify your Firebox Cloud software plan and generate a SSH-2 RSA public key/private key pair. For more information, see Deploy WatchGuard Firebox Cloud on Azure.
Deploy WatchGuard Firebox Cloud
To create the Firebox Cloud instance:
- Log on to the Azure portal with your Microsoft Azure account credentials.
- Click Create a Resource.
The Azure Marketplace opens. - In the Search text box, type Firebox Cloud.
- Select WatchGuard Firebox Cloud.
The WatchGuard Firebox Cloud license options opens.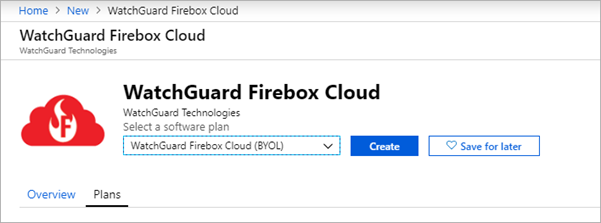
- From the Select a software plan drop-down list, select WatchGuard Firebox Cloud (BYOL) or WatchGuard Firebox Cloud (PAYG).
- Click Create.
The VM configuration steps opens.
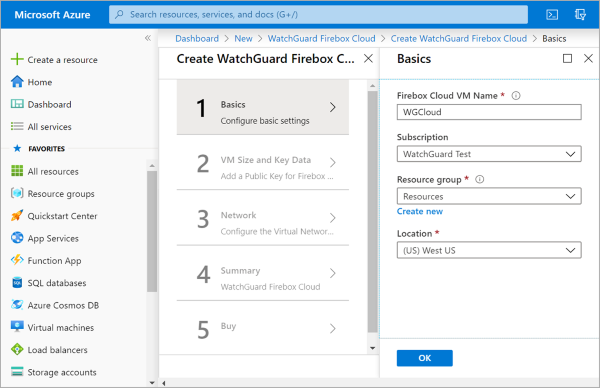
- In the Basics step, specify basic information about your virtual machine.
Firebox Cloud VM Name
The name for the Firebox Cloud virtual machine in the Azure portal.
Subscription
The name of the Azure subscription where the virtual machine and resources are stored. This is the account that Microsoft bills for VM use and storage.
Resource group
A resource group is a collection of resources that share the same lifecycle, permissions, and policies. All objects, such as networks and interfaces, and data for the Firebox Cloud instance will be associated with the resource group you specify. The resource group does not affect networking or connectivity from the Firebox to existing Azure resources.
Microsoft Azure does not support deployment of a managed application to a resource group with existing resources. You must create a new resource group or use an empty resource group.
Location
The Azure region for this Firebox Cloud instance.
- In the VM Size and Key Data step, specify virtual machine configuration details.
Firebox Cloud License Type and VM Size — for Firebox Cloud (BYOL)
For a BYOL license, select the Firebox Cloud License Type. This is the Firebox Cloud license you purchased from WatchGuard or a WatchGuard reseller. Select Small, Medium, Large or Extra Large. After you select the License Type, an appropriate VM size is selected by default. To select a different size, click Change size. An Availability Set is created as part of the BYOL deployment.
Azure VM Tier and VM Size — for Firebox Cloud (PAYG)
For a PAYG license, select the Azure VM tier for the virtual machine. Select Free Tier Eligible or Standard. After you select the VM tier, an appropriate VM size is selected by default. To select a different size, click Change size.
SSH public key
The public key for this Firebox. You can use a tool such as puttygen, or ssh-keygen command in Linux to generate the key pair. You must use the private key associated with this public key to connect to the Firebox Cloud CLI.
Storage account
The name of the storage account to store boot diagnostic log files. The storage account you select must not be in another resource group in your subscription. Boot diagnostic log files contain information that can help WatchGuard support troubleshoot issues.
- Click Next : Network Settings.
- From the Virtual network drop-down list, select NerdioVnet.
- From the External (Public) subnet drop-down list, select a subnet. In our example, we select DMZ (10.125.254.0/24).
- From the Trusted (Private) subnet drop-down list, select LAN (10.125.0.0/17).
- For External Network Security Group, select Management Only.
- For Public IP address, select or create a public IP address to use for your Firebox Cloud external interface. In our example, we create a new public IP address. Keep the Domain name label setting as the default value.
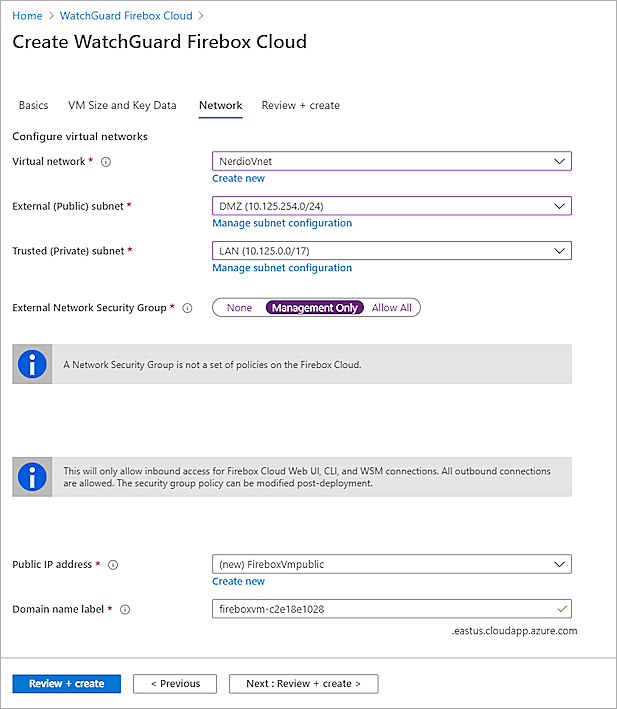
- Click Next : Review + create.
- Click Create.
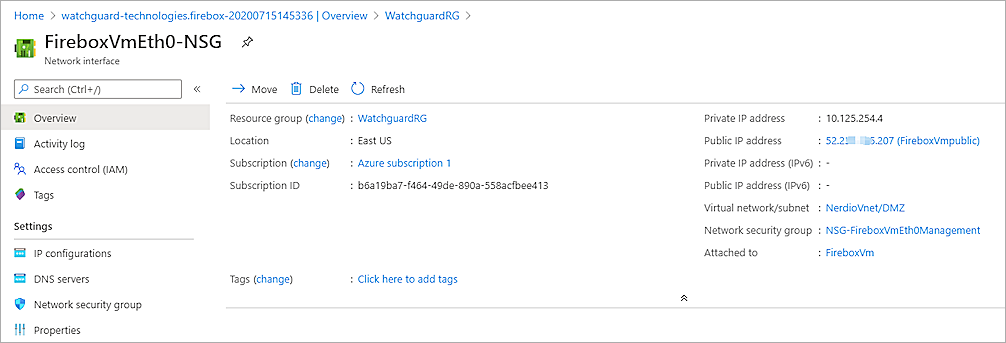
After the deployment is complete, you can go to the Resource group. - You can find the public IP address in the Network interface of the resource group.
- Go to the NerdioRG resource group.
- Click the NSG-DMZ network security group.
If you select LAN (10.125.0.0/17) as your Firebox Cloud external subnet, you must click NSG-LAN to add an Inbound security rule. - Select Settings > Inbound security rules > Add.
- From the Destination drop-down list, select IP Addresses.
- In the Destination IP addresses/CIDR ranges text box, type the Firebox Cloud public IP address.
- In the Destination port ranges text box, type *.
- In the Priority text box, type the number higher than block-inbound-DMZ priority. In our example, we type 101.
- In the Name text box, type the name.
- Keep all other settings as default values.
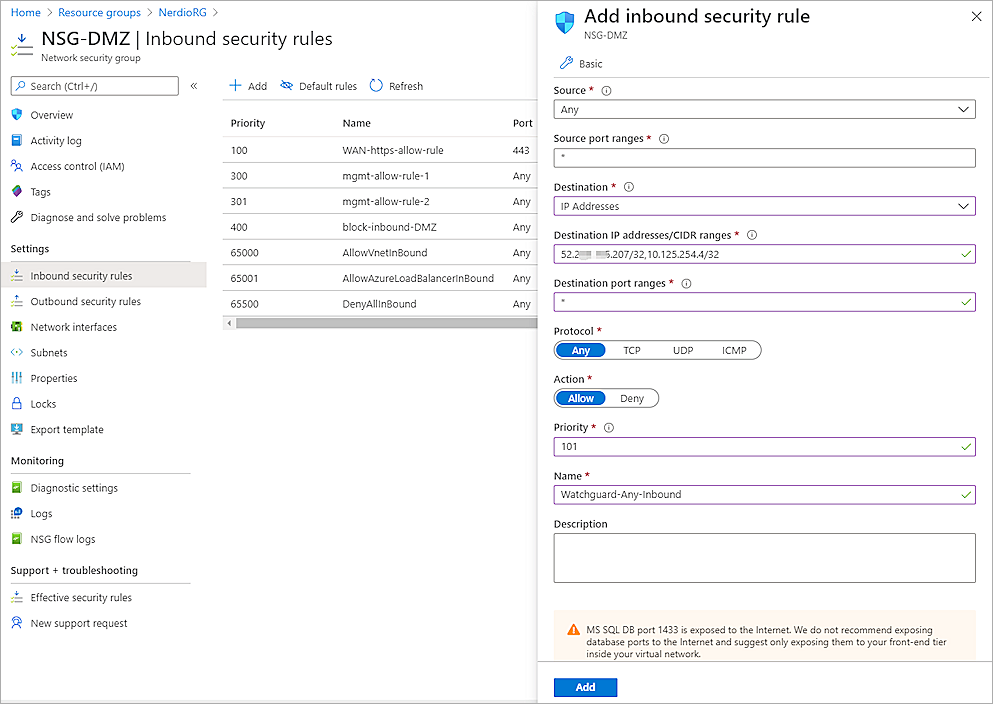
- Click Add.
For information about how to find the Instance ID, activate your Firebox Cloud License, run the Firebox Cloud Setup Wizard, connect to Fireware Web UI, and add the Feature Key, see Deploy WatchGuard Firebox Cloud on Azure.
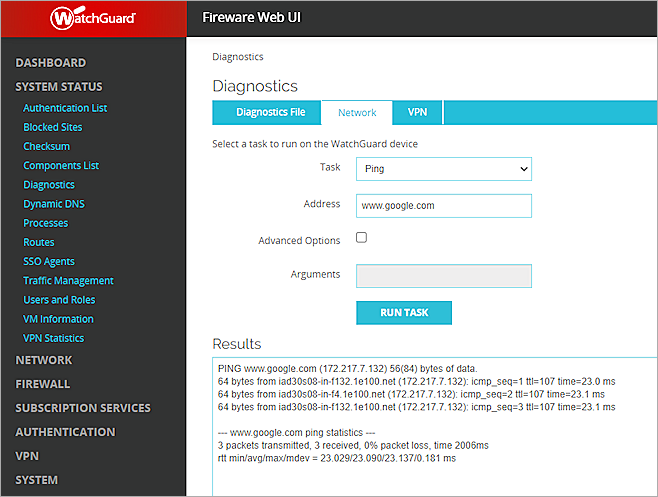
Test the Integration
- Log in to Fireware Web UI (https://<Eth0_public_IP>:8080).
- Select System Status > Diagnostics.
- Select the Network tab.
- From the Task drop-down list, select Ping.
- In the Address text box, type an address or fully qualified domain name (FQDN).
- Click Run Task.
- Verify the Firebox Cloud can ping Internet.