Applies To: Locally-managed Fireboxes
You can enable Access Point 1, Access Point 2, or Access Point 3 on your wireless Firebox for any network type, and configure the wireless interfaces with the same type of settings as an internal network interface.
The wireless interfaces have these default interface names:
Single Radio Firebox
| Access Point | Interface Name |
|---|---|
| Access Point 1 | ath1 (2.4 or 5 GHz) |
| Access Point 2 | ath2 (2.4 or 5 GHz) |
| Access Point 3 | ath3 (2.4 or 5 GHz) |
Dual Radio Firebox
| Access Point | Interface Name |
|---|---|
| Access Point 1 | ath1 - 2.4 GHz ath5 - 5 GHz |
| Access Point 2 | ath2 - 2.4 GHz ath6 - 5 GHz |
| Access Point 3 | ath3 - 2.4 GHz ath7 - 5 GHz |
For more information about network interfaces, go to About Network Modes and Interfaces.
Wireless and wired networks operate as if they are on the same local network. Broadcast traffic, such as DHCP requests, can pass between wired and wireless clients. If a DHCP server is active on the physical network, or if a wireless client is configured as a DHCP server, then all wired and wireless clients on that network can receive IP addresses from that DHCP server.
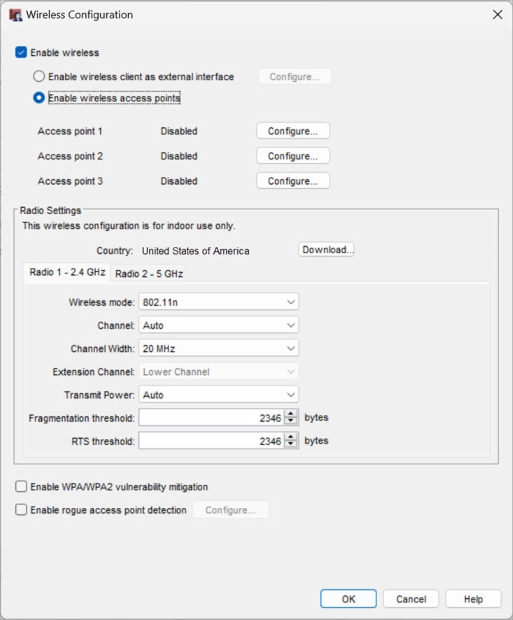
- Select Network > Wireless.
The Wireless configuration page appears.

- Select the Enable wireless check box.
- Select Enable wireless access points.
- Adjacent to Access point 1 or Access point 2, or Access point 3, click Configure.
The Wireless Access Point configuration dialog box appears.

- In the Interface Name (Alias) text box, you can change the alias name of the interface or use the default name.
- From the Interface Type drop-down list, select an interface type for this Access Point interface.
For more information on these interface types, go to Wireless Device Configuration Options.- Trusted
- Optional
- Bridge
- VLAN
- Custom
If you want your wireless users to be on the same network as your wired trusted or optional network, you must use a network bridge between the wireless interface and the trusted or optional wired interface. For more information, go to Create a Network Bridge Configuration.
For detailed instructions on how to bridge a wireless interface to the trusted interface, go to Bridge a Wireless Interface to the Trusted Interface.
- Click OK.
- Select the Wireless tab.

Wireless Settings for a Dual Radio Firebox
- To configure the wireless interface to send and answer SSID requests, select the Broadcast SSID check box. For information, go to Enable or Disable SSID Broadcasts.
- To send a log message each time a wireless computer tries to connect to the interface, select the Log Authentication Events check box. For more information, go to Log Authentication Events.
- To allow wireless guest users to send traffic to each other, clear the Prohibit client to client wireless network traffic check box.
- To require wireless users to use the WatchGuard Mobile VPN with IPSec Client, select the Require encrypted Mobile VPN with IPSec connections for wireless clients check box.
When you select this option, the Firebox only allows the DHCP, DNS, IKE (UDP port 500), and ESP packets over the wireless network. If you require wireless users to use the IPSec Mobile VPN Client, it can increase the security for wireless clients if you do not select WPA or WPA2 as the wireless authentication method.
- Select the Radio (2.4 GHz, 5 GHz, or both 2.4 GHz and 5 GHz) that will broadcast this SSID.
If the wireless interface is configured as a VLAN interface, you must first remove the interface from the VLAN if you need to change the radio settings for the SSID. You can then re-add the interface to the VLAN.
- In the Network name (SSID) text box, type a unique name for your wireless optional network, or use the default name. For more information, go to Change the SSID.
- From the Security drop-down list, select the encryption and authentication setting to enable for wireless connections to the optional interface. For more information, go to Set the Wireless Security Method.
- (Fireware v12.9 and lower) From the Encryption algorithm drop-down list, select the type of encryption to use for the wireless connection and specify the keys or passwords required for the type of encryption you select. If you select an encryption option with pre-shared keys, a random pre-shared key is generated for you. You can use this key or type another key. For more information, go to Set the Encryption Algorithm.
- Save the configuration.
- Select Network > Wireless.
The Wireless Configuration dialog box appears.
Wireless Settings for a Dual Radio Firebox
- Select the Enable wireless check box.
- Select Enable wireless access points.
- Adjacent to Access point 1 or Access point 2, or Access point 3, click Configure.
The Wireless Access Point configuration dialog box appears.

- In the Interface Name (Alias) text box, you can change the alias name of the interface or use the default name.
- From the Interface Type drop-down list, select an interface type for this Access Point interface.
For more information on these interface types, go to Wireless Device Configuration Options.- Trusted
- Optional
- Bridge
- VLAN
- Custom
If you want your wireless users to be on the same network as your wired trusted or optional network, you must use a network bridge between the wireless interface and the trusted or optional wired interface. For more information, go to Create a Network Bridge Configuration.
For detailed instructions on how to bridge a wireless interface to the trusted interface, go to Bridge a Wireless Interface to the Trusted Interface.
- Click OK.
- Select the Wireless tab.

Wireless Settings for a Dual Radio Firebox
- To configure the wireless interface to send and answer SSID requests, select the Broadcast SSID check box. For information, go to Enable or Disable SSID Broadcasts.
- To send a log message each time a wireless computer tries to connect to the interface, select the Log Authentication Events check box. For more information, go to Log Authentication Events.
- To allow wireless guest users to send traffic to each other, clear the Prohibit client to client wireless network traffic check box.
- To require wireless users to use the WatchGuard Mobile VPN with IPSec Client, select the Require encrypted Mobile VPN with IPSec connections for wireless clients check box.
When you select this option, the Firebox only allows the DHCP, DNS, IKE (UDP port 500), and ESP packets over the wireless network. If you require wireless users to use the IPSec Mobile VPN Client, it can increase the security for wireless clients if you do not select WPA or WPA2 as the wireless authentication method.
- Select the Radio (2.4 GHz, 5 GHz, or both 2.4 GHz and 5 GHz) that will broadcast this SSID.
If the wireless interface is configured as a VLAN interface, you must first remove the interface from the VLAN if you need to change the radio settings for the SSID. You can then re-add the interface to the VLAN.
- In the Network name (SSID) text box, type a unique name for your wireless optional network, or use the default name. For more information, go to Change the SSID.
- From the Security drop-down list, select the encryption and authentication to enable for wireless connections to the optional interface. For more information, go to Set the Wireless Security Method.
- (Fireware v12.9 and lower) From the Encryption algorithm drop-down list, select the type of encryption to use for the wireless connection and specify the keys or passwords required for the type of encryption you select. If you select an encryption option with pre-shared keys, a random pre-shared key is generated for you. You can use this key or type another key. For more information, go to Set the Encryption Algorithm.
- Save the configuration.
MAC Access Control
You can use the MAC Access Control list to restrict access to the wireless network and only allow access to the MAC addresses of devices you add to the list. This prevents users from connecting to the wireless Firebox from unauthorized devices.
If you enable the MAC access control list, only wireless client devices with MAC addresses configured in the list can connect to the wireless SSID.
In some cases, clients not on the MAC access control list might still see the SSID if they receive a beacon frame for the SSID, but will not be able to connect to the network.
To enable MAC access control from the wireless access point configuration page:
- Select the MAC Access Control tab.
- Select the Restrict access by MAC address check box.
- Click Add.
- Type the MAC address of the device that is allowed access to the wireless network.
- (Optional) Type a Name for the device to identify it in the list.
- Repeat these steps to add additional devices.
- Save the configuration to the Firebox.
About Network Modes and Interfaces
Enable or Disable SSID Broadcasts
Change the Fragmentation Threshold