Applies To: AuthPoint Multi-Factor Authentication, AuthPoint Total Identity Security
RADIUS client resources represent devices that send RADIUS packets to the AuthPoint Gateway. These are commonly used to authenticate users for firewalls and VPNs.
You must link RADIUS client resources to the AuthPoint Gateway and you must specify a shared secret key so that the RADIUS server (AuthPoint Gateway) and the RADIUS client can communicate.
See the AuthPoint Integration Guides for steps to configure AuthPoint multi-factor authentication (MFA) for specific RADIUS client resources.
AuthPoint supports RADIUS authentication with PAP and MS-CHAPv2. 802.1x authentication is not supported.
AuthPoint truncates RADIUS packets that contain more than 3000 characters of group information for a user. If the names of all groups a user belongs to total more than 3000 characters, AuthPoint truncates the group information and the response includes only the first 3000 characters.
RADIUS Authentication Workflow
This section explains the authentication flow when a user authenticates with the RADIUS protocol. The authentication workflow is different for local AuthPoint users and users synced from an LDAP database, and for RADIUS client resources that use MS-CHAPv2.
- The user initiates a connection to the RADIUS client, such as a Firebox or other firewall.
- The RADIUS client forwards the request to AuthPoint.
- AuthPoint determines if the user is local and has a valid MFA policy.
- For Push:
- AuthPoint sends a push notification to the user's mobile phone.
- The user receives and approves the push notification.
- AuthPoint receives the push approval and contacts the RADIUS client.
- The RADIUS client receives the approval and allows the user to connect.
- For OTP:
- AuthPoint validates the OTP.
- The RADIUS client receives the approval and allows the user to connect.
- For Push:
- The user initiates a connection to the RADIUS client, such as a Firebox or other firewall.
- The RADIUS client forwards the request to AuthPoint.
- AuthPoint determines if the user is an Active Directory user.
- AuthPoint, through the AuthPoint Gateway, sends the user credentials to the Active Directory server (LDAP bind request).
- Active Directory validates the user credentials and responds to AuthPoint.
- AuthPoint verifies the user has a valid MFA policy.
- For Push:
- AuthPoint sends a push notification to the user's mobile phone.
- The user receives and approves the push notification.
- AuthPoint receives the push approval and contacts the RADIUS client.
- The RADIUS client receives the approval and allows the user to connect.
- For OTP:
- AuthPoint validates the OTP.
- The RADIUS client receives the approval and allows the user to connect.
- For Push:
- The user initiates a connection to the RADIUS client, such as a Firebox or other firewall.
- The RADIUS client forwards the request to AuthPoint.
- AuthPoint determines if the user is an Active Directory user.
- AuthPoint, through the AuthPoint Gateway, sends the user credentials to the NPS server for validation (RADIUS protocol).
- The NPS server validates the user credentials.
- The NPS server responds to AuthPoint, through the AuthPoint Gateway.
- AuthPoint verifies the user has a valid MFA policy.
- AuthPoint sends a push notification to the user's mobile phone.
- The user receives and approves the push notification.
- AuthPoint receives the push approval and contacts the RADIUS client.
- The RADIUS client receives the approval and allows the user to connect.
Add a RADIUS Client Resource
- From the AuthPoint navigation menu, select Resources.
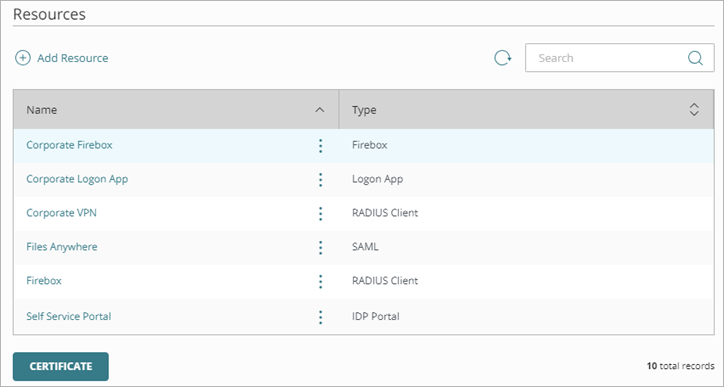
- Click Add Resource.
The Add Resource page opens.
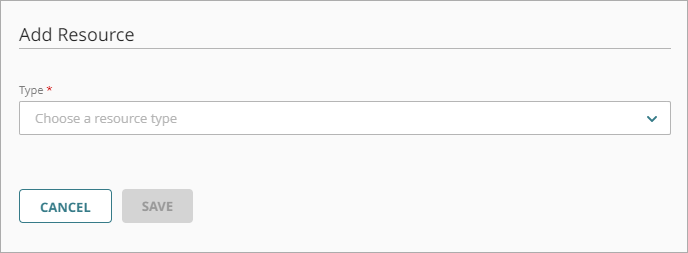
- From the Type drop-down list, select RADIUS Client.
Additional fields appear. - In the Name text box, type a descriptive name for the resource.
- In the RADIUS client trusted IP or FQDN text box, type the IP address that your RADIUS client uses to send RADIUS packets to the AuthPoint Gateway. This must be a private IP address. For Fireboxes, this is usually the Trusted IP address of your Firebox.
- From the Value sent for RADIUS attribute 11 drop-down list, select the value to send for the attribute 11 (Filter-ID) value in RADIUS responses. You can send either the user's AuthPoint groups or the user's Active Directory groups.
If you have configured a group sync to sync groups from Active Directory or Azure Active Directory to AuthPoint, the option to send the user's AuthPoint groups includes any Active Directory or Azure Active Directory groups that the user is a member of.
- In the Shared Secret text box, type the password that the RADIUS server (AuthPoint Gateway) and the RADIUS client will use to communicate. The shared secret is case-sensitive, and can include special characters. AuthPoint supports 255-character shared secrets.
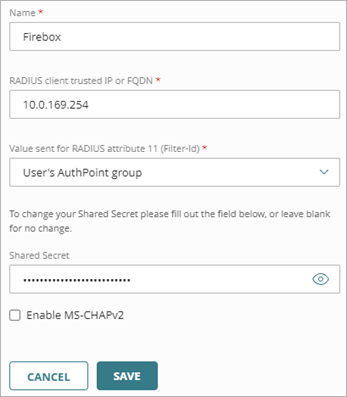
- To configure the RADIUS client resource to accept MS-CHAPv2 authentication requests, click the Enable MS-CHAPv2 toggle. You might do this if you want to configure AuthPoint MFA for IKEv2.
Additional fields appear.To use the MS-CHAPv2 feature, you must install version 5.3.1 or higher of the AuthPoint Gateway.
- In the NPS RADIUS Server trusted IP or FQDN text box, type the IP address or FQDN of the NPS RADIUS server.
- In the Port text box, type the port number for the Gateway (RADIUS server) to use to communicate with NPS. The default port is 1812.
If NPS and the Gateway are installed on the same server, the port that the Gateway uses to communicate with NPS must be different than the port that the Gateway uses to communicate with the RADIUS client.
- In the Timeout in Seconds text box, type a value in seconds. The timeout value is the amount of time before a push authentication expires.

- Click Save.
- Add the RADIUS resource to your existing authentication policies, or add new authentication policies for the RADIUS resource. Authentication policies specify which resources users can authenticate to and which authentication methods they can use. For more information, see About AuthPoint Authentication Policies.
For RADIUS authentication, policies that have a network location or geofence do not apply because AuthPoint does not have the IP address of the user. We recommend that you configure policies for RADIUS resources without network locations or geofences.
You must enable the push authentication method for policies with MS-CHAPv2 RADIUS resources.
Add a RADIUS Client Resource to a Gateway Configuration
After you add a RADIUS client resource, you must add it to the configuration for your AuthPoint Gateway. This enables the RADIUS client to communicate with the RADIUS server (Gateway) and with AuthPoint.
If you have not already installed the AuthPoint Gateway, see About Gateways for detailed steps to download and install the AuthPoint Gateway.
To add a RADIUS client resource to the Gateway configuration:
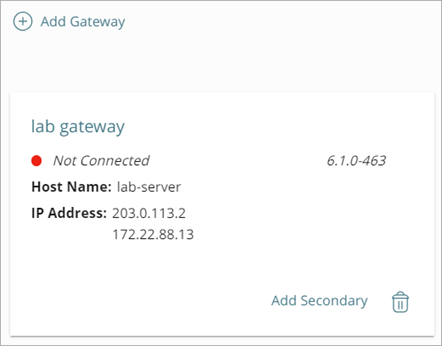
- From the navigation menu, select Gateway.
- Click the Name of your Gateway.
- In the RADIUS section, in the Port text box, type the port number for the RADIUS client to use to communicate with the Gateway (RADIUS server). The default Gateway ports are 1812 and 1645.
If you already have a RADIUS server installed that uses port 1812 or 1645, such as the Network Policy Server role, you must use a different port to communicate with the Gateway.
For the Gateway to work with RADIUS client resources, you might have to create a new inbound firewall rule for the UDP RADIUS port that you configured or disable the Windows firewall.
- From the Select a RADIUS resource list, select your RADIUS client resource(s).
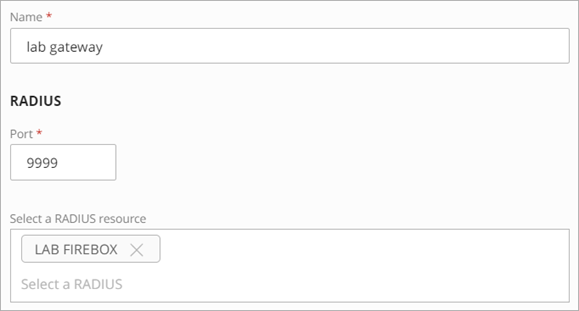
- Click Save.
Configure the RADIUS Client
After you successfully add a RADIUS client resource and connect it with your Gateway, the last step is to configure your RADIUS client for authentication. Refer to the AuthPoint Integration Guides for the steps to configure specific RADIUS client resources.
Firebox Mobile VPN with SSL Integration with AuthPoint
Firebox Mobile VPN with IKEv2 Integration with AuthPoint for Active Directory Users
Firebox Mobile VPN with IKEv2 Integration with AuthPoint for Azure Active Directory Users
Video Tutorial: Enable AuthPoint MFA for Mobile VPN with IKEv2
Firebox Cloud Mobile VPN with IKEv2 Integration with AuthPoint for Azure Active Directory Users
Firebox Mobile VPN with IPSec Integration with AuthPoint
Firebox Mobile VPN with L2TP Integration with AuthPoint
Firebox Mobile VPN with L2TP Integration with AuthPoint for Azure Active Directory Users